


体验一个令人着迷的过程:从下载最新版内核源码开始,根据个人需求编译定制 Linux 内核,接着创建精心设计的 Grub 启动项,进行系统基础库的迁移。这一系列步骤,将带您驶入一个全新的领域——您独自构建的 Linux 操作系统。随后,您还能将诸如 Nginx 和 Keepalived 等关键组件迁移到这个自制系统之中。经过这番努力:在成功部署 Nginx 和 Keepalived 等组件后,您打造的定制操作系统整个磁盘占用不足 100MB,凝聚了精益求精的极致精简。无疑,这是一场关于创造与优化的华丽探险,正等待着您去开启。
[toc]
linux系统与应用定制
linux 系统层面工作原结构
必需要熟悉系统启动流程
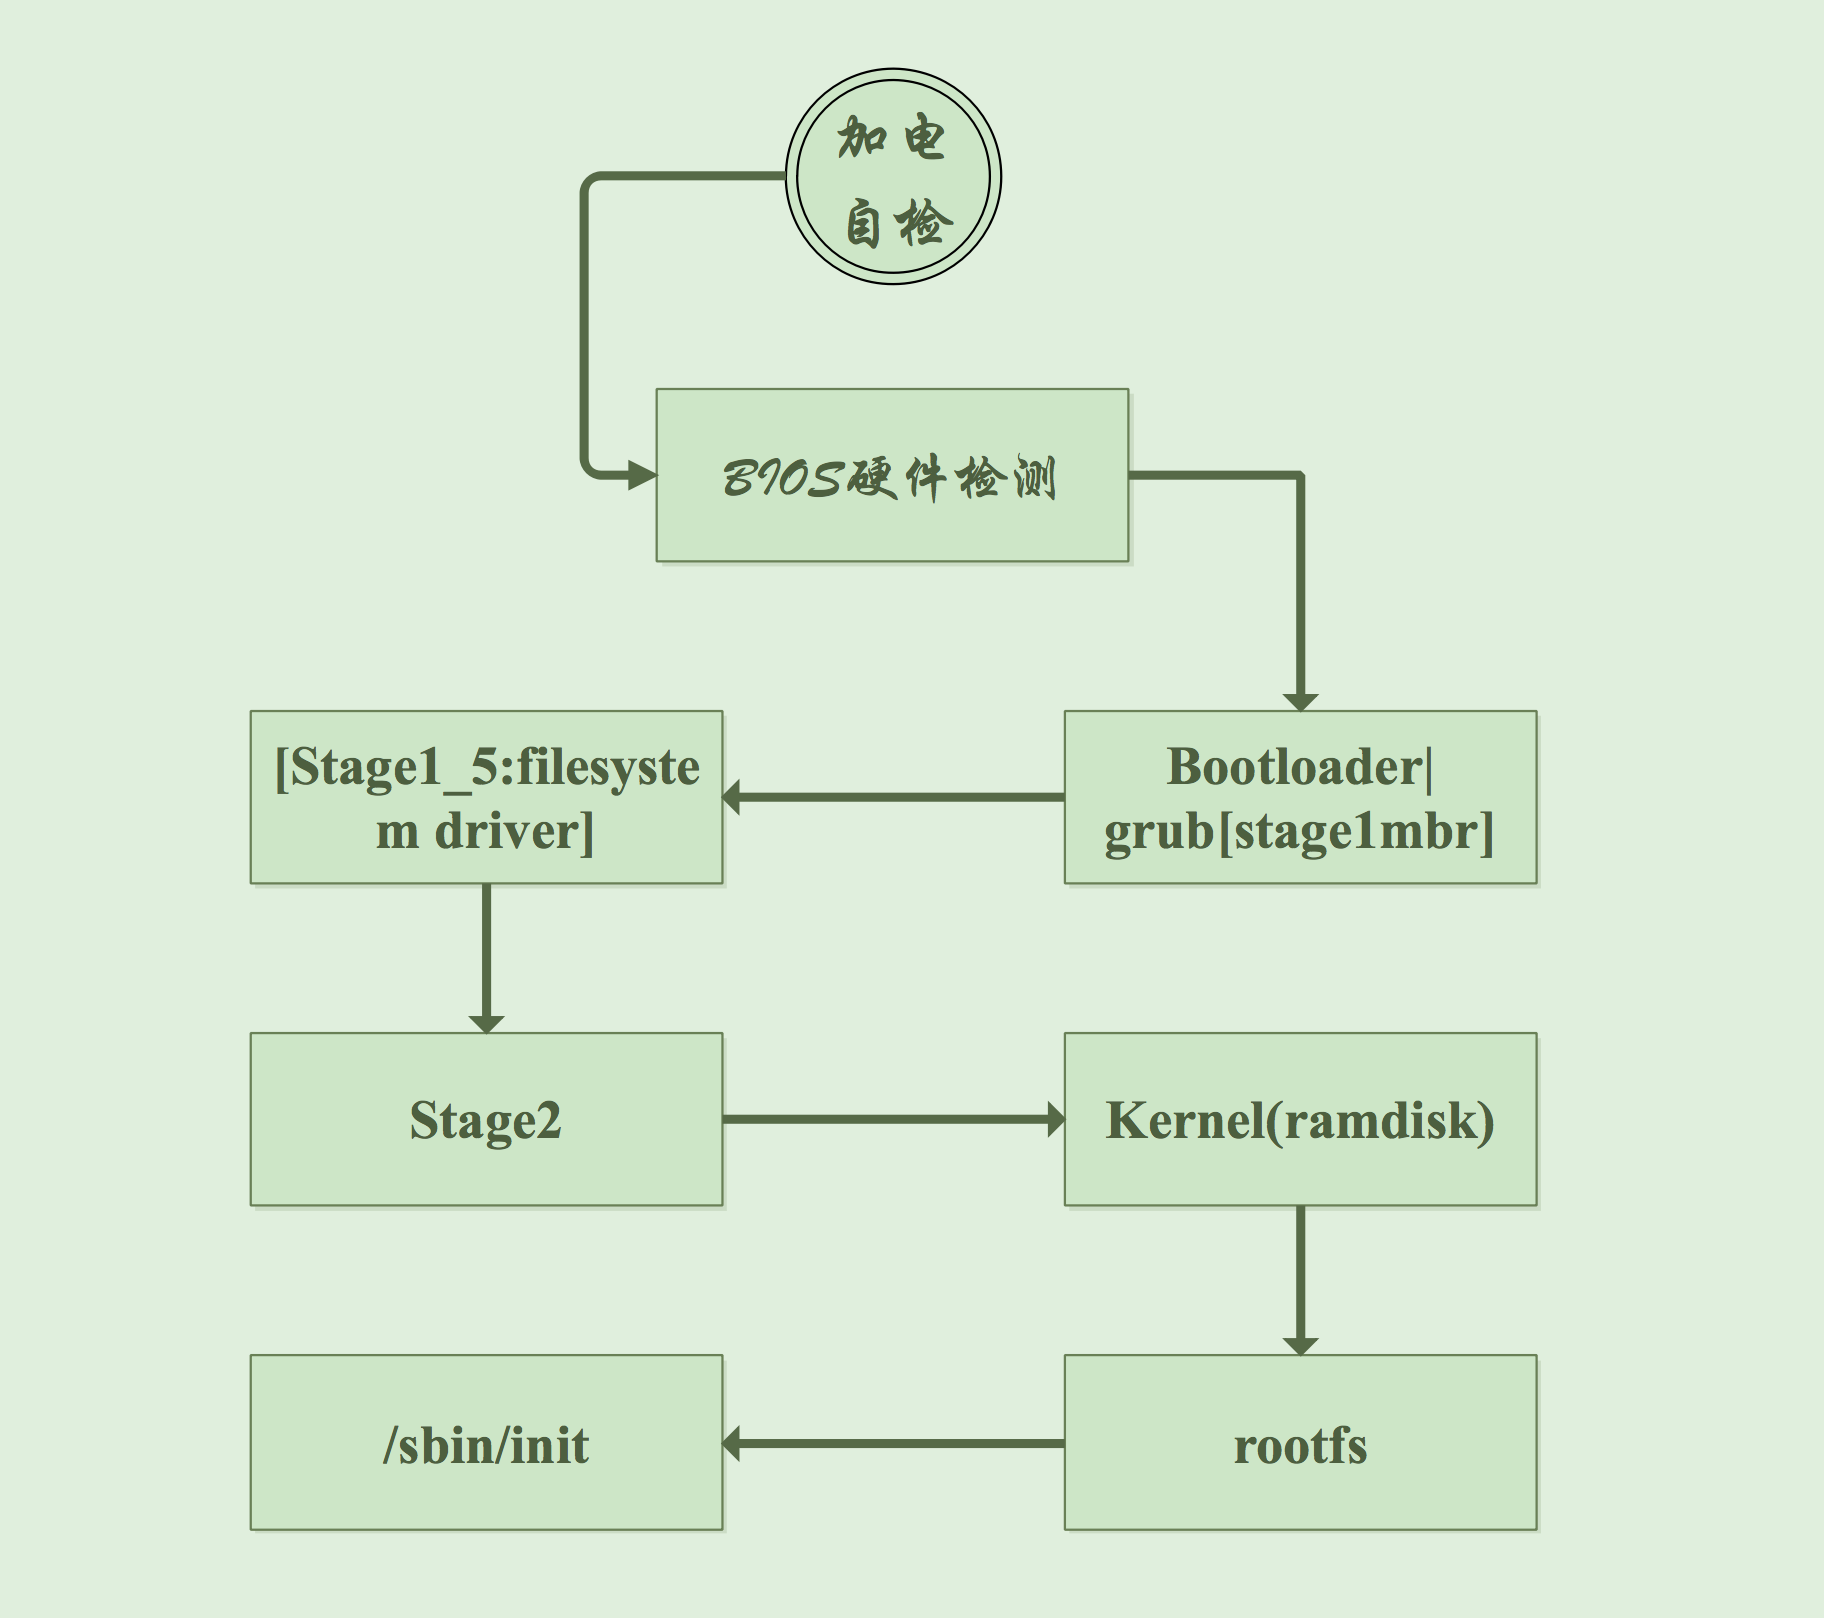
CentOS 6 系统启动流程
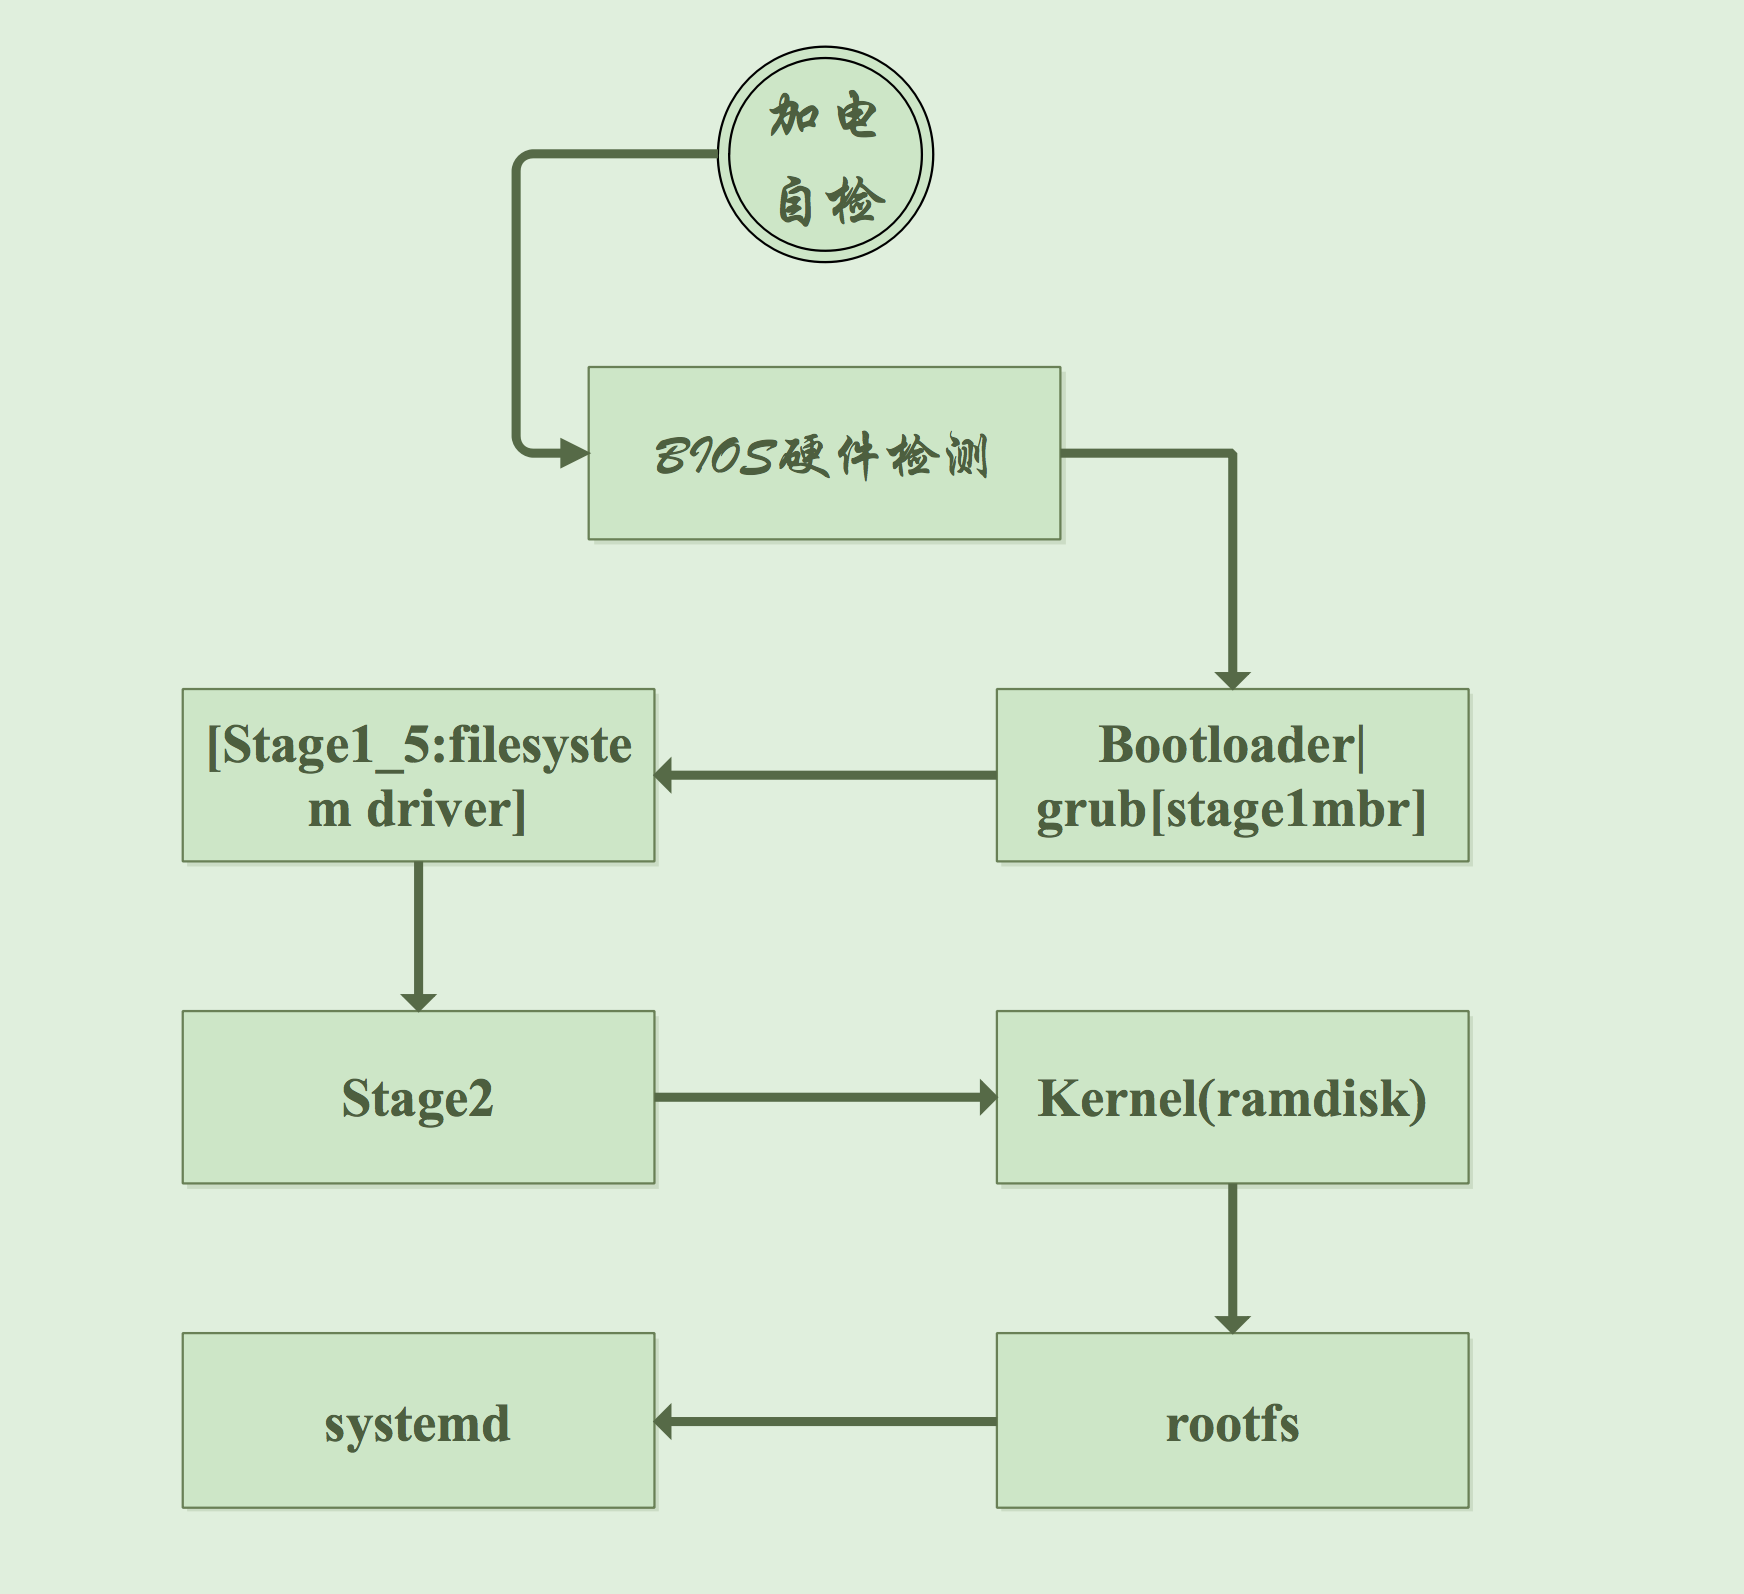
CentOS 7 系统启动流程
环境准备
| 服务器 | 系统环境 | 主机名 | 内核版本 | 必装环境 |
|---|---|---|---|---|
| 宿主机 | CentOS 6.9 | Node11 | Kernel 2.6.32-696.el6.x86_64 | Development Tools |
| 制作机 | ssjinyao Linux | Node21 | Kernel linux-4.18.4 | Busybox 1.29 |

将下载的包上传到服务器中
~ ➤ scp ~/Downloads/linux-4.18.4.tar.xz root@node11:/usr/local/src/
~ ➤ scp ~/Downloads/busybox-1.29.2.tar.bz2 root@node11:/usr/local/src/
安装宿主机所需要编译环境
[root@ssjinyao-node11:~]# yum groupinstall "Development tools" "Desktop Platform Development" -y
内核编译
解压文件
[root@ssjinyao-node11:~]# cd /usr/local/src/
[root@ssjinyao-node11:~]# ln -s linux-4.18.4 linux
[root@ssjinyao-node11:~]# cd linux
[root@ssjinyao-node11:~]# make help   # 查看make帮助
# 如果在centos不能解压时,需要执行
# yum -y install xz 因为在CentOS 6 的环境中 tar 解压xz文件调用的是xz命令
[root@ssjinyao-node11:/usr/local/src/linux]# make allnoconfig
# 把原默认配置都清空,根据我们的需要选则编译
[root@ssjinyao-node11:/usr/local/src/linux]# make menuconfig
# 根据自己的需求,选则内核需要支持模块
默认配置
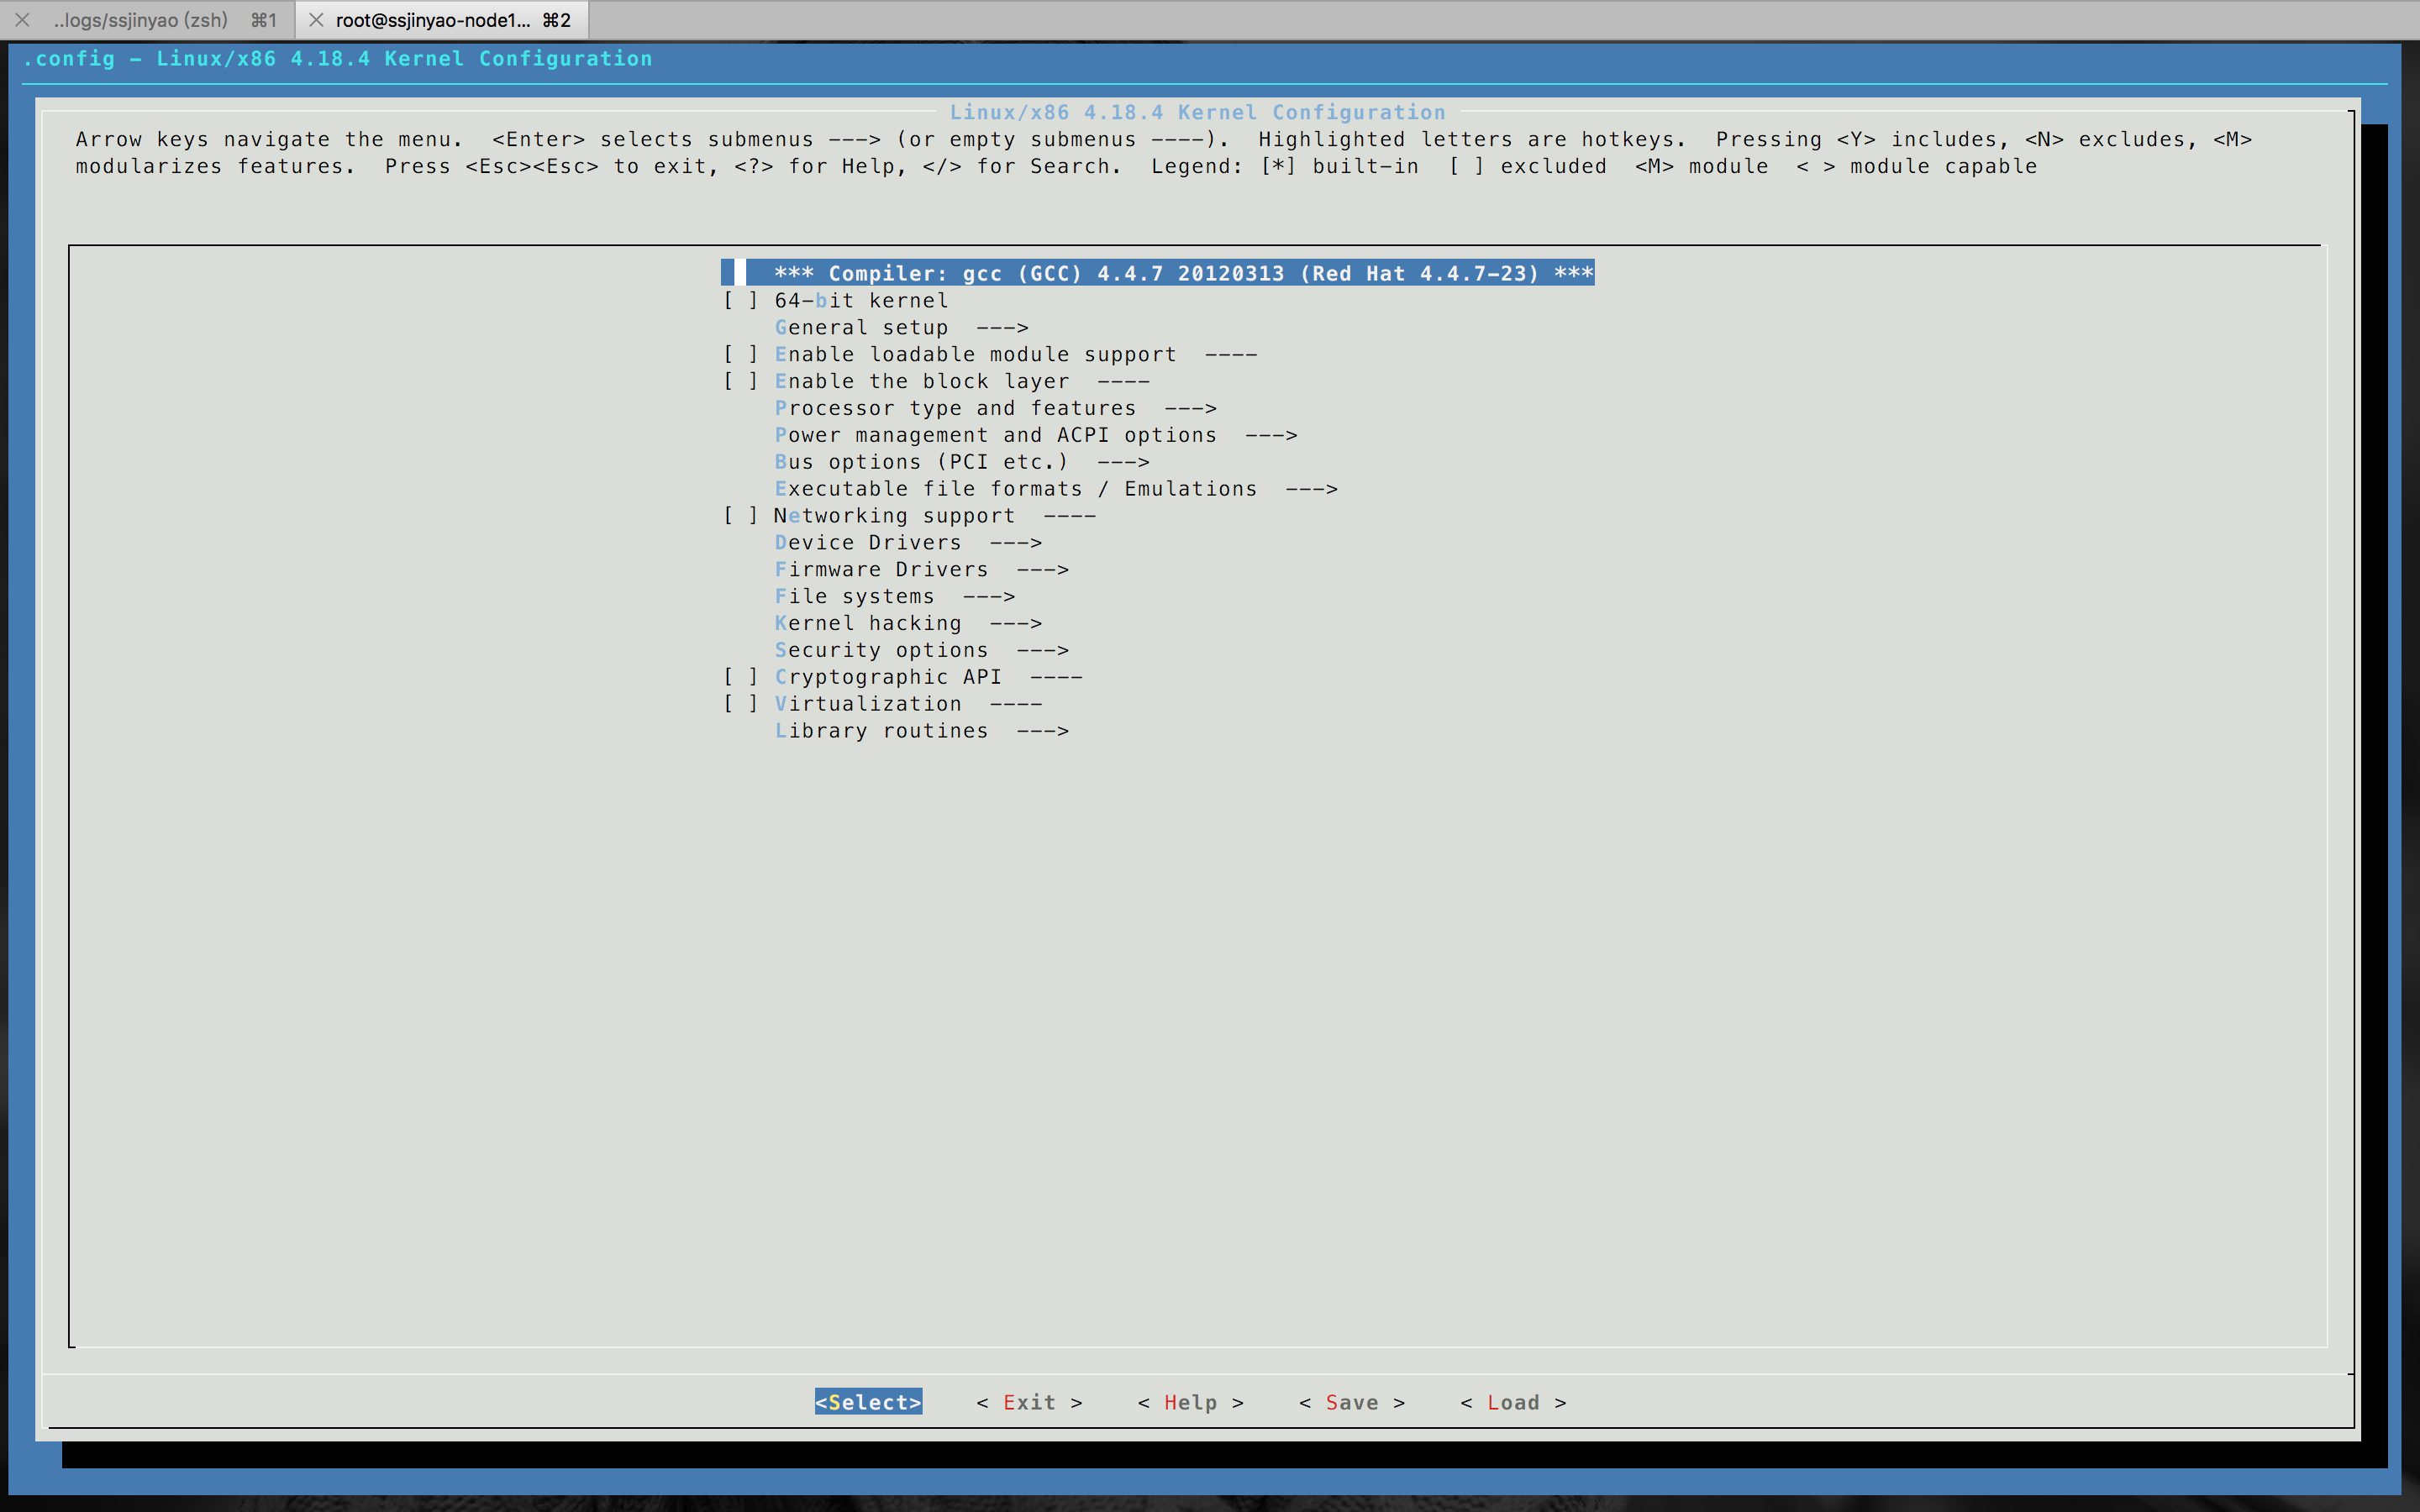
全局配置
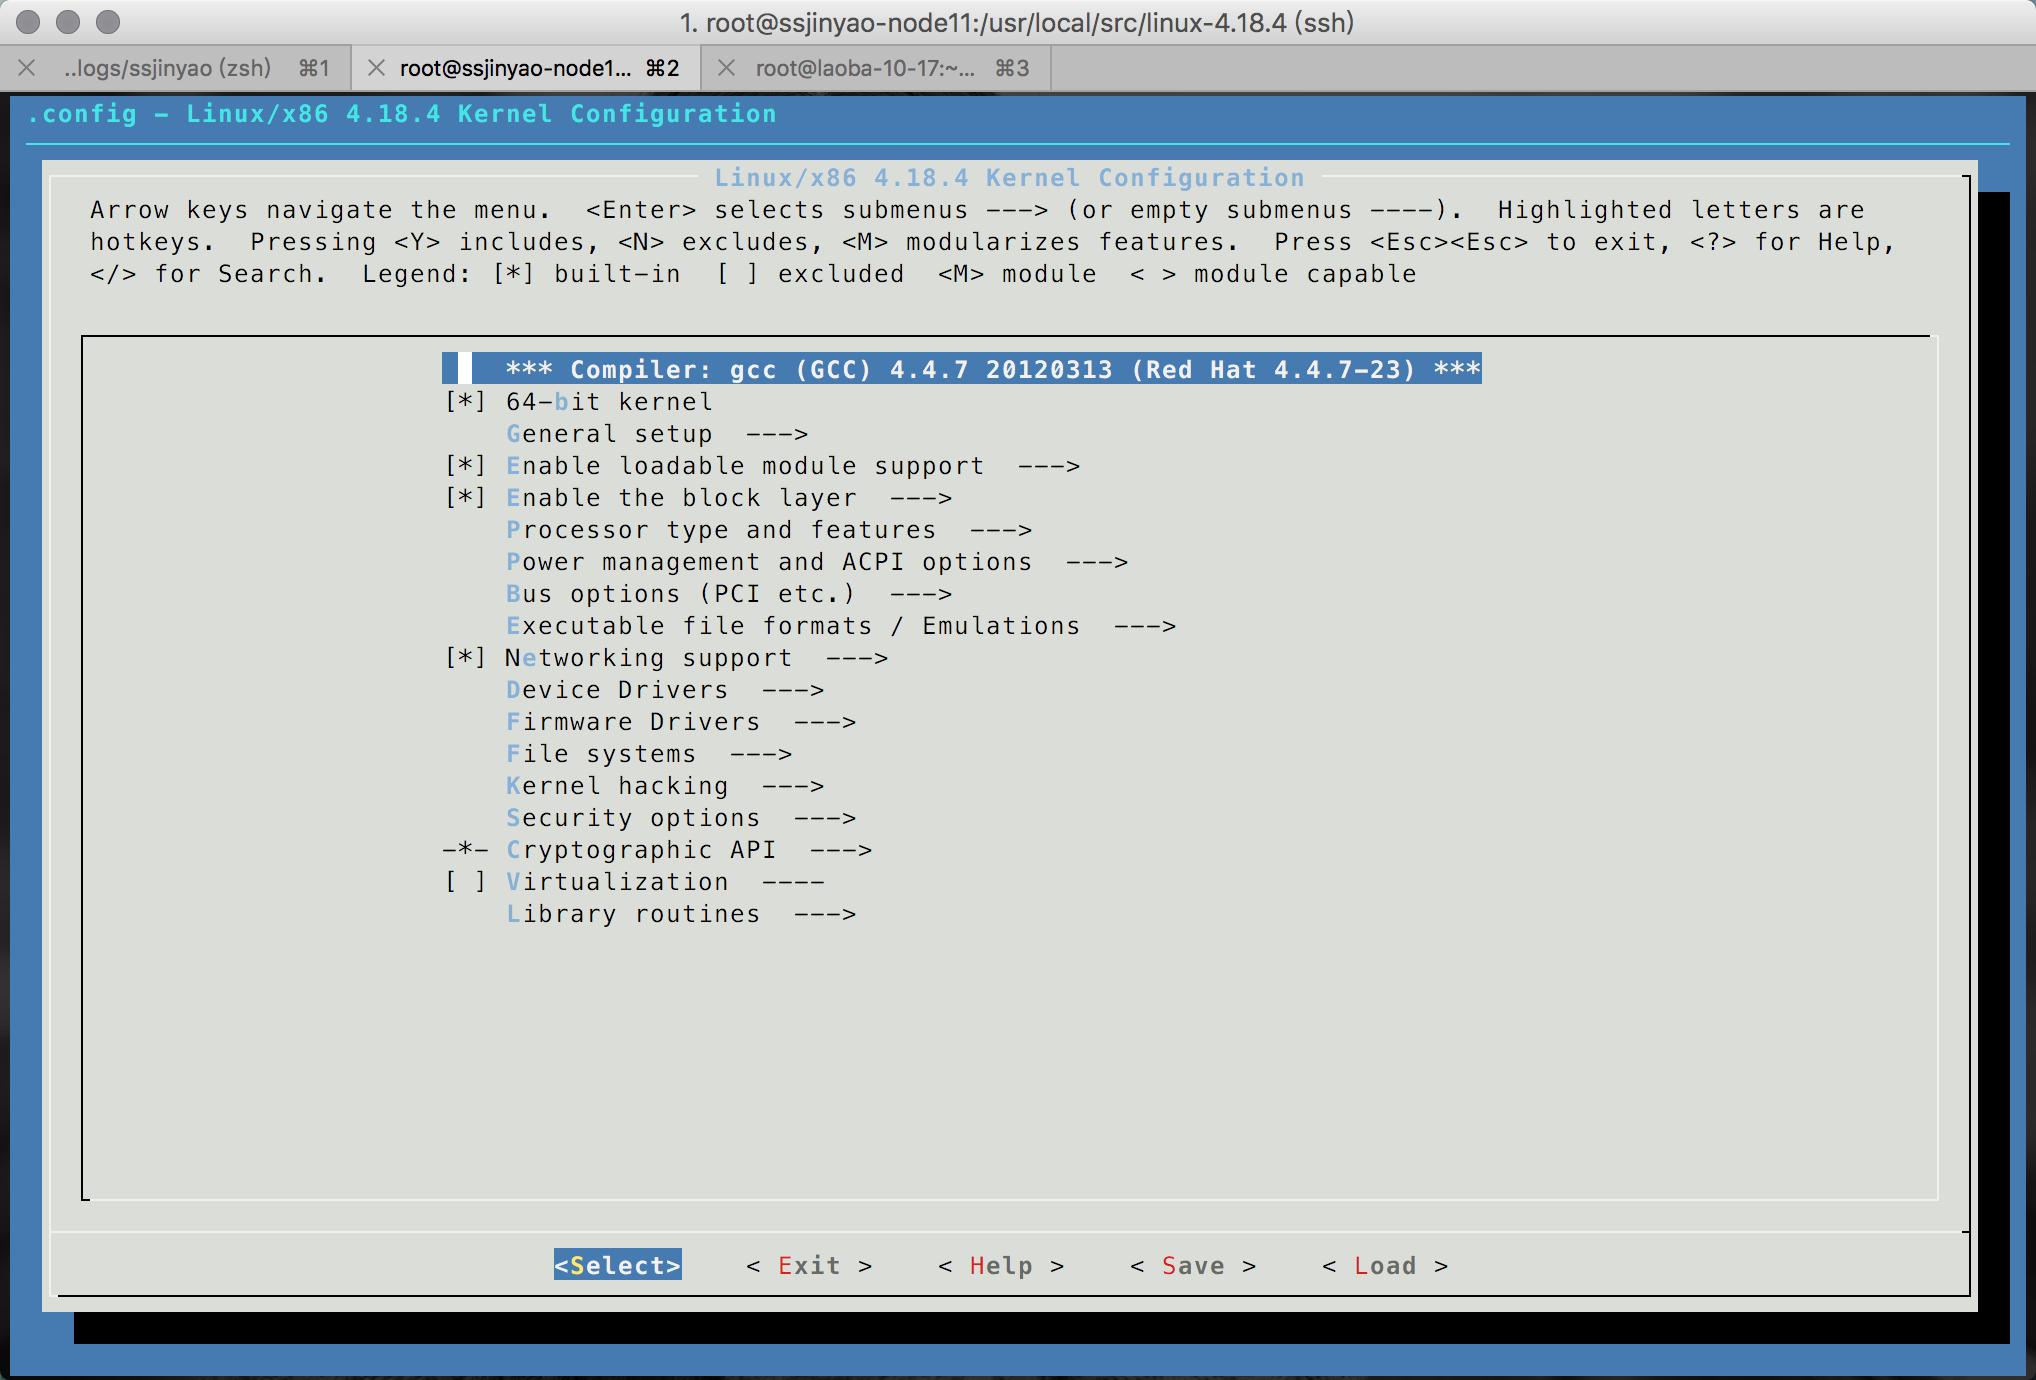
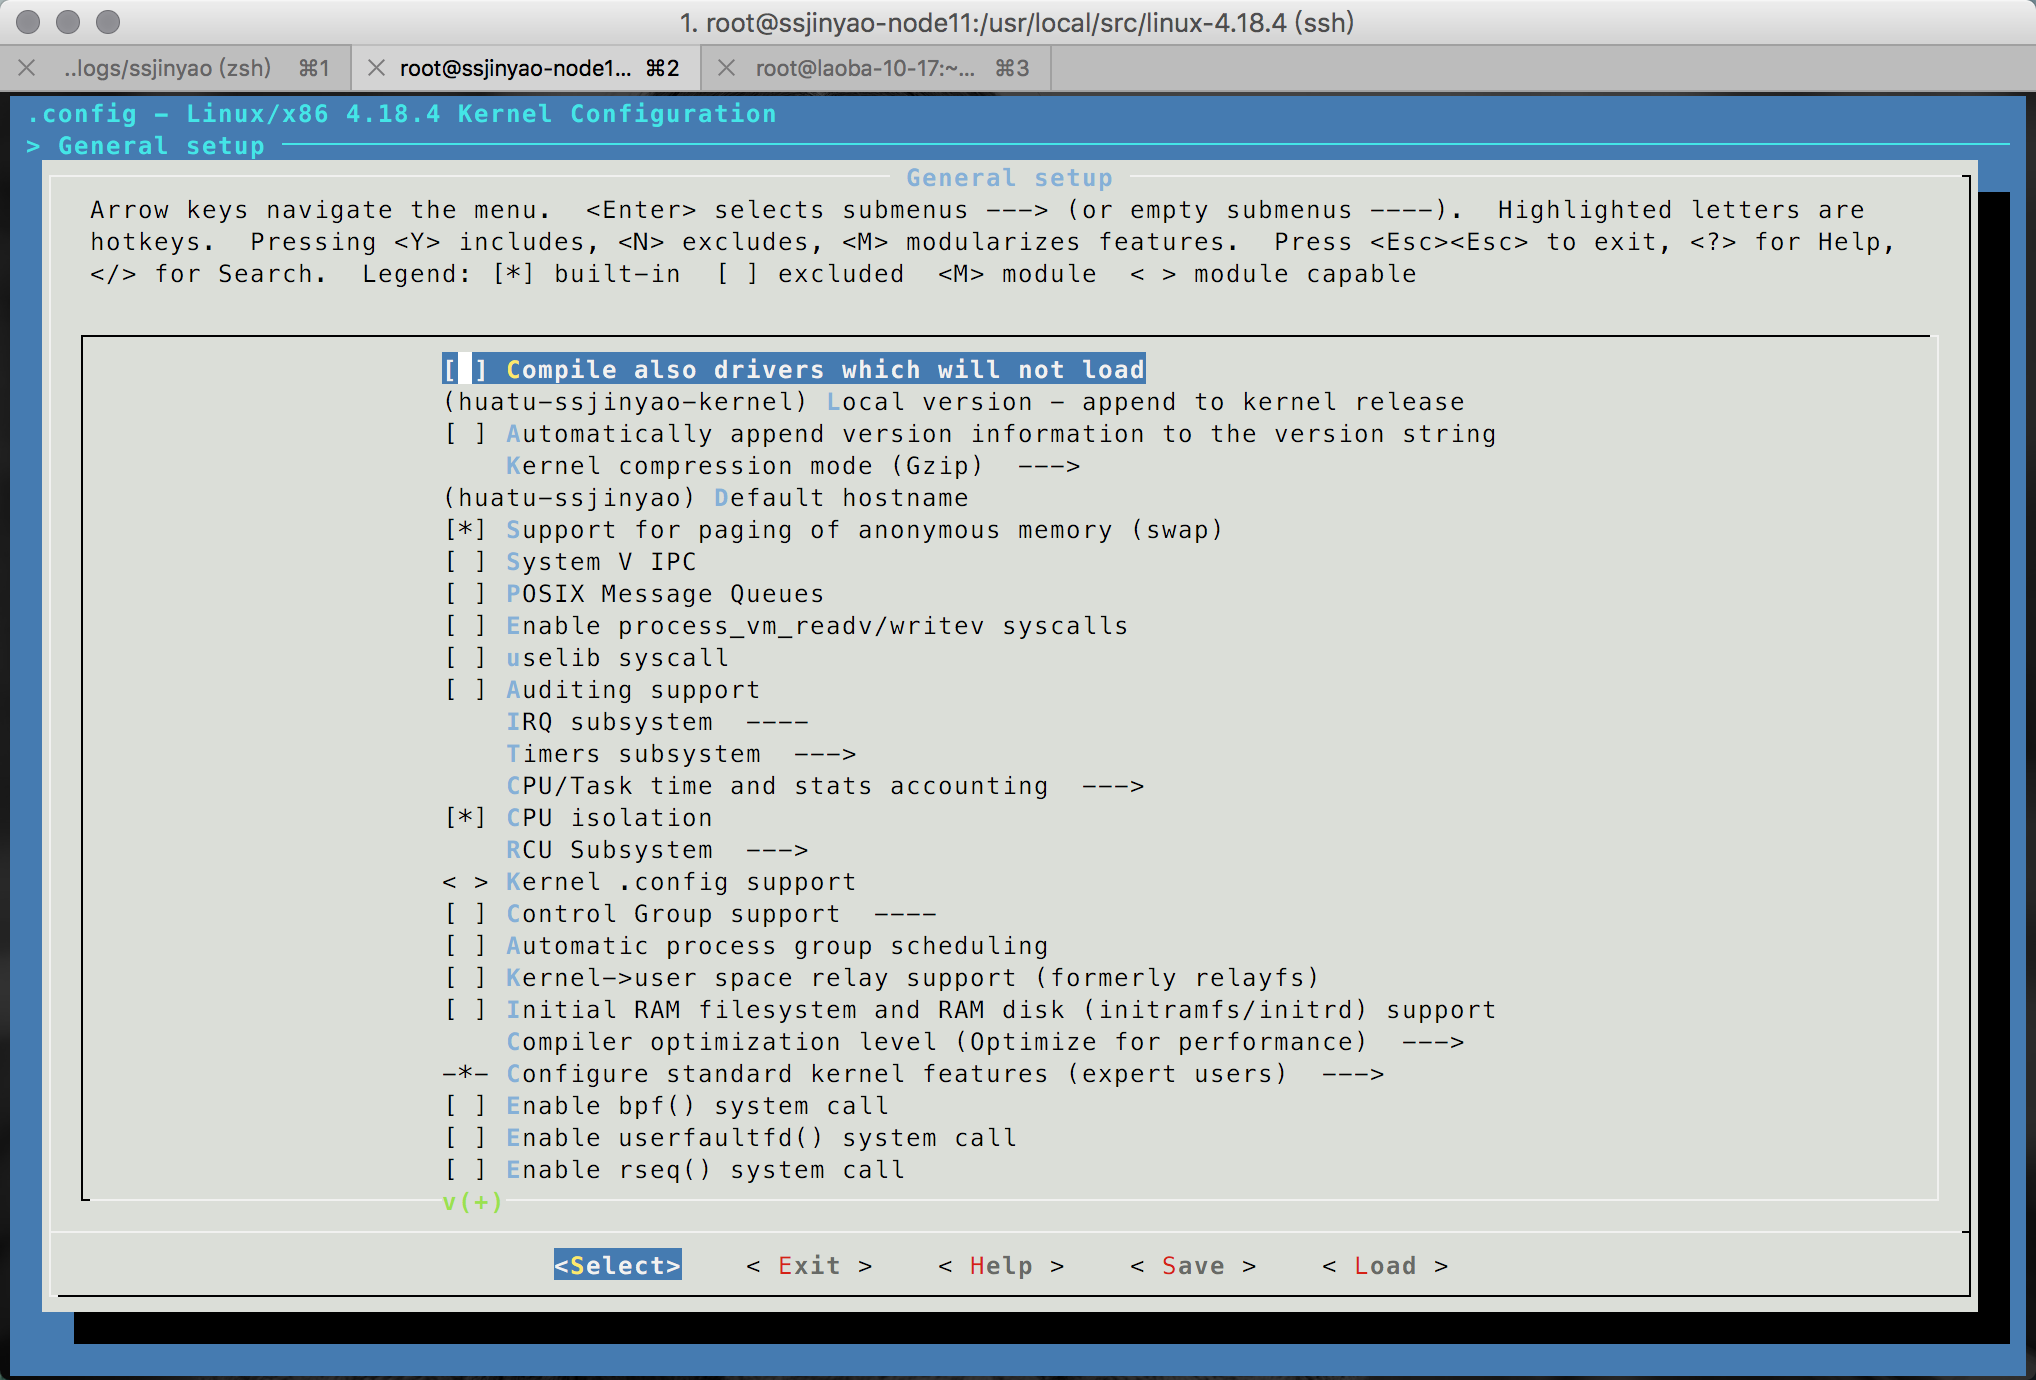
kernel-config-general-setup
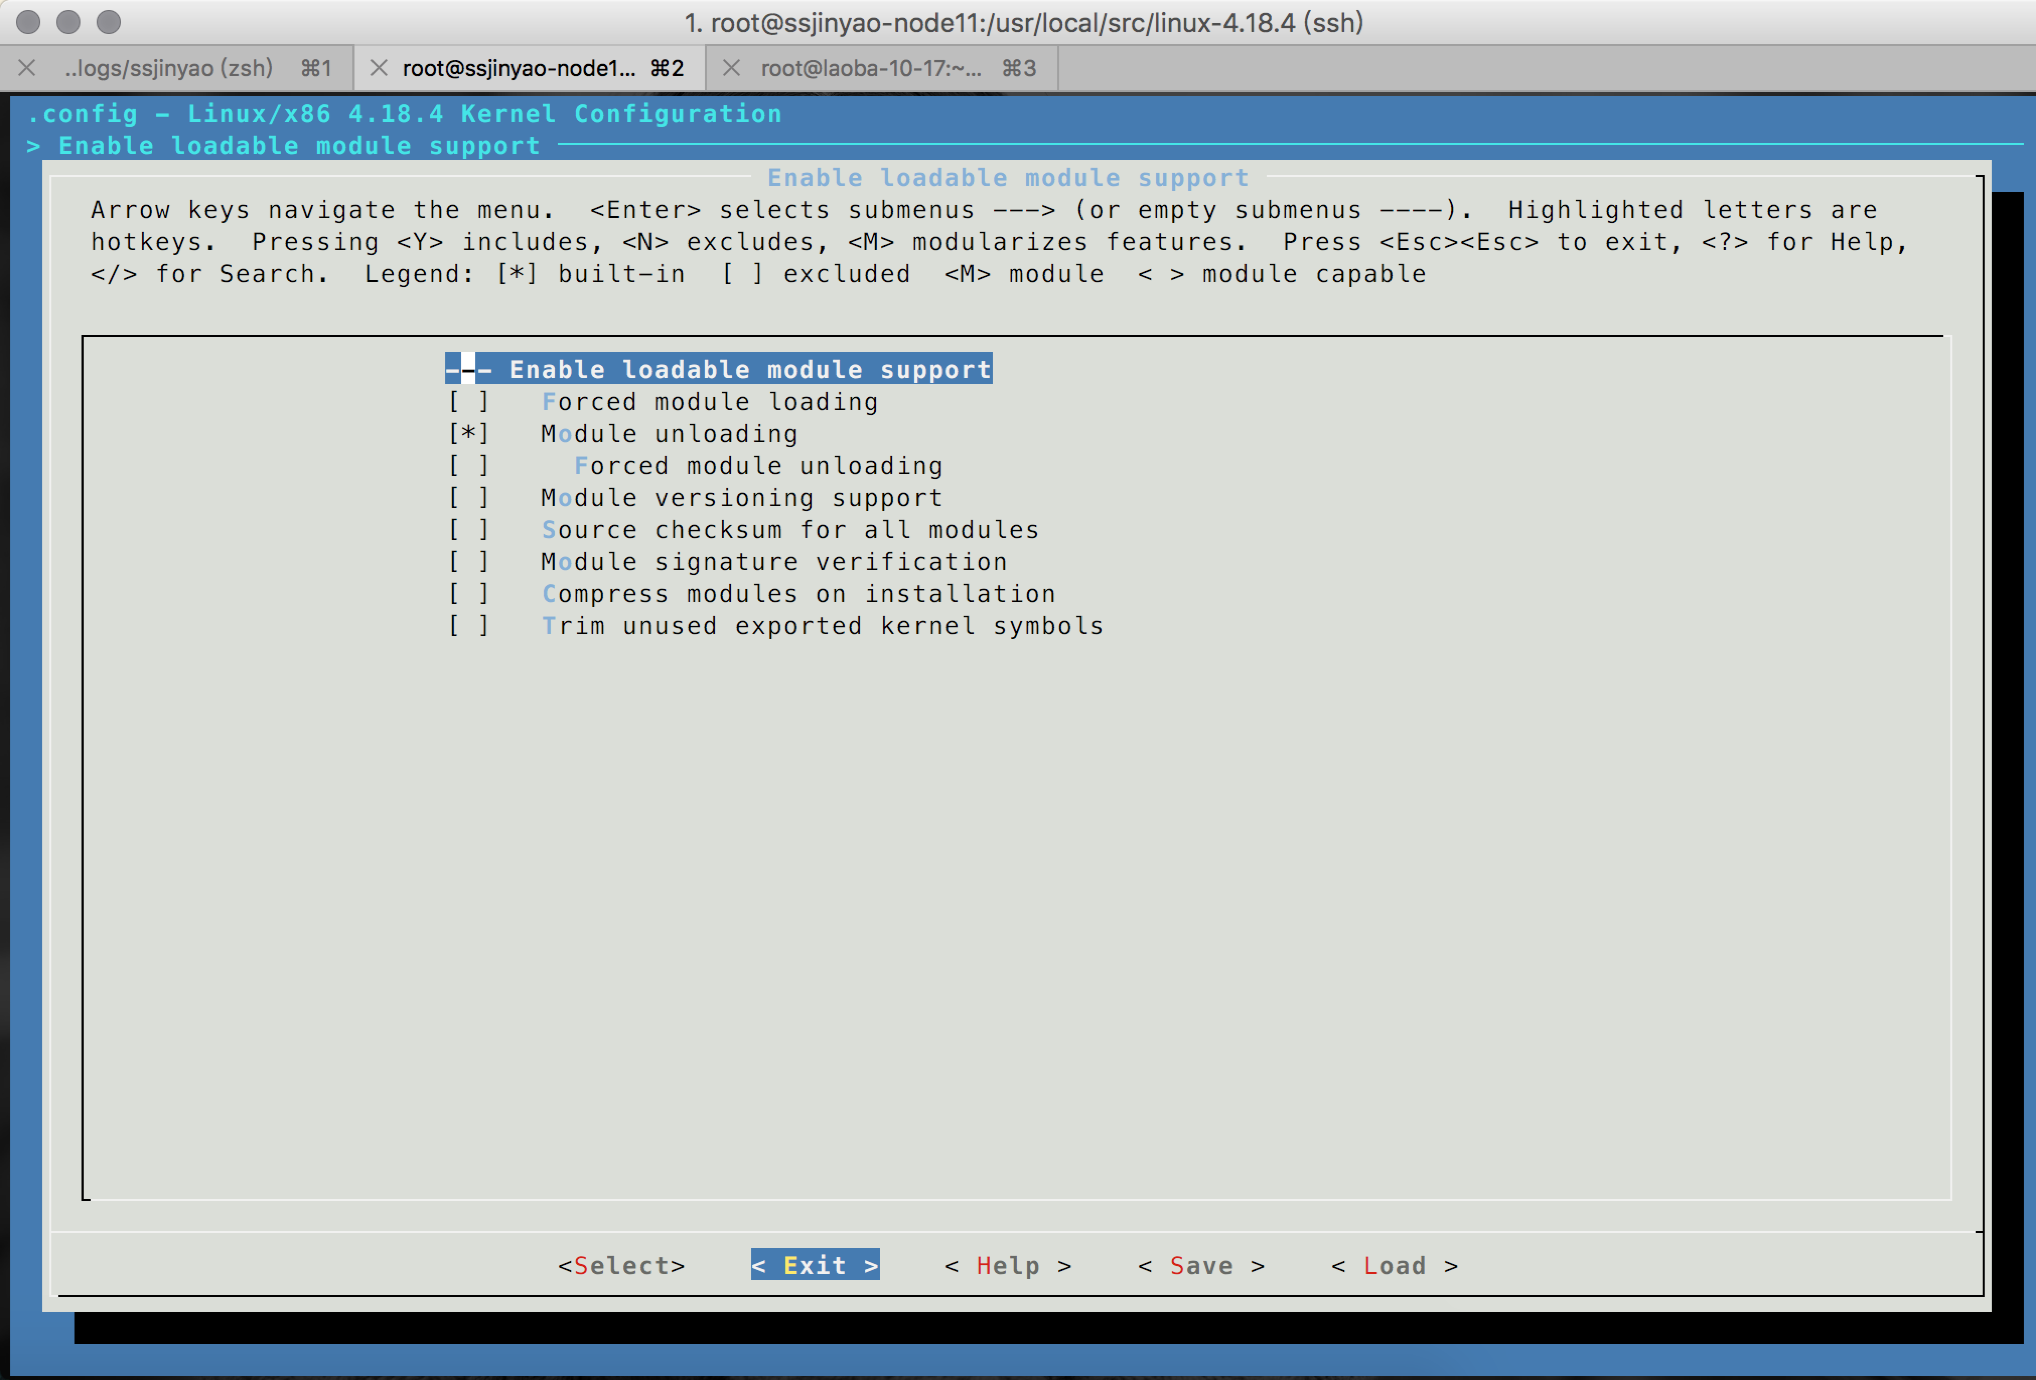
kernel-config-enable-loadble-module
kernel-config-device-drivers

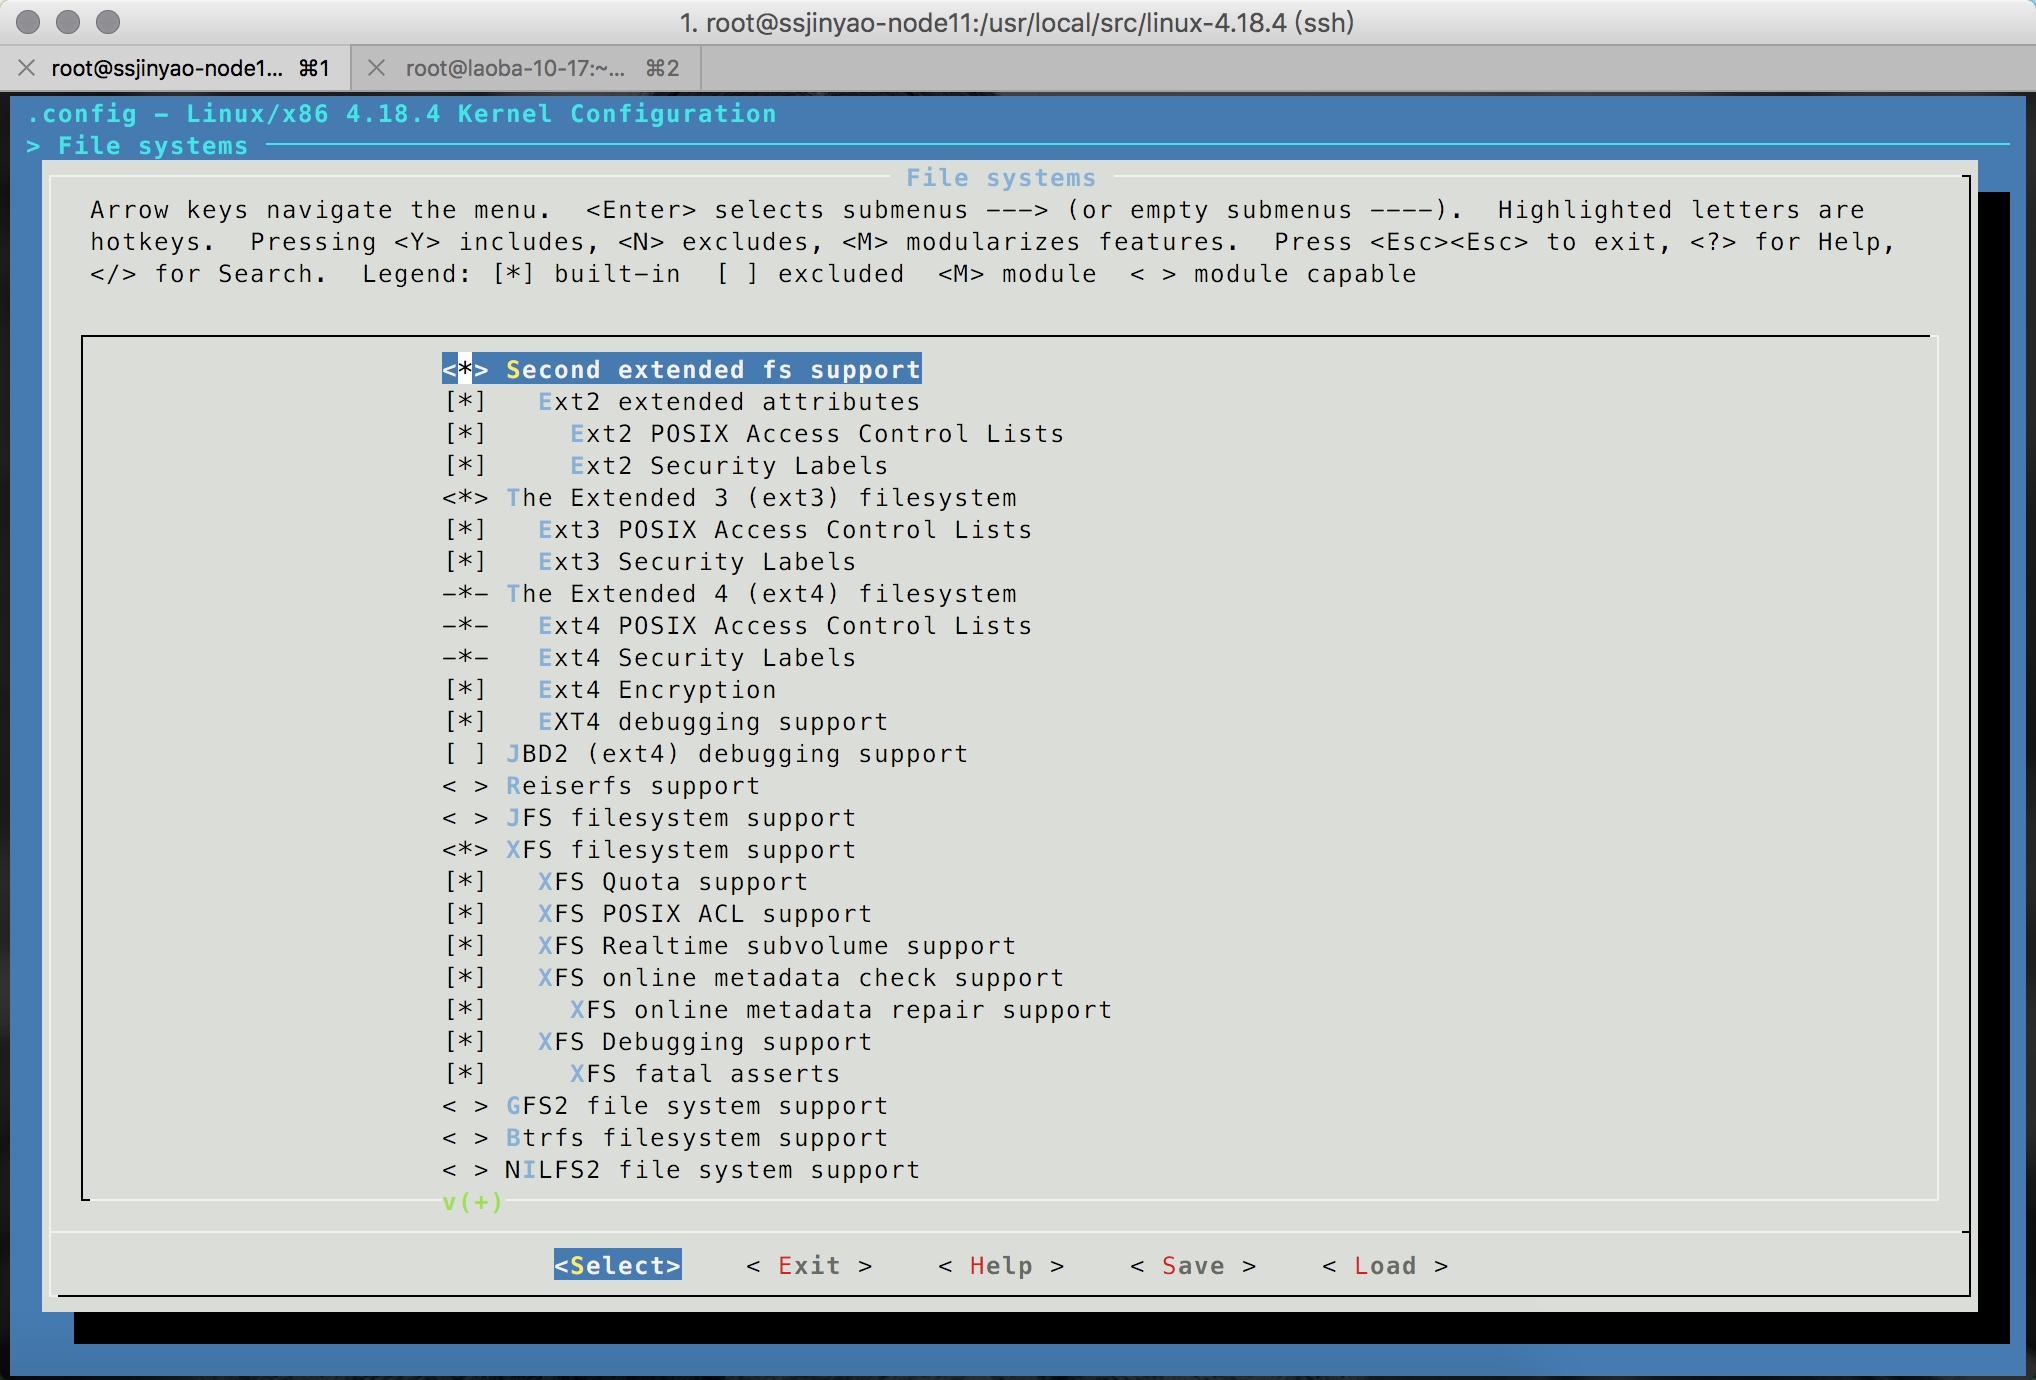
kernel-config-file-systems
详细配置与操作过程如下
* 启用 64-bit kernel # 让内核支持 64位架构
* 启用 Enable loadable module support # 支持内核模块装载
* 点进 Enable loadable module support -->  Module unloading # 让内核支持动态装卸载
* 点进 Enable loadable module support --> Module signature verification
        # 让内核校验装载的模块是否是已经认证的公司,避免内核被污染,以确保内核层面的安全
* 点进 Processor type and features --> processor family(Generic-x86-64) ---> Generic-x86-64
        # 支持通用cpu,当然也可以对应选则适合自己的
* 点进 Processor type and features --> Symmetric multi-processing support
        # 支持多核cpu
* 点进 Bus options (PCI etc.) --> PCI support # 选中支持
* 启用 Enable the block layer  # 选中支持
* 点进 Device Drivers --> SCSI device support  # 选中支持
* 点进 Device Drivers --> SCSI disk support # 选中支持
* 点进 Device Drivers --> Fusion MPT device support(启用) ---> Fusion MPT ScsiHost drivers for SPI # 选中支持
* 点进 Device Drivers --> Fusion MPT device support(启用) ---> Fusion MPT ScsiHost drivers for SAS # 选中支持
* 点进 Device Drivers --> Fusion MPT device support(启用) ---> Fusion MPT misc device (ioctl) driver # 选中支持
* 点进 Device Drivers --> Fusion MPT device support(启用) ---> Fusion MPT logging facility # 选中支持
* 点进 Device Drivers --> Input device support   ---> Keyboards (NEW) (启用 ) ---->  <*>   AT keyboard (NEW) # 选中支持
* 点进 Device Drivers --> Input device support --->  Mouse interface # 选中支持
* 点进 Device Drivers --> Input device support ---> Provide legacy /dev/psaux device # 选中支持
* 点进 Device Drivers --> USB support  ---> Support for Host-side USB # 选中支持
* 点进 Device Drivers --> USB support ---> Enable USB persist by default (NEW) # 选中支持
* 点进 Device Drivers --> USB support ---> xHCI HCD (USB 3.0) support # 选中支持
* 点进 Device Drivers --> USB support --->  Generic xHCI driver for a platform device # 选中支持
* 点进 Device Drivers --> USB support ---> EHCI HCD (USB 2.0) support # 选中支持
* 点进 Device Drivers --> USB support ---> Root Hub Transaction Translators # 选中支持
* 点进 Device Drivers --> USB support ---> Improved Transaction Translator scheduling (NEW) # 选中支持
* 点进 Device Drivers --> USB support --->  OHCI HCD (USB 1.1) support # 选中支持
* 点进 Device Drivers --> USB support ---> OHCI support for PCI-bus USB controllers (NEW) # 选中支持
* 点进 Device Drivers  --> Generic Driver Options  ---> Maintain a devtmpfs filesystem to mount at /dev # 选中支持
* 点进 Device Drivers --> Generic Driver Options ---> Automount devtmpfs at /dev, after the kernel mounted the rootfs # 选中支持
* 点进 File systems  --> Second extended fs support # 选中支持
* 点进 File systems  --> Ext2 extended attributes # 选中支持
* 点进 File systems  --> Ext2 POSIX Access Control Lists # 选中支持
* 点进 File systems  --> Ext2 Security Labels # 选中支持
* 点进 File systems  --> The Extended 3 (ext3) filesystem # 选中支持
* 点进 File systems  --> Ext3 POSIX Access Control Lists # 选中支持
* 点进 File systems  --> Ext3 Security Labels  # 选中支持
* 点进 File systems  --> The Extended 4 (ext4) filesystem # 选中支持
* 点进 File systems  --> Ext4 POSIX Access Control Lists # 选中支持
* 点进 File systems  --> Ext4 Security Labels # 选中支持
* 点进 File systems  --> Ext4 Encryption #  选中支持
* 点进 File systems  --> XFS filesystem support # 选中支持
* 点进 File systems  --> XFS Quota support # 选中支持
* 点进 File systems  --> XFS POSIX ACL support # 选中支持
* 点进 File systems  --> XFS Realtime subvolume support # 选中支持
* 点进 File systems  --> XFS online metadata check support # 选中支持
* 点进 File systems  --> XFS online metadata repair support # 选中支持
* 点进 File systems  --> XFS Debugging support # 选中支持
* 点进 File systems  --> XFS fatal asserts (NEW) # 选中支持
# 注:这里选择文件系统时可以选择自己常用的一种就好,我这里为方便以后使用,都加入进去了
# 一般xfs 文件系统类型是目前性能最好的文件系统,而ext3 ext4 则有较成熟的数据恢复技术,如ext3grep
* 点进 Executable file formats / Emulations  --> Kernel support for ELF binaries # 选中支持
* 点进 Executable file formats / Emulations  -->  Kernel support for scripts starting with #! # 选中支持,即文件系统shell支持机制
* 点进 Executable file formats / Emulations  -->  Kernel support for MISC binaries # 选中支持
* Networking support (启用) --> Networking options  --->  TCP/IP networking # 选中支持,为以后做实验或者使用方便。将TCP/IP networking 下面的核心项即tcp/ip 与devel项安装
* Device Drivers  --> Network device support  ---> Ethernet driver support (NEW)  ----> (启用) ----> Intel devices (NEW)(启用) ----->  Intel(R) PRO/1000 Gigabit
* * Device Drivers  --> Network device support  ---> Ethernet driver support (NEW)  ----> (启用) ----> AMD devices(启用) ----->  AMD相关的我这里全部勾选
Ethernet support # 添加模块  , 其它的所有 Ethernet driver support 可以取消,依据自己的需求选则
* 点进 General setup  --> (huatu-ssjinyao-kernel) Local version - append to kernel release # 点加Kernel release
* 点进 General setup --> (huatu-ssjinyao) Default hostname
编译内核是个比较复杂的过程,这里的大家如果一直编译不成功,或者编译完内核后不有成功启动系统
可以使用我这里给大家建立的模板
# cp kernel-config-ok-net-all-ok /usr/local/src/linux/.config # 可以使用这个模板来进行编译生成内核文件
[root@ssjinyao-node11:/usr/local/src/linux-4.18.4]# cat init/main.c | grep -C 8 ' !try_to_run_init_process("/etc/init")'
    if (execute_command) {
        ret = run_init_process(execute_command);
        if (!ret)
            return 0;
        panic("Requested init %s failed (error %d).",
              execute_command, ret);
    }
    if (!try_to_run_init_process("/sbin/init") ||
        !try_to_run_init_process("/etc/init") ||
        !try_to_run_init_process("/bin/init") ||
        !try_to_run_init_process("/bin/sh"))
        return 0;

    panic("No working init found.  Try passing init= option to kernel. "
          "See Linux Documentation/admin-guide/init.rst for guidance.");
}

[root@ssjinyao-node11:/usr/local/src/linux-4.18.4]# pwd
/usr/local/src/linux-4.18.4
# 注: 通过查看这段内核源码,则可以看到系统启动时查到init的流程
  先找 /sbin/init --> 若不存在
  再找 /etc/init --> 若不存在
  再找 /bin/init --> 若不存在
  再找 /bin/sh   --> 若不存在
  启动报内核恐慌
当然也可以在grub 的配置文件中指定 init= 来指定init的位置
[root@ssjinyao-node11:/usr/local/src/linux]# make -j 4 bzImage
[root@ssjinyao-node11:/usr/local/src/linux]# du -sh arch/x86/boot/bzImage
3.0M    arch/x86/boot/bzImage
编译单个网卡模块
[root@ssjinyao-node11:/usr/local/src/linux]# ls drivers/net/ethernet/intel/e1000/
e1000_ethtool.c  e1000.h  e1000_hw.c  e1000_hw.h  e1000_main.c  e1000_osdep.h  e1000_param.c  Makefile
root@ssjinyao-node11:/usr/local/src/linux]# ls drivers/net/ethernet/intel/e1000/e1000.ko
drivers/net/ethernet/intel/e1000/e1000.ko
# insmod /lib64/modules/e1000.ko
安装 编译安装busybox
因静态编译依赖于软件包 glibc-static, 因此在编译busybox时需要安装 glibc-static
[root@ssjinyao-node11:/usr/local/src]# tar -xvf busybox-1.29.2.tar.bz2
[root@ssjinyao-node11:/usr/local/src]# cd busybox-1.29.2
[root@ssjinyao-node11:/usr/local/src]# yum -y install glibc-static
[root@ssjinyao-node11:/usr/local/src/busybox-1.29.2]# make menuconfig
Settings  -->   --- Build Options  标题栏中 Build static binary (no shared libs) # 选中支持
Settings  -->    --- Installation Options ("make install" behavior)  What kind of applet links to install (as soft-links)  ---> 这个默认的 as soft-links 就可以了
Settings  -->    --- Installation Options ("make install" behavior)  (./_install) Destination path for 'make install' ---> 这个也选用默认的编译安装完到默认当前路径
make install # 注编译出错的时候要去了 Coreutils --> sync 后面需要再同步过去
利用busybox 制作initrd
[root@ssjinyao-node11:/usr/local/src/busybox-1.29.2]# mkdir /tmp/busybox
[root@ssjinyao-node11:/usr/local/src/busybox-1.29.2]# cp -a ./_install/*
bin/     linuxrc  sbin/    usr/
[root@ssjinyao-node11:/usr/local/src/busybox-1.29.2]# cp -a ./_install/* /tmp/busybox/
[root@ssjinyao-node11:/usr/local/src/busybox-1.29.2]# cd /tmp/busybox/
[root@ssjinyao-node11:/tmp/busybox]#
[root@ssjinyao-node11:/tmp/busybox]# mkdir -pv  proc  sys  etc/init.d  tmp  dev  mnt/sysroot
[root@ssjinyao-node11:/tmp/busybox]# vim init
#!/bin/ash
echo -e "\t\033[32m Now start init and switch root ! \033[0m "
mount -t proc proc /proc
mount -t sysfs sysfs /sys
mdev -s
mount -t xfs /dev/sda2  /mnt/sysroot
exec  switch_root  /mnt/sysroot  /sbin/init
[root@ssjinyao-node11:/tmp/busybox]# chmod +x init
[root@ssjinyao-node11:/tmp/busybox]# mknod  dev/console  c  5  1
[root@ssjinyao-node11:/tmp/busybox]# mknod  dev/null  c  1  3
[root@ssjinyao-node11:/tmp/busybox]# find  .  | cpio  --quiet  -H newc  -o  | gzip  -9 -n > ./huatu-ssjinyao-initrd.gz
[root@ssjinyao-node11:/tmp/busybox]# du -sh huatu-ssjinyao-initrd.gz
1.3M    huatu-ssjinyao-initrd.gz
安装grub,整合内核与initrd
此时将宿主机关掉,挂载一块scsi磁盘,用于将grub,内核,initrd写嵌入
我这里用的是vmware fusion 虚拟工具,windows大家习惯用vmware workstation
只要给虚拟机添加一块磁盘即可,如下图
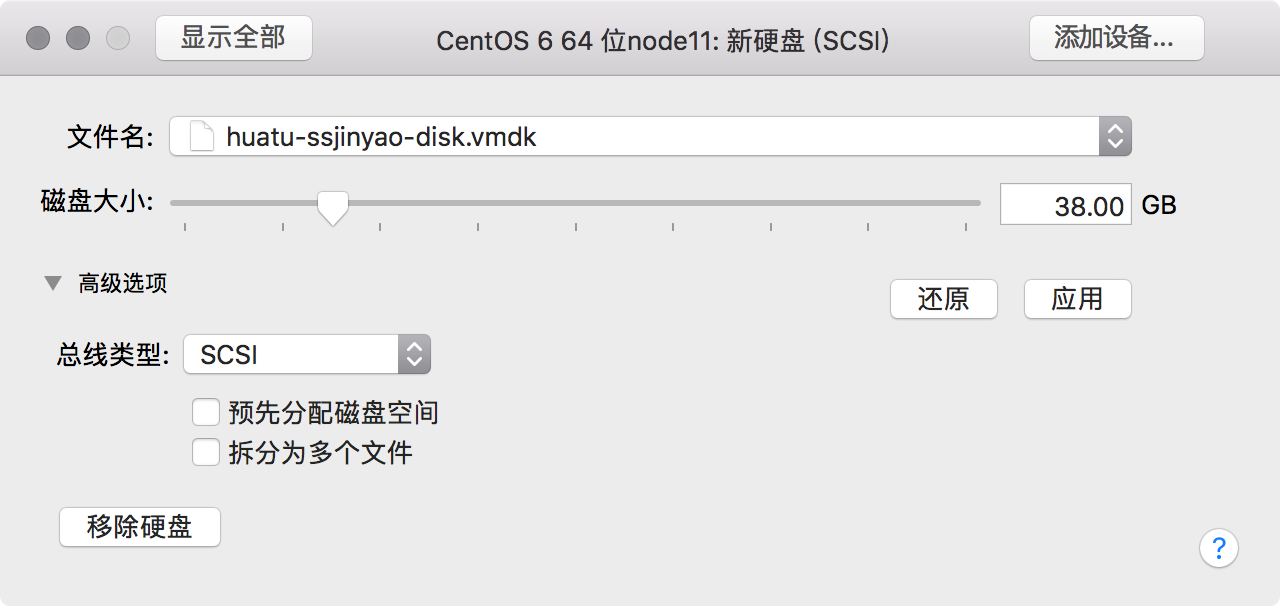
注意: 现在挂载磁盘一定是要和宿主机共享磁盘,不然的话信息不会实时同步 ;
也是说,添加的这块磁盘是为宿主机和制作机之间同步数据使用,也就是说共用一块虚拟磁盘;
添加完后将宿主服务器启动
[root@ssjinyao-node11:~]# lsblk
NAME                                 MAJ:MIN RM  SIZE RO TYPE MOUNTPOINT
sda                                    8:0    0   20G  0 disk
├─sda1                                 8:1    0  500M  0 part /boot
└─sda2                                 8:2    0 19.5G  0 part
  ├─vg_ssjinyaonode11-lv_root (dm-0) 253:0    0 17.6G  0 lvm  /
  └─vg_ssjinyaonode11-lv_swap (dm-1) 253:1    0    2G  0 lvm  [SWAP]
sdb                                    8:16   0   38G  0 disk
由上可以看出,已经添加了一块磁盘 sdb,将磁盘分区并挂载至/mnt目录下boot,与sysroot
[root@ssjinyao-node11:~]# mkdir /mnt/{boot,sysroot}
[root@ssjinyao-node11:~]# fdisk /dev/sdb
Device contains neither a valid DOS partition table, nor Sun, SGI or OSF disklabel
Building a new DOS disklabel with disk identifier 0x42ed0c1e.
Changes will remain in memory only, until you decide to write them.
After that, of course, the previous content won't be recoverable.

Warning: invalid flag 0x0000 of partition table 4 will be corrected by w(rite)

WARNING: DOS-compatible mode is deprecated. It's strongly recommended to
         switch off the mode (command 'c') and change display units to
         sectors (command 'u').

Command (m for help): n
Command action
   e   extended
   p   primary partition (1-4)
p
Partition number (1-4): 1
First cylinder (1-4960, default 1): 1
Last cylinder, +cylinders or +size{K,M,G} (1-4960, default 4960): +300M

Command (m for help): n
Command action
   e   extended
   p   primary partition (1-4)
p
Partition number (1-4): 2
First cylinder (40-4960, default 40): 40
Last cylinder, +cylinders or +size{K,M,G} (40-4960, default 4960): 4960

Command (m for help): w
The partition table has been altered!

Calling ioctl() to re-read partition table.
Syncing disks.
[root@ssjinyao-node11:~]# mkfs.xfs /dev/sdb1
[root@ssjinyao-node11:~]# mkfs.xfs /dev/sdb2
# mkdir /mnt/{boot,sysroot}
# mount /dev/sdb1 /mnt/boot
# mount /dev/sdb2 /mnt/sysroot
[root@ssjinyao-node11:~]# mount /dev/sdb1 /mnt/boot/
[root@ssjinyao-node11:~]# mount /dev/sdb2 /mnt/sysroot/
[root@ssjinyao-node11:~]# cd /tmp/busybox/
将编译好的内核与制作好的initrd入到boot启动目录
[root@ssjinyao-node11:/tmp/busybox]# cp huatu-ssjinyao-initrd.gz /mnt/boot/
[root@ssjinyao-node11:~]# cp /usr/local/src/linux/arch/x86/boot/bzImage  /mnt/boot/huatu-ssjinyao-kernel
安装 grub 至新添加的硬盘
[root@ssjinyao-node11:/tmp/busybox]# grub-install --root-directory=/mnt/ /dev/sdb
提供 grub 配置文件
[root@ssjinyao-node11:/mnt/sysroot]# vim /mnt/boot/grub/grub.conf
default        0
timeout        3
color    light-green/black light-magenta/black
title    huatu-ssinyao-kernel 4.18.5
    root (hd0,0)
    kernel /huatu-ssjinyao-kernel ro root=/dev/sda2 vga=877 quiet
    initrd /huatu-ssjinyao-initrd.gz
vga=877 这里是根据我的屏目分辨率而调整的适应的;
这里可以在启动 vga=ask grub开机时会给你一个列表,让你选择自己的分辨率;
最后可以选择自己屏幕的分辨率大小;
如,这里的我的分辨率是 1400x900,这里选的是36D,再将16进制36D转换为十进制数,即是我在grub.conf
中配置的vga=877
其它项配置项
default  配置这个项目为0默认启动项;
timeout  配置超过3秒不选则,则自动选则第一个title启动;
color    配置grub菜单栏颜色;
title    配置启动项标题;
root (hd0,0)    配置root先识别第一块盘的第一个分区;
kernel  配置指定启动内核,这里即是我们编译好的内核,root 指定启动后的根分区;
initrd  配置启动虚根,与第一个进程;
建立真实文件系统
[root@ssjinyao-node11:/mnt/sysroot]# cp /usr/local/src/busybox-1.29.2/_install/*  . -a
[root@ssjinyao-node11:/mnt/sysroot]# rm -f linuxrc
[root@ssjinyao-node11:/mnt/sysroot]# mkdir -pv etc  dev proc sys bin sbin usr/{bin,sbin,lib,lib64,local} lib64 lib/modules home var/{log,run,lock} tmp mnt media root boot
[root@ssjinyao-node11:/mnt/sysroot]# vim etc/inittab
# console:respawn:-/bin/ash
# tty1::askfirst:/bin/ash
# tty2::askfirst:/bin/ash
# tty3::askfirst:/bin/ash
::sysinit:/etc/rc.d/rc.sysinit
::respawn:/sbin/getty 9600 tty1
::respawn:/sbin/getty 9600 tty2
::respawn:/sbin/getty 9600 tty3
::respawn:/sbin/getty 9600 tty4
::respawn:/sbin/getty 9600 tty5
::respawn:/sbin/getty 9600 tty6
::respawn:/sbin/getty 9600 tty7
::ctrlaltdel:/sbin/reboot
::shutdown:/bin/umount -a -r &> /dev/null
[root@ssjinyao-node11:/mnt/sysroot]# chmod +x etc/inittab
#[root@ssjinyao-node11:/mnt/sysroot]# mkdir etc/rc.d/
#[root@ssjinyao-node11:/mnt/sysroot]# vim etc/rc.d/rc.sysinit
#!/bin/sh
echo -e "\t welcome to \033[31m HuaTu SSJinYao \033[0m Linux"
mount -t proc proc /proc
mount -t sysfs sysfs /sys
echo "scan /sys and to populate to /dev..."
mdev -s
mount -o remount,rw /dev/sda2 /
echo "mounting all filesystems..."
mount -a
ifconfig eth0 10.180.66.31 netmask 255.255.255.0
ifconfig lo 127.0.0.1
route add default gw 10.180.66.2
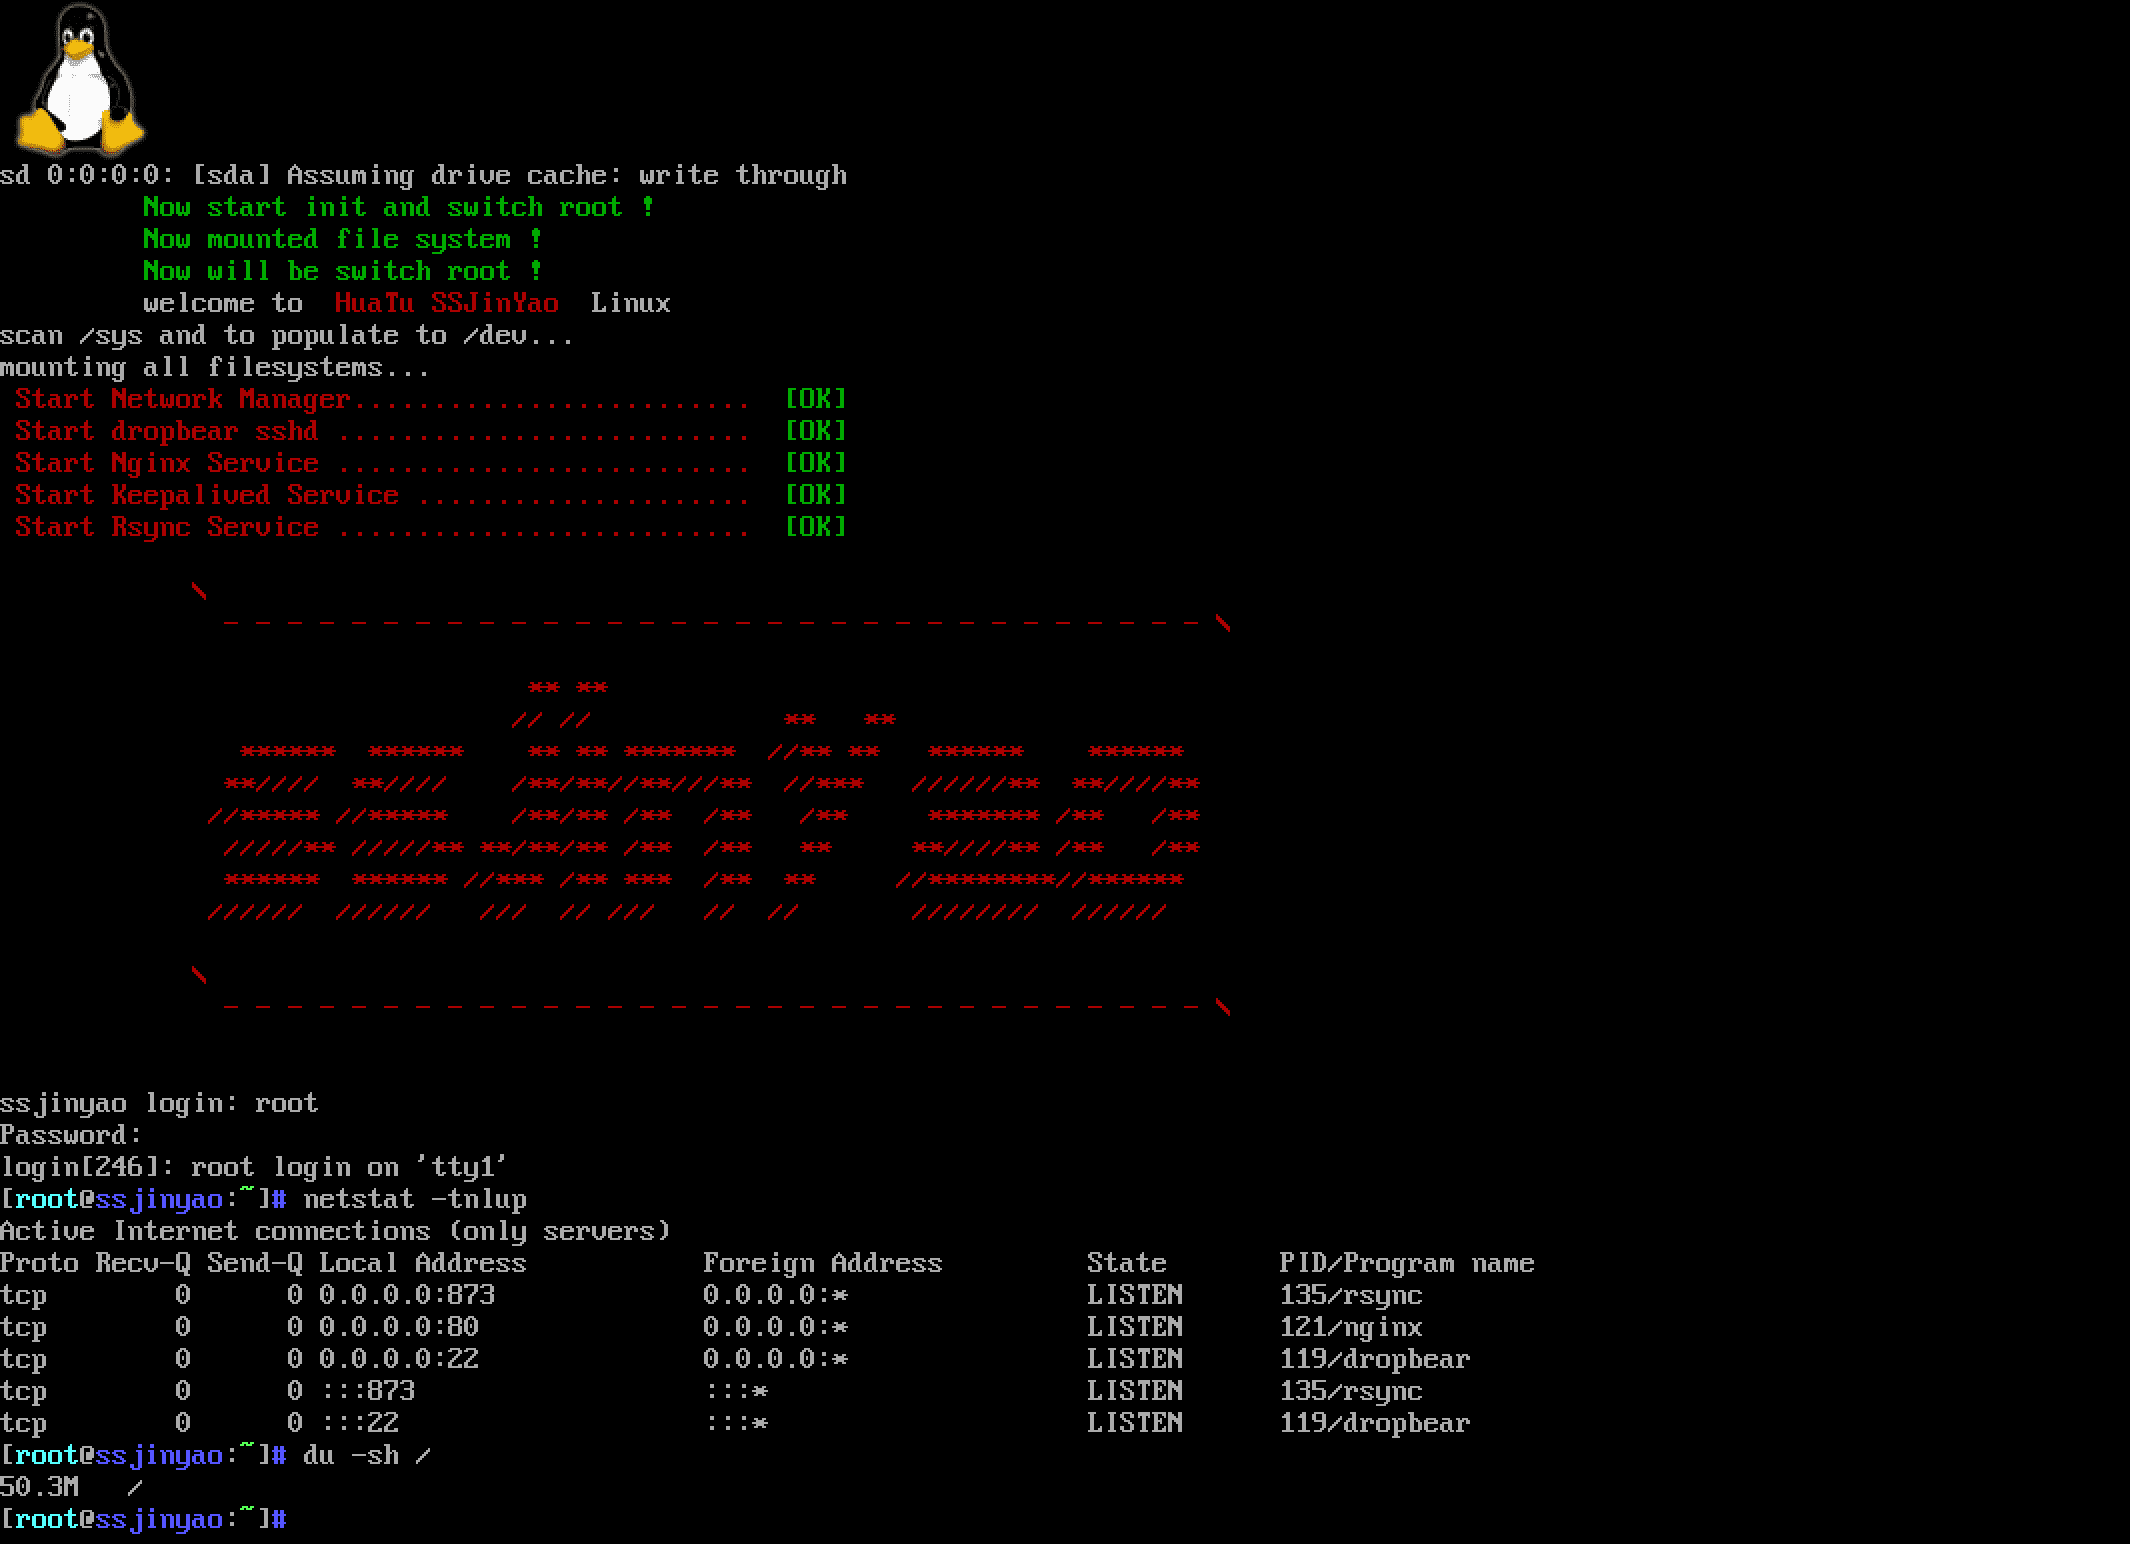
echo -e "\033[31m Start Network Manager.........................\033[0m \033[32m [OK] \033[0m"
/usr/local/sbin/dropbear -E -F &> /var/log/dropbear/sshd.log &
echo -e "\033[31m Start dropbear sshd ..........................\033[0m \033[32m [OK] \033[0m"
/usr/local/nginx/sbin/nginx
echo -e "\033[31m Start Nginx Service ..........................\033[0m \033[32m [OK] \033[0m"
/usr/local/keepalived/sbin/keepalived -D -S 0 -f /usr/local/keepalived/etc/keepalived/keepalived.conf
echo -e "\033[31m Start Keepalived Service .....................\033[0m \033[32m [OK] \033[0m"
rsync.sh &> /dev/null &
echo -e "\033[31m Start Rsync Service ..........................\033[0m \033[32m [OK] \033[0m"
echo -e "\033[31m
\
- - - - - - - - - - - - - - - - - - - - - - - - - - - - - - - \
** **
// // ** **
****** ****** ** ** ******* //** ** ****** ******
**//// **//// /**/**//**///** //*** //////** **////**
//***** //***** /**/** /** /** /** ******* /** /**
/////** /////** **/**/** /** /** ** **////** /** /**
****** ****** //*** /** *** /** ** //********//******
////// ////// /// // /// // // //////// //////
\\
- - - - - - - - - - - - - - - - - - - - - - - - - - - - - - - \\
\033[0m"
# chmod +x etc/rc.d/rc.sysinit
建系统系统挂载目录 fstab
[root@ssjinyao-node11:/mnt/sysroot]# mkdir /dev/pts
# 注: 在此之前一定要有 dev/pts 目录
[root@ssjinyao-node11:/mnt/sysroot]# vim etc/fstab
sysfs       /sys      sysfs defaults 0 0
proc        /proc     proc      defaults 0 0
devpts      /dev/pts  devpts    mode=620 0 0
/dev/sda1   /boot     xfs      defaults 0 0
/dev/sda2   /         xfs      defaults 0 0
添加登录后脚本/etc/profile
export PS1='[\[\033[01;36m\]\u\[\033[00m\]@\[\033[01;34m\]\h\[\033[00m\]:\[\033[01;32m\]\w\[\033[00m\]]\[\033[01;34m\]\$\[\033[00m\] '
export PATH=/usr/local/bin:/usr/local/sbin/:/sbin:/bin:/usr/bin:/usr/sbin
[root@ssjinyao-node11:/mnt/sysroot]# vim etc/shells
/bin/sh
/bin/ash
/bin/hush
/bin/bash
/sbin/nologin
[root@ssjinyao-node11:/mnt/sysroot]# etc/nsswitch.conf
passwd: files
grup: files
shadow: files
hosts: files dns
编译安装dropbear
注 dropbear 可以在dropbear官网下载
[root@ssjinyao-node11:/usr/local/src]# tar -xvf dropbear-2018.76.tar.bz2
[root@ssjinyao-node11:/usr/local/src]# cd dropbear-2018.76
[root@ssjinyao-node11:/usr/local/src/dropbear-2018.76]#  make PROGRAMS="dropbear dbclient dropbearkey dropbearconvert scp" install
[root@ssjinyao-node11:/mnt/sysroot]# cd /mnt/sysroot/etc/dropbear/
[root@ssjinyao-node11:/mnt/sysroot/etc/dropbear/]# openssl passwd -1 -salt $(openssl rand -hex 4)
[root@ssjinyao-node11:/mnt/sysroot/etc/dropbear/]# dropbearkey -t rsa -s 2048 -f dropbear_rsa_host_key
[root@ssjinyao-node11:/mnt/sysroot/etc/dropbear/]# dropbearkey -t dss -f dropbear_dss_host_key
[root@ssjinyao-node11:/mnt/sysroot/etc/dropbear/]# dropbear -E -F 启动
移植系统认证、登录、解析相关的依赖库
[root@ssjinyao-node11:/mnt/sysroot] mkdir  usr/lib64/
[root@ssjinyao-node11:/mnt/sysroot] cp -d /lib64/libnss_files* lib64/
[root@ssjinyao-node11:/mnt/sysroot] cp -d /usr/lib64/libnss3.so usr/lib64/
[root@ssjinyao-node11:/mnt/sysroot] cp -d /usr/lib64/libnss_files.so* usr/lib64/
[root@ssjinyao-node11:/mnt/sysroot] cp -d /lib64/libresolv*  lib64/
[root@ssjinyao-node11:/mnt/sysroot] cp -d /lib64/libnss_dns* lib64/
编译安装nginx
[root@ssjinyao-node11:/usr/local/src]# cd /usr/local/src/
[root@ssjinyao-node11:/usr/local/src]# tar -xvf nginx-1.14.0.tar.gz
./configure --prefix=/usr/local/nginx   --http-log-path=/var/log/nginx/access.log --error-log-path=/var/log/nginx/error.log --with-http_gzip_static_module --with-http_stub_status_module --with-http_ssl_module --user=root --group=root
[root@ssjinyao-node11:/usr/local/src]# cp -a /usr/local/nginx/sbin/nginx  /usr/sbin/
[root@ssjinyao-node11:/usr/local/src]# cp -a /usr/local/nginx/ /mnt/sysroot/usr/local/
编译安装inotify并移植
[root@ssjinyao-node11:/usr/local]# cd /usr/local/src/
[root@ssjinyao-node11:/usr/local/src]# tar -xvf inotify-tools-3.14.tar.gz
[root@ssjinyao-node11:/usr/local/src]# cd inotify-tools-3.14
[root@ssjinyao-node11:/usr/local/src/inotify-tools-3.14]# ./configure --prefix=/usr/local/inotify/
[root@ssjinyao-node11:/usr/local/src/inotify-tools-3.14]# cp -a /usr/local/inotify/ /mnt/sysroot/usr/local
编译安装keepalived
注: keepalived 依赖net-tools psmisc 两个工具包,因此需要将这两个工具包的命令移植
[root@laoba-10-17:/usr/local/src/linux-4.18.5]# rpm -ql net-tools | grep bin && rpm -ql psmisc | grep bin
/bin/netstat
/sbin/arp
/sbin/ether-wake
/sbin/ifconfig
/sbin/ipmaddr
/sbin/iptunnel
/sbin/mii-diag
/sbin/mii-tool
/sbin/nameif
/sbin/plipconfig
/sbin/route
/sbin/slattach
/usr/bin/killall
/usr/bin/peekfd
/usr/bin/prtstat
/usr/bin/pstree
/usr/bin/pstree.x11
/usr/sbin/fuser
[root@ssjinyao-node11:/usr/local/src]# tar -xvf keepalived-2.0.6.tar.gz
[root@ssjinyao-node11:/usr/local/src]# cd keepalived-2.0.6
[root@ssjinyao-node11:/usr/local/src]# cp /usr/local/keepalived/sbin/keepalived /usr/sbin/
[root@ssjinyao-node11:/usr/local/src/keepalived-2.0.6]# ./configure --prefix=/usr/local/keepalived/
[root@ssjinyao-node11:/usr/local/src]# cp -a /usr/local/keepalived/ /mnt/sysroot/usr/local
编写bincp 脚本
ldd 命令可以查看命令所依赖的库的位置
[root@ssjinyao-node11:/mnt/sysroot]# ldd /bin/cp
编写脚本,将需要的命令同步到/mnt/sysroot 目录
[root@ssjinyao-node11:/mnt/sysroot]# mkdir /root/bin
[root@ssjinyao-node11:/mnt/sysroot]# vim /root/bin/bincp.sh
[root@ssjinyao-node11:/mnt/sysroot]# chmod +x /root/bin/bincp.sh
#!/bin/bash
#The scripts can copy bin file and that bin libs
#author renjin
#date 2016 11 19
#version 3.0
echo "acquiesce copy bin file in /mnt/sysroot!! "
MNT="/mnt/sysroot"
BIN_FILE() { bindir=`dirname $file`
             [ -e $MNT ] || mkdir -p $MNT
             [ -e $MNT$bindir ] || mkdir -p $MNT$bindir
             if [ -e $MNT$file ] ; then
                echo "you will copy bin file exsit !"
             else
               cp $file $MNT$bindir
             fi
          }
LIB_FILE() { lib=`ldd $file | grep -Eo "/.*lib(64){0,1}/[^[:space:]]{1,}"`
             for lib64 in $lib; do
                 libdir=`dirname $lib64`
                 if [ ! -e $MNT$libdir ]; then
                       mkdir -p $MNT$libdir
                 elif  [ -e $MNT$lib64 ] ; then
                     echo "you will copy lib file exsit " && continue
                 else cp $lib $MNT$libdir
                 fi
            done
          }

read -p "please input your will copy bin file name,or input quit quitng: " BIN
until [ $BIN == 'quit' -o $BIN == 'q' ]; do
! which $BIN 2> /dev/null && read -p  "you input command no exsit,please again input or input quit ,quiting  " BIN && continue
file=`which --skip-alias $BIN 2> /dev/null | grep "/.*[^[:space:]]" `
      BIN_FILE $BIN && LIB_FILE $BIN
read -p "continue!,or input quit ,quting: " BIN
done
# chmod +x /root/bincp.sh && cp /root/bincp.sh /bin
[root@ssjinyao-node11:/usr/local/src]# bincp.sh
acquiesce copy bin file in /mnt/sysroot!!
please input your will copy bin file name,or input quit quitng:
需要移植的命令有
bash dropbear ssh scp rysnc dbclient dropbearconvert dropbearkey genhash nginx 等等
利上这个脚本将自己需要的命令拷贝到/mnt/sysroot中
添加root用户
# adduser root
# passwd root
这里要注意把 root id 在 /etc/passwd 中改0
在Linux内核中,系统权限只对应id
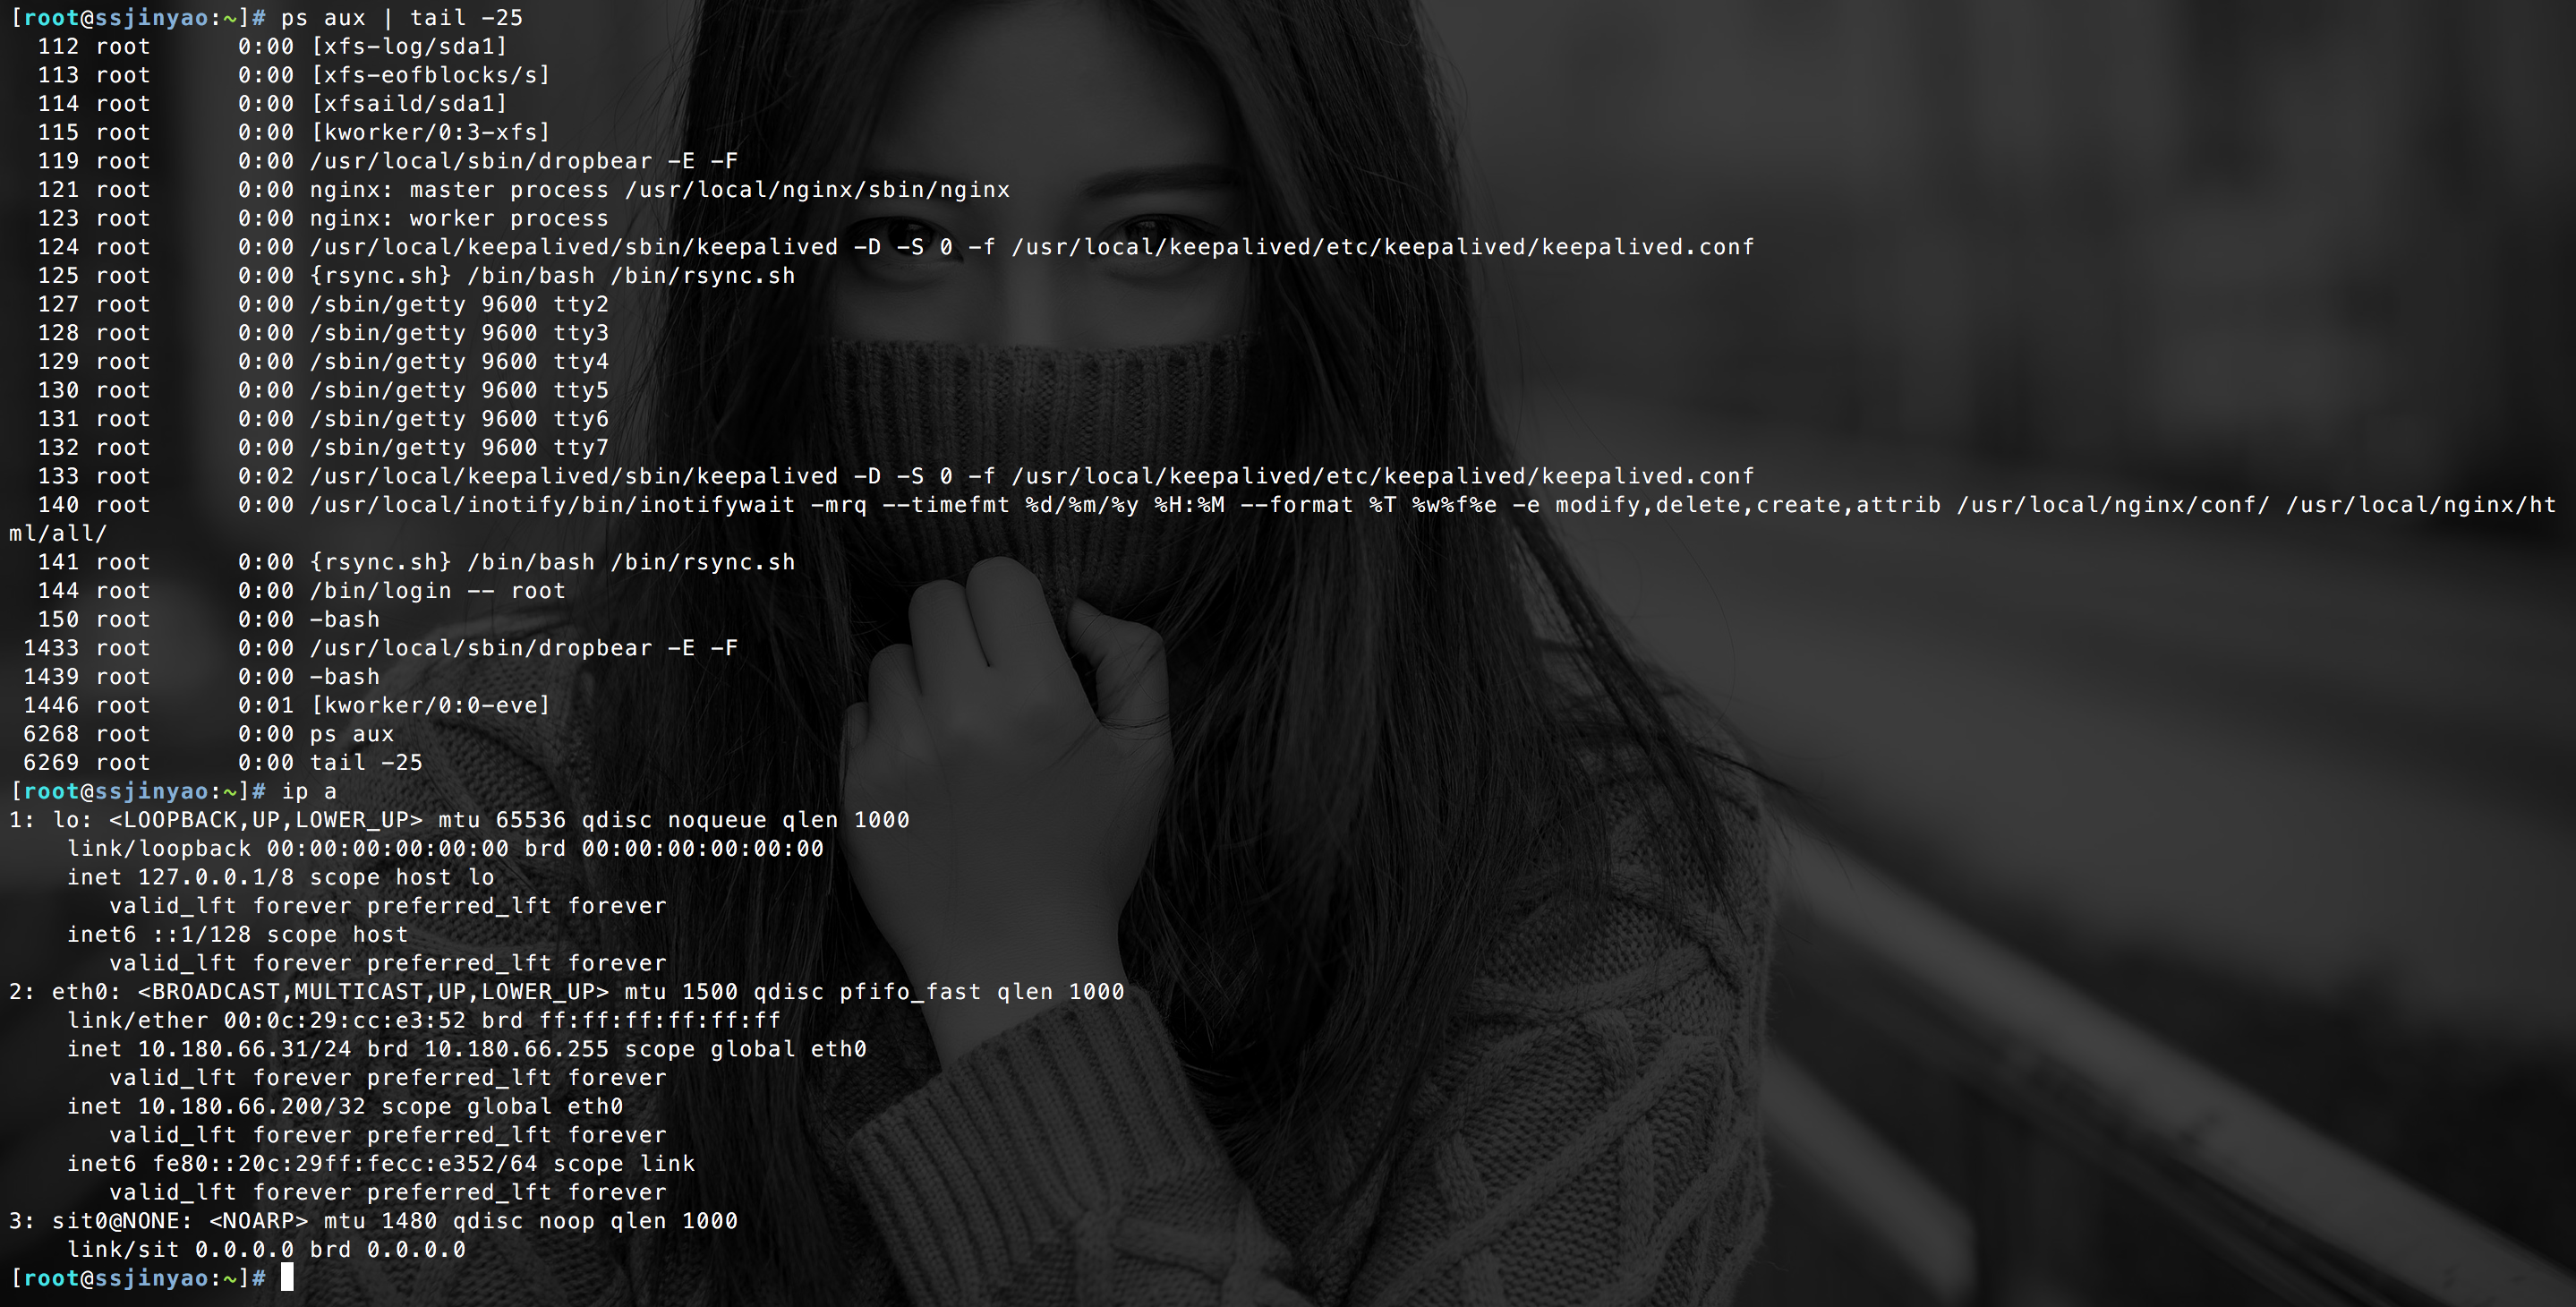
微系统 keepaived+nginx+rsync+inotify的实现
keepalived+nginx+rsync+intofity 在之前的文章中有实现
大家可以再克隆一个小系统,来实现keepalived的双主
系统启动后如下图