


[toc]
docker笔记(一)
Virtualization And Container
主机级虚拟化
- Type-I 直接在硬件上做虚拟化;
- Type-II 启动系统后,再做虚拟化;
- 真正能产生生产力的,是应用层面;
- 系统运行两颗树:进程树和文件系统树;
- 基于用户层面的隔离(UTS,Mount,IPC,PID,User,Net);
- namespaces:名称空间,系统调用,向外输出(clone(),setns());
Linux Namespaces
| namespace | 系统调用参数 | 隔离内容 | 内核版本 |
|---|---|---|---|
| UTS | CLONE_NEWUTS | 主机名和域名 | 2.6.19 |
| IPC | CLONE_NEWIPC | 信号量、消息队列和共享内存 | 2.6.19 |
| PID | CLONE_NEWPID | 进程编号 | 2.6.24 |
| Network | CLONE_NEWNET | 网络设备、网络栈、端口号等 | 2.6.29 |
| Mount | CLONE_NEWNS | 挂载点(文件系统) | 2.4.19 |
| User | CLONE_NEWUSER | 用户和用户组 | 3.8 |
Control Groups(cGroups)
把系统级的资源分成多个组
- lxc-create,template
- nmp
- machine+swarm+compose
- mesos+marathon
- kubernetes -> k8s
- libcontainer -> runC
- Moby, CNCF
- docker中的容器
lxc -> libcontainer -> runC - OCI Open Container Initiative
旨在围绕容器式和运行时制定一个开放的式业化标准
the Runtime Specification(runtime-spec)
the Image Specification(image-spec) - runC Open Container Format
https:hub.docker.com
- docker 的两个版本
docker-ee
docker-ce - docker architecture
The Docker daemon
The Docker client
Docker registries - yum 中的仓库 repository,repo
docker 中的仓库 repository, repo
镜像名称 nginx:1.10 以此来命令镜像,nginx:1.15 nginx:latest 而镜像的默认版是最新版的
nginx:1.14 nginx:stable 最新稳定版
镜像:静态;
容器:动态,有生命周期,特别类似于程序;
容器常用资源: images, containers, networks, volumes, plugins,安装及使用docker
依赖的环境
64 bits CPU
Linux Kernel 3.10+
Linux Kernel cgrups and namespaceCentOS 7
“Extras” repositoryDocker Daemon
systemctl start docker.serviceDocker Client
docker[OPTIONS] COMMAND [arg …]
#  cd /etc/yum.repos.d/
# wget https://mirrors.aliyun.com/docker-ce/linux/centos/docker-ce.repo
# yum makecache
# yum repolist
# yum remove docker docker-common container-selinux docker-selinux docker-engine
# yum install docker-ce
仓库配置文件: https://dowland.docker.com/linux/centos/docker-ce.repo
Docker组件:
docker程序环境:
环境配置文件:
    /etc/sysconfig/docker-network
    /etc/sysconfig/docker-storage
    /etc/sysconfig/docker
Unit FIle:
    /usr/lib/systemd/system/docker.serivce
Docker Registry配置文件
    /etc/contalners/registries.conf
docker-ce:
    配置文件:/etc/docker/daemon.json
注册阿里云账号,专用加速器地址获得路径:
https://cr.console.aliyun.com/#/accelerator
Docker镜像加速
    docker cn
    阿里云加速器
    中国科技大学
{
    "registry-mirrors":["https://registry.docker-cn.com"]
}
# mkdir /etc/docker
# vim /etc/docker/daemon.json
{
    "registry-mirrors":["https://registry.docker-cn.com"]
}
# systemctl start docker
查看docker 版本信息
# docker version
Client:
 Version:           18.06.1-ce
 API version:       1.38
 Go version:        go1.10.3
 Git commit:        e68fc7a
 Built:             Tue Aug 21 17:23:03 2018
 OS/Arch:           linux/amd64
 Experimental:      false

Server:
 Engine:
  Version:          18.06.1-ce
  API version:      1.38 (minimum version 1.12)
  Go version:       go1.10.3
  Git commit:       e68fc7a
  Built:            Tue Aug 21 17:25:29 2018
  OS/Arch:          linux/amd64
  Experimental:     false
# docker info
常用操作
docker search : 搜索镜像
# docker search nginx
docker pull: 下载镜像到本地
# docker pull nginx:1.14-alpine-perl
# docker pull busybox:latest
# docker image pull nginx:1.14-alpine-perl
# docker
docker images: 列出本地镜像
# docker images
REPOSITORY          TAG                 IMAGE ID            CREATED             SIZE
nginx               1.14-alpine-perl    a47b6006585d        2 weeks ago         51.6MB
busybox             latest              e1ddd7948a1c        8 weeks ago         1.16MB
# docker image rm a47b6006585d  # 删除镜像
# docker images
REPOSITORY          TAG                 IMAGE ID            CREATED             SIZE
busybox             latest              e1ddd7948a1c        8 weeks ago         1.16MB
# docker image ls --no-trunc # 列出完整image id信息
REPOSITORY          TAG                 IMAGE ID                                                                  CREATED             SIZE
nginx               1.14-alpine-perl    sha256:a47b6006585d03b999ee55c6eec4331430fb2bcddb5ce8f76f294cc997482ca2   2 weeks ago         51.6MB
busybox             latest              sha256:e1ddd7948a1c31709a23cc5b7dfe96e55fc364f90e1cebcde0773a1b5a30dcda   8 weeks ago         1.16MB
# docker container ls # 列出所有容器
# docker ps: 列出所有容器
# docker images: 列出所有镜像
# docker create: 创建新的container
# docker start: Start one or more stopped contaners
# docker run: Run a command in a new container
# docker attacth: Attach to a running container
# docker ps: List containers
apline: 能够能程序提供基础环境,但是体积非常小,所以在生产环境中不建议使用apline版;
busybox: 能够用一个busybox实现linux系统的多个命令,当链接busybox为ls 时,它可以执行ls命令;
链接成pwd时,可以实现pwd命令。kernel+busybox可以实现一个微linux系统;
所畏的android系统也是linux+busybox+jvm所运行的系统;
容器使用
# docker run --name b2 -it busybox:latest
/ #
# docker run --name b1 -it busybox:latest
/ # mkdir /data/www -p
/ # vi /data/www/index.html
<h1>www.ssjinyao.com</h1>
/ # httpd -f -h /data/www/
# docker inspect b1 # 查看 docker 容器的启动信息
# 在另一个终端中访问  curl 172.17.0.2
<h1>www.ssjinyao.com</h1>
docker 再启动
# docker ps -a
CONTAINER ID        IMAGE               COMMAND             CREATED             STATUS                       PORTS               NAMES
57c80d23f0e5        busybox:latest      "sh"                6 minutes ago       Exited (130) 4 minutes ago                       b1
# docker container start -i -a b1
docker 容器终止
# docker kill b1
# docker stop b1
docker 启动nginx镜像
# docker run --name web1 -d nginx:1.14-alpine-perl
# docker inspect web1
# [root@ssjinyao-node1:~]# curl 172.17.0.2
<!DOCTYPE html>
<html>
<head>
<title>Welcome to nginx!</title>
<style>
    body {
        width: 35em;
        margin: 0 auto;
        font-family: Tahoma, Verdana, Arial, sans-serif;
    }
</style>
</head>
<body>
<h1>Welcome to nginx!</h1>
<p>If you see this page, the nginx web server is successfully installed and
working. Further configuration is required.</p>

<p>For online documentation and support please refer to
<a href="http://nginx.org/">nginx.org</a>.<br/>
Commercial support is available at
<a href="http://nginx.com/">nginx.com</a>.</p>

<p><em>Thank you for using nginx.</em></p>
</body>
</html>
注: 一个容器就是为了运行一个程序,如果程序跑后台运行,那么容器认为程序终止了。
因为,如果程序在容器运行在后台,那么程序一启动,容器就会终止。
直接搜索下载镜像并运行
# docker run --name kvstor1 -d redis:4-alpine
绕过容器的边界,交互式接入进去
# docker exec -it  kvstor1 /bin/sh
/data # ps
PID   USER     TIME  COMMAND
    1 redis     0:00 redis-server
   12 root      0:00 /bin/sh
   16 root      0:00 ps
查看docker启动容器后的日志信息
# docker logs web1
docker event state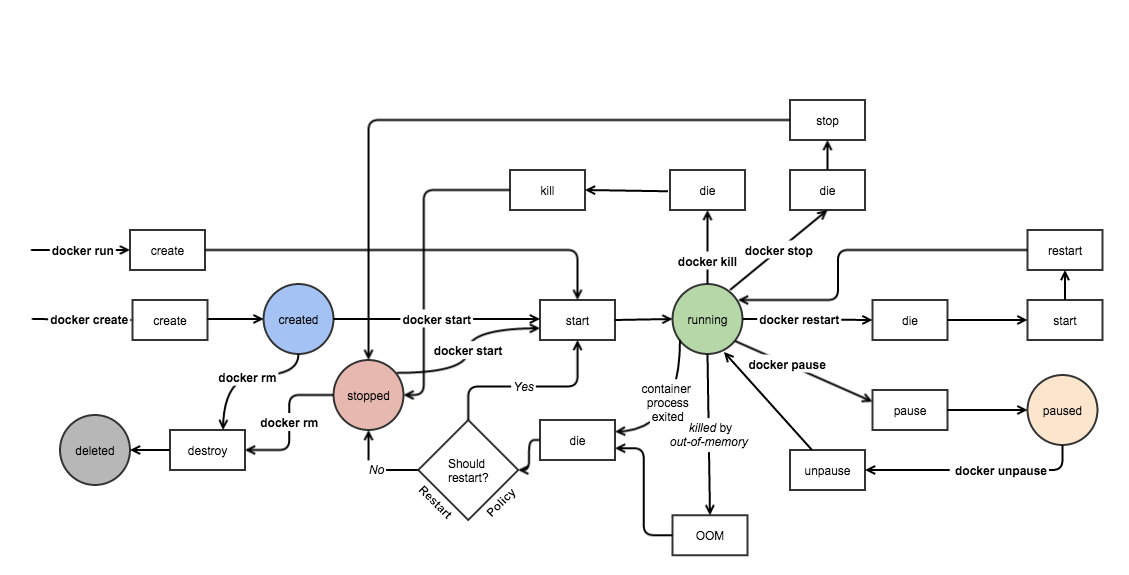
Docker 镜像的使用与管理
Docker:码头工人
一般我们部署应用程序时,我们都是散装的。而docker可以进行集装的;
Docker 镜像含有启动容器所需要的文件系统及其内容,因此,其用于创建并启动docker容器
采用分层构建机制,最底层为bootfs,其之为rootfs
    bootfs: 用于系统引导的文件系统,包括bootloader和kernel,
        容器启动完成后会被卸载以节约内在资源
    rootfs: 位于bootfs之上,表现为docker容器的根文件系统:
        传统模式中,系统启动之时,内核挂载rootfs时会首先将其挂载为"只读"模式,
        完整性自检后将其重新挂载为读写模式;
        docker中,rootfs由内核挂载为"只读"模式,而后通过"联合挂载"技术额外提供一个可写层;
Aufs: advnaced multi-layered unification filesystem: 高级多层统一文件系统
CentOS 为求稳定,不整合此文件系统
overlayfs 从3.18版本开始被合并到Linux内核;
# docker info # 可以看出前端用的文件系统是overlay2,而后端用的是xfs
 Storage Driver: overlay2
 Backing Filesystem: xfs
Docker Registry
启动容器时,docker daemon 会试图从本地获取镜像; 本地镜像不存在时 将Registry 中的镜像下载保存到本地;
Docker Registry 分类
Registry用于保存docker镜像,包括镜像的层次结构和元数据;
用户可自建Registry,也可以用官方的Docker Hub
分类
Sponsor Registry: 第三方的registry, 供客户和Docker社区使用
Mirror Registry: 第三方的registry,只让客户使用
Vendor Registry: 由发布Docker镜像的供应商提供的registry
Private Rgeistry: 通过设有防火墙和客外的安全层的私有实体提供的registry
Repository
由某特定的docker镜像的所有迭代版本组成的镜像仓库
一个Registry中可能存在多个Repository
    Repository 可分为"顶层仓库" 和 "用户仓库"
    用户仓库名称格式为"用户名/仓库名"
每个仓库可以包含多个Tag(标签),每个标签对应一个镜像
Index
维护用户帐户、镜像的校验以及公共命名空间的信息;
相当于为Registry提    相当于为Registry提供了一个完成用户认证等功能
Docker Registry中的镜像通常由开发人员制作,而后推送至”公共”或”私有”Registry上保存;
供其他人员使用,例如”部署”到生产环境;
# docker pull registry>[:<prot>]/[<namespace>/]<name>:<tag>
quay.io 也可以下载多种镜像
# docker pull quay.io/coreos/flannel:v0.10.0-amd64 #指定站点pull镜像
镜像制作
镜像的生成途径
Dockerfile
基于容器制作
Docker Hub automated builds
| Namespace | Example( |
|---|---|
| organization | redhat/kubernets |
| login(user name) | alice/application, bob/application |
| role | devel/database, test/database, prod/database |
# docker container run --name busybox1 -it busybox
WARNING: IPv4 forwarding is disabled. Networking will not work.
/ #
/ #
/ # mkdir  -p /data/html
/ # echo "<h1>www.ssjinyao.com</h1>" > /data/html/index.html
暂时不关闭容器,再打开一个终端来制作镜像
# docker commit -p busybox1
# docker image ls
REPOSITORY               TAG                 IMAGE ID            CREATED             SIZE
<none>                   <none>              d5ab408117c0        8 seconds ago       1.16MB
redis                    4-alpine            db23f46600bc        2 weeks ago         30MB
nginx                    1.14-alpine-perl    a47b6006585d        2 weeks ago         51.6MB
busybox                  latest              e1ddd7948a1c        2 months ago        1.16MB
quay.io/coreos/flannel   v0.10.0-amd64       f0fad859c909        8 months ago        44.6MB
# 再给标签打标签
# docker tag d5ab408117c0 ssjinyao/httpd:v0.1.1-1
# docker image ls
REPOSITORY               TAG                 IMAGE ID            CREATED              SIZE
ssjinyao/httpd           v0.1.1-1            d5ab408117c0        About a minute ago   1.16MB
redis                    4-alpine            db23f46600bc        2 weeks ago          30MB
nginx                    1.14-alpine-perl    a47b6006585d        2 weeks ago          51.6MB
busybox                  latest              e1ddd7948a1c        2 months ago         1.16MB
quay.io/coreos/flannel   v0.10.0-amd64       f0fad859c909        8 months ago         44.6MB
# docker tag ssjinyao/httpd:v0.1.1-1 ssjinyao/httpd:latest
# docker image ls
REPOSITORY               TAG                 IMAGE ID            CREATED             SIZE
ssjinyao/httpd           latest              d5ab408117c0        3 minutes ago       1.16MB
ssjinyao/httpd           v0.1.1-1            d5ab408117c0        3 minutes ago       1.16MB
一个IMAGE ID 对应多个Tag时,删除 Tag 不会删除镜像,而像软链一下,删除链接
# docker image rm ssjinyao/httpd:latest
Untagged: ssjinyao/httpd:latest
# docker image ls
REPOSITORY               TAG                 IMAGE ID            CREATED             SIZE
ssjinyao/httpd           v0.1.1-1            d5ab408117c0        5 minutes ago       1.16MB
redis                    4-alpine            db23f46600bc        2 weeks ago         30MB
nginx                    1.14-alpine-perl    a47b6006585d        2 weeks ago         51.6MB
busybox                  latest              e1ddd7948a1c        2 months ago        1.16MB
quay.io/coreos/flannel   v0.10.0-amd64       f0fad859c909        8 months ago        44.6MB
# docker tag ssjinyao/httpd:v0.1.1-1 ssjinyao/httpd:latest
# docker images
REPOSITORY               TAG                 IMAGE ID            CREATED             SIZE
ssjinyao/httpd           latest              d5ab408117c0        6 minutes ago       1.16MB
ssjinyao/httpd           v0.1.1-1            d5ab408117c0        6 minutes ago       1.16MB
redis                    4-alpine            db23f46600bc        2 weeks ago         30MB
nginx                    1.14-alpine-perl    a47b6006585d        2 weeks ago         51.6MB
busybox                  latest              e1ddd7948a1c        2 months ago        1.16MB
quay.io/coreos/flannel   v0.10.0-amd64       f0fad859c909        8 months ago        44.6MB
制作镜像加入Command指令
# docker commit -a "ssjinyao" -c 'CMD ["/bin/httpd", "-f", "-h","/data/html"]' -p busybox1 ssjinyao/httpd:v0.1.1.1-2
# docker image ls
REPOSITORY               TAG                 IMAGE ID            CREATED             SIZE
ssjinyao/httpd           v0.1.1.1-2          0ec8103a1bb2        53 seconds ago      1.16MB
# docker run --name busybox2 ssjinyao/httpd:v0.1.1.1-2 # 肯据创建的镜像启动容器

# docker container ls
CONTAINER ID        IMAGE                       COMMAND                  CREATED             STATUS              PORTS               NAMES
27403687efa0        ssjinyao/httpd:v0.1.1.1-2   "/bin/httpd -f -h /d…"   30 seconds ago      Up 29 seconds                           busybox2
6373ae374a7a        redis:4-alpine              "docker-entrypoint.s…"   4 days ago          Up 4 days           6379/tcp            kvstor1
a5ffdd373b90        nginx:1.14-alpine-perl      "nginx -g 'daemon of…"   4 days ago          Up 4 days           80/tcp              web1
# docker inspect # 查看容器信息
# curl  172.17.0.4
<h1>www.ssjinyao.com</h1>
在 docker hub 建立帐号,并创建REPOSITORY
# docker login -u ssjinyao
Password:
WARNING! Your password will be stored unencrypted in /root/.docker/config.json.
Configure a credential helper to remove this warning. See
https://docs.docker.com/engine/reference/commandline/login/#credentials-store

Login Succeeded
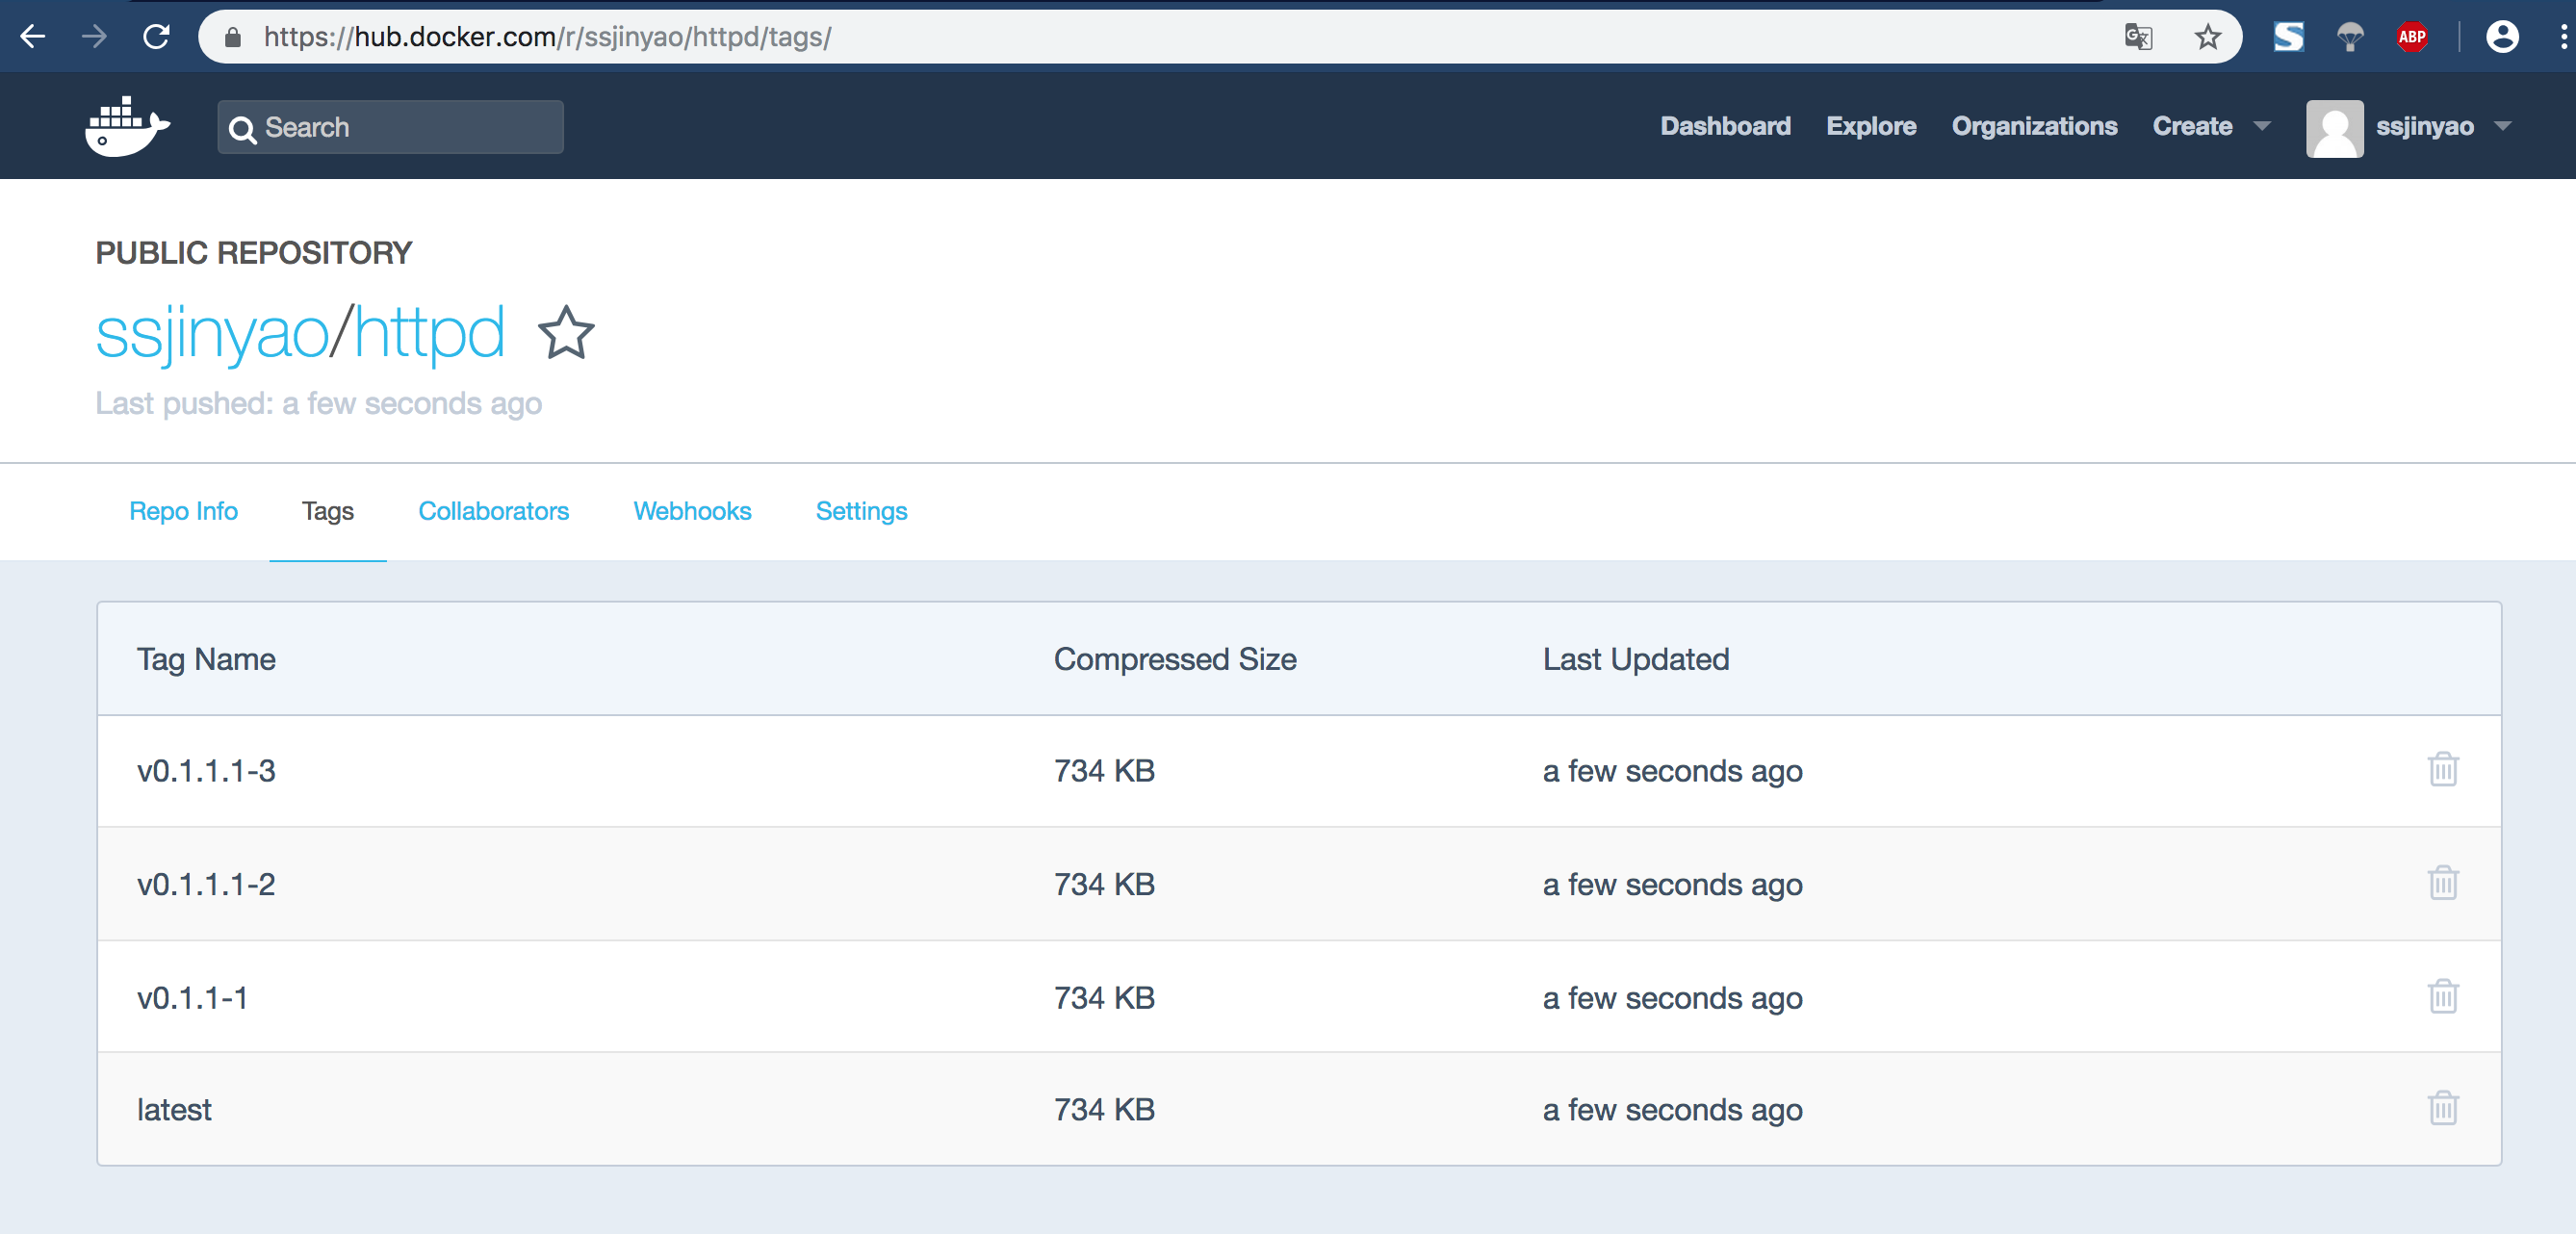
往 hub.docker.com 上面推镜像
# docker push ssjinyao/httpd
可以看到,上传的镜像
国内比较常用的镜像地址
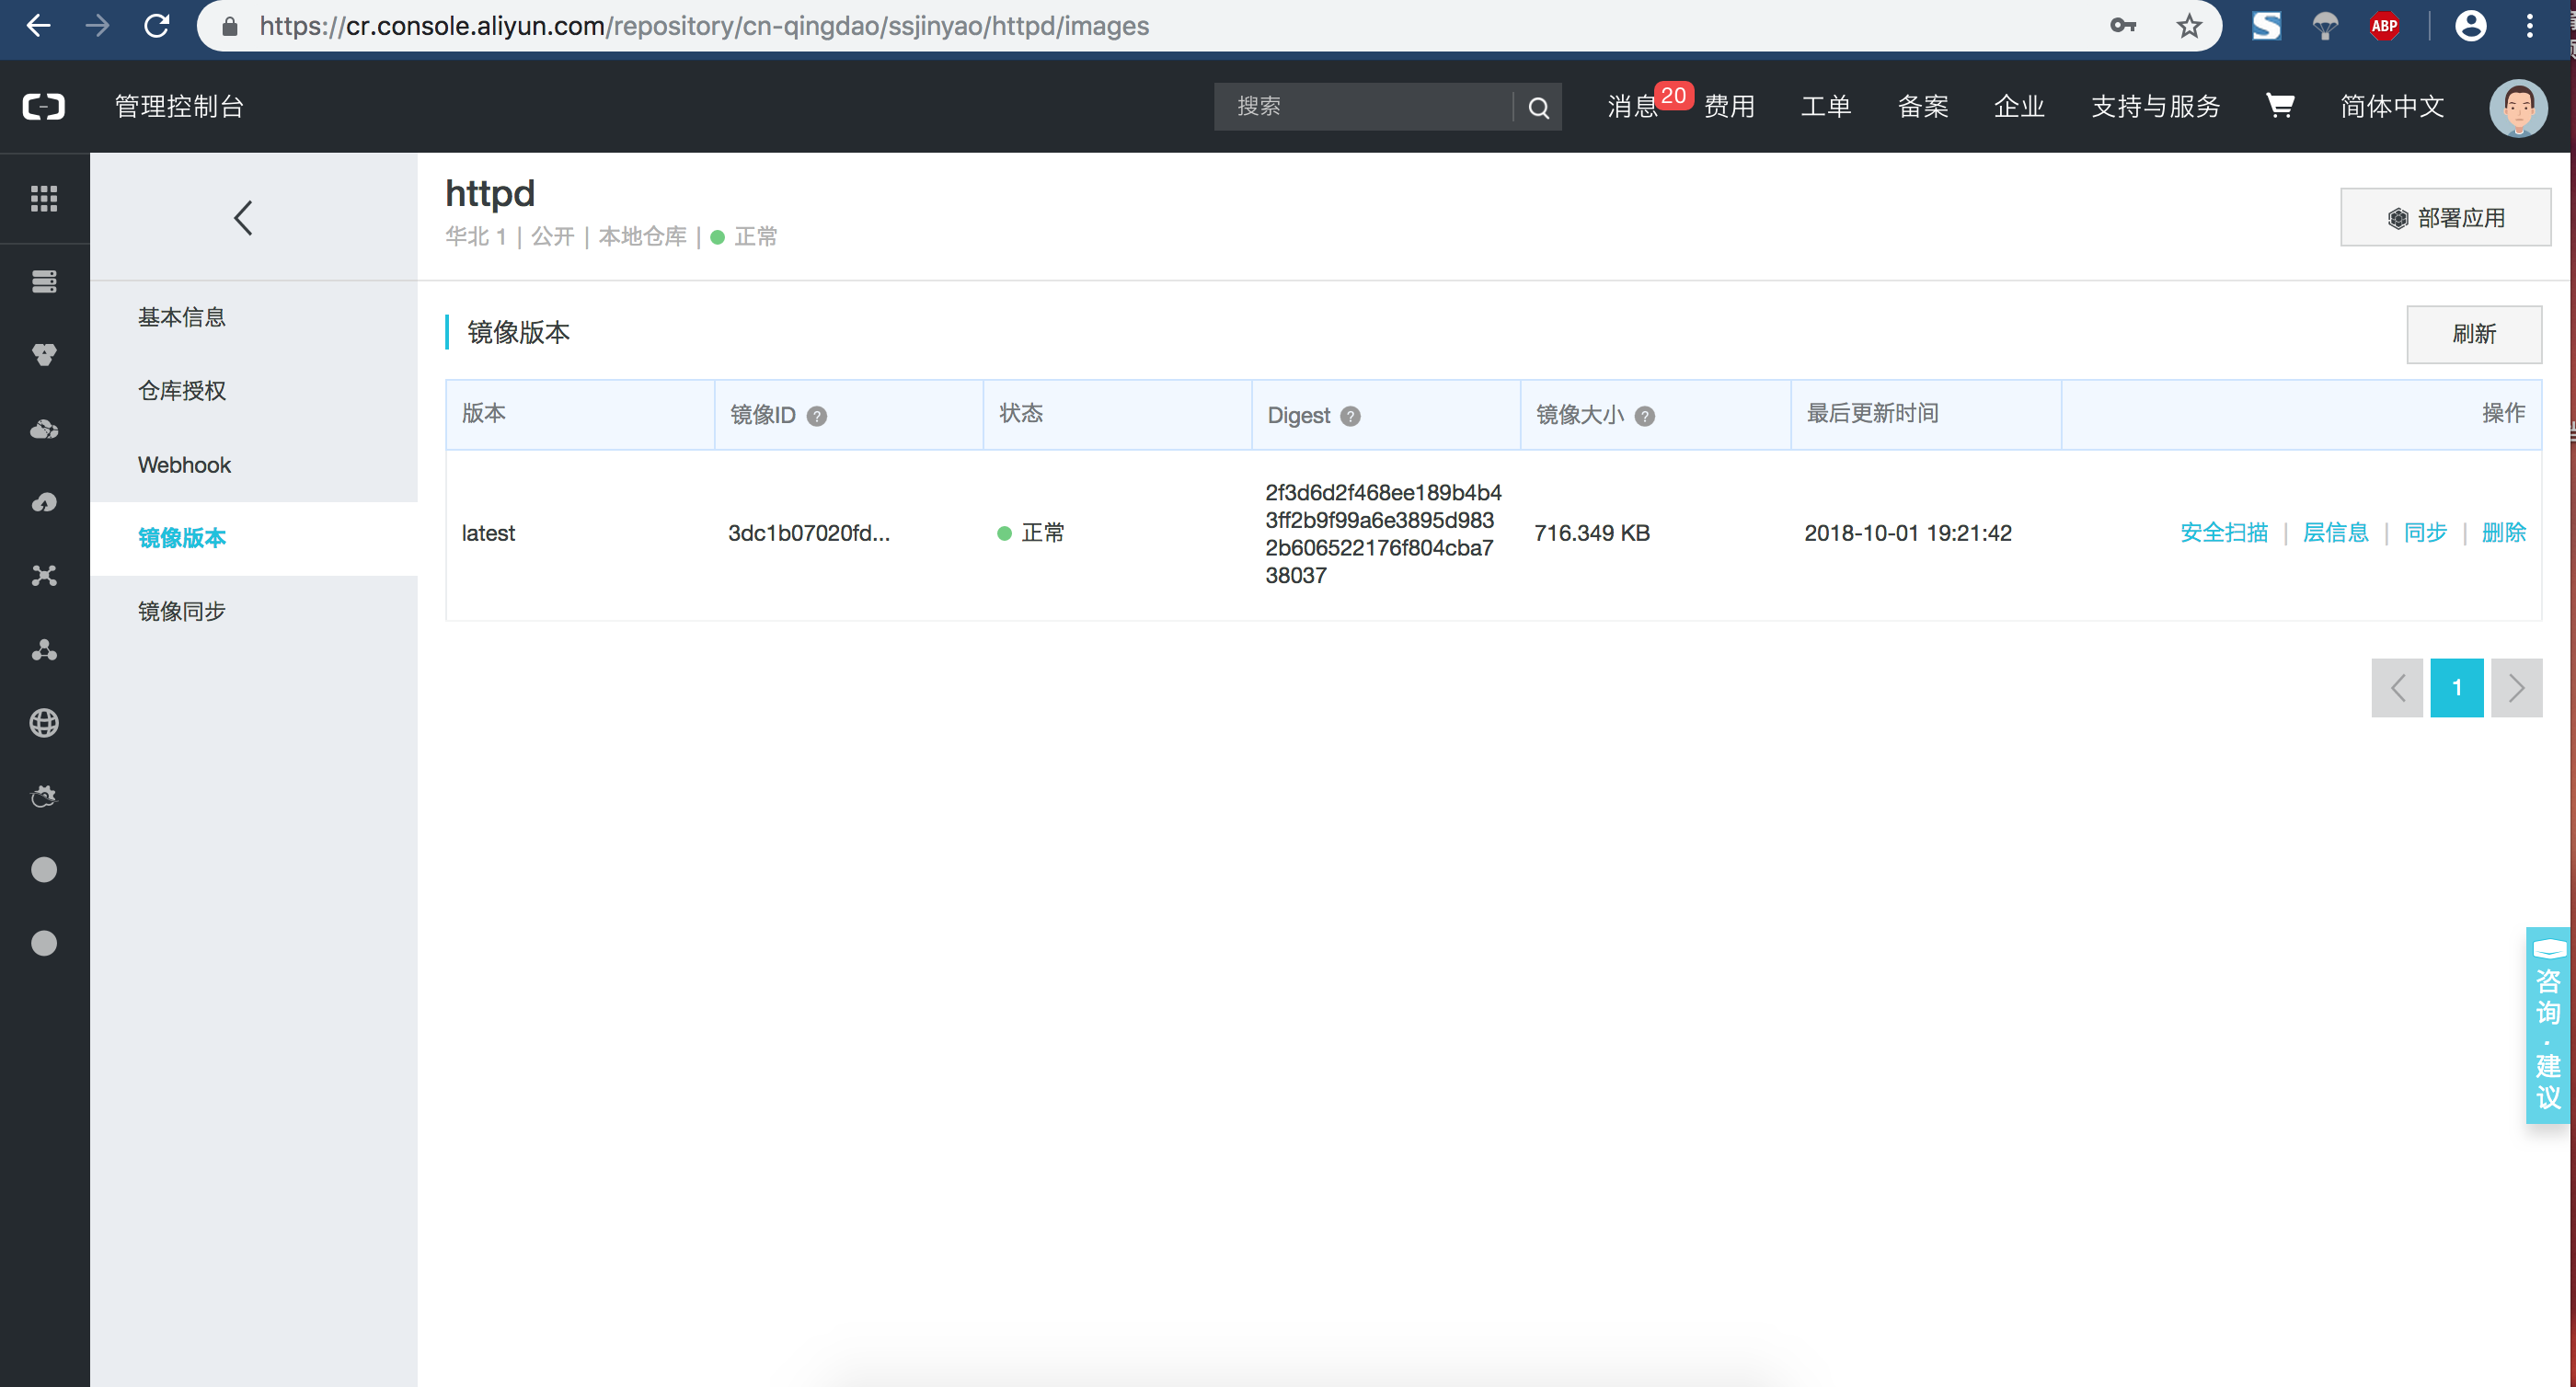
在阿里云docker 镜像站点中创建REPOSITORY
上传本地的镜像
# docker tag ssjinyao/httpd:v0.1.1.1-2 registry.cn-qingdao.aliyuncs.com/ssjinyao/httpd
# docker logout
Removing login credentials for https://index.docker.io/v1/

# docker login --username=ssjinyao registry.cn-qingdao.aliyuncs.com
Password:
WARNING! Your password will be stored unencrypted in /root/.docker/config.json.
Configure a credential helper to remove this warning. See
https://docs.docker.com/engine/reference/commandline/login/#credentials-store

Login Succeeded
# docker push registry.cn-qingdao.aliyuncs.com/ssjinyao/httpd
docker 镜像的导入和导出
# docker save -o ssjinyao-busybox-image.gz ssjinyao/httpd:v0.1.1.1-3 ssjinyao/httpd:v0.1.1.1-2
# 将镜像复制到另一台服务器
# scp ssjinyao-busybox-image.gz root@node2:/root/
ssjinyao-busybox-image.gz                                                  100% 1370KB  23.8MB/s   00:00
在另一台服务器上导入镜像
# docker load -i ssjinyao-busybox-image.gz
f9d9e4e6e2f0: Loading layer  1.378MB/1.378MB
e6baf59e35e7: Loading layer  4.608kB/4.608kB
# docker image ls
REPOSITORY          TAG                 IMAGE ID            CREATED             SIZE
ssjinyao/httpd      v0.1.1.1-3          cfa66f44c384        About an hour ago   1.16MB
ssjinyao/httpd      v0.1.1.1-2          3dc1b07020fd        About an hour ago   1.16MB
# docker run --name busybox  ssjinyao/httpd:v0.1.1.1-2
# 再开启一个终端
# # docker inspect busybox | grep "IPAddress"
            "SecondaryIPAddresses": null,
            "IPAddress": "172.17.0.2",
                    "IPAddress": "172.17.0.2",
# curl  172.17.0.2
<h1>www.ssjinyao.com</h1>
虚拟化网络管理
6种名称空间: UTS, User, Mount, IPC, Pid, Net;
Linux 内核支持二层和三层设备的模拟;
OVS: Open VSwitch;
# yum -y install bridge-utils
# brctl show
bridge name    bridge id        STP enabled    interfaces
docker0        8000.024288c640ef    no        veth5097b16
# ip link show #可以看到docker虚拟网卡信
在同一台服务器上启动两个容器
# docker start 27403687efa0
# docker container run --name busybox3 -it ssjinyao/httpd:v0.1.1.1-3
# 查看两个容器间基于nat的通信
# docker exec -it busybox2 /bin/sh
/ # wget -O - -q http://172.17.0.5
<h1>www.ssjinyao.com</h1>
{User,Mount,Pid}, {User,Mount,Pid} —> 共享{UTS,Net,IPC}
让容器使用管理宿主机的网络名称空间
# docker network inspect bridge
ip 名称空间管理
# yum -y install iproute
# ip netns help
Usage: ip netns list
       ip netns add NAME
       ip netns set NAME NETNSID
       ip [-all] netns delete [NAME]
       ip netns identify [PID]
       ip netns pids NAME
       ip [-all] netns exec [NAME] cmd ...
       ip netns monitor
       ip netns list-id
# ip netns add r1
# ip netns add r2
# ip netns exec r1 ifconfig -a
# ip link add name veth1.1 type veth peer name veth1.2
# ip link show | grep veth1
34: veth1.2@veth1.1: <BROADCAST,MULTICAST,M-DOWN> mtu 1500 qdisc noop state DOWN mode DEFAULT qlen 1000
35: veth1.1@veth1.2: <BROADCAST,MULTICAST,M-DOWN> mtu 1500 qdisc noop state DOWN mode DEFAULT qlen 1000
# ip link set dev veth1.2 netns r1 # 将设veth1.2 称到名称空间r1 中
# ip netns exec  r1 ifconfig -a
lo: flags=8<LOOPBACK>  mtu 65536
        loop  txqueuelen 1  (Local Loopback)
        RX packets 0  bytes 0 (0.0 B)
        RX errors 0  dropped 0  overruns 0  frame 0
        TX packets 0  bytes 0 (0.0 B)
        TX errors 0  dropped 0 overruns 0  carrier 0  collisions 0

veth1.2: flags=4098<BROADCAST,MULTICAST>  mtu 1500
        ether da:2a:32:c9:1e:e2  txqueuelen 1000  (Ethernet)
        RX packets 0  bytes 0 (0.0 B)
        RX errors 0  dropped 0  overruns 0  frame 0
        TX packets 0  bytes 0 (0.0 B)
        TX errors 0  dropped 0 overruns 0  carrier 0  collisions 0
# ip netns exec r1 ip link set dev veth1.2 name eth0 # 将名称空间中的veth1.2更名为eth0
# ip netns exec  r1 ifconfig -a
eth0: flags=4098<BROADCAST,MULTICAST>  mtu 1500
        ether da:2a:32:c9:1e:e2  txqueuelen 1000  (Ethernet)
        RX packets 0  bytes 0 (0.0 B)
        RX errors 0  dropped 0  overruns 0  frame 0
        TX packets 0  bytes 0 (0.0 B)
        TX errors 0  dropped 0 overruns 0  carrier 0  collisions 0

lo: flags=8<LOOPBACK>  mtu 65536
        loop  txqueuelen 1  (Local Loopback)
        RX packets 0  bytes 0 (0.0 B)
        RX errors 0  dropped 0  overruns 0  frame 0
        TX packets 0  bytes 0 (0.0 B)
        TX errors 0  dropped 0 overruns 0  carrier 0  collisions 0
# ifconfig veth1.1 10.1.0.1/24 up # 激活网卡veth1.1
# ip netns exec r1 ifconfig eth0 10.1.0.2/24 up # 激活r1名称空间中的 eth0
# ip netns exec r1 ifconfig
eth0: flags=4163<UP,BROADCAST,RUNNING,MULTICAST>  mtu 1500
        inet 10.1.0.2  netmask 255.255.255.0  broadcast 10.1.0.255
        inet6 fe80::d82a:32ff:fec9:1ee2  prefixlen 64  scopeid 0x20<link>
        ether da:2a:32:c9:1e:e2  txqueuelen 1000  (Ethernet)
        RX packets 8  bytes 648 (648.0 B)
        RX errors 0  dropped 0  overruns 0  frame 0
        TX packets 8  bytes 648 (648.0 B)
        TX errors 0  dropped 0 overruns 0  carrier 0  collisions 0

# ping 10.1.0.2
PING 10.1.0.2 (10.1.0.2) 56(84) bytes of data.
64 bytes from 10.1.0.2: icmp_seq=1 ttl=64 time=0.945 ms
64 bytes from 10.1.0.2: icmp_seq=2 ttl=64 time=0.061 ms
# ip link set dev veth1.1 netns r2 # 将 veth1.1 移到名称空间r2中
# ip netns exec r2 ifconfig veth1.1 10.1.0.3/24 up # 启用r2名称空间中的veth1.1
# ip netns exec r2 ping 10.1.0.2 # 在名称空间r2中ping 名称空间r1的eth0绑定的ip地址
PING 10.1.0.2 (10.1.0.2) 56(84) bytes of data.
64 bytes from 10.1.0.2: icmp_seq=1 ttl=64 time=0.214 ms
64 bytes from 10.1.0.2: icmp_seq=2 ttl=64 time=0.080 ms

--rm  容器停止后,将容器删除
# docker run --name t1 -it --network bridge -h www.ssjinyao.com --rm busybox:latest
/ # hostname
www.ssjinyao.com
/ # ping www.ssjinyao.com
PING www.ssjinyao.com (172.17.0.6): 56 data bytes
64 bytes from 172.17.0.6: seq=0 ttl=64 time=0.094 ms
--- www.ssjinyao.com ping statistics ---
1 packets transmitted, 1 packets received, 0% packet loss
round-trip min/avg/max = 0.094/0.094/0.094 ms
/ # cat /etc/hosts
127.0.0.1    localhost
::1    localhost ip6-localhost ip6-loopback
fe00::0    ip6-localnet
ff00::0    ip6-mcastprefix
ff02::1    ip6-allnodes
ff02::2    ip6-allrouters
172.17.0.6    www.ssjinyao.com www
/ # cat /etc/resolv.conf
# Generated by NetworkManager
search localdomain
nameserver 10.180.66.2
只要配置了正确的域名服务器,可以正解的解析
/ # nslookup -type=A nas.ssjinyao.com
Server:        10.180.66.2
Address:    10.180.66.2:53

Non-authoritative answer:
Name:    nas.ssjinyao.com
Address: 47.104.201.165
# docker run --name t1 -it --network bridge -h www.ssjinyao.com --dns 114.114.114.114 --dns 8.8.8.8 --rm busybox:latest
/ # cat /etc/resolv.conf
search localdomain
nameserver 114.114.114.114
nameserver 8.8.8.8
/ # hostname
www.ssjinyao.com
# docker run --name t1 -it --network bridge -h t1.ssjinyao.com --dns 114.114.114.114 --dns-search ssjinyao.com --add-host www.ssjinyao.com:1.1.1.1 --rm busybox:latest
/ # cat /etc/hosts
127.0.0.1    localhost
::1    localhost ip6-localhost ip6-loopback
fe00::0    ip6-localnet
ff00::0    ip6-mcastprefix
ff02::1    ip6-allnodes
ff02::2    ip6-allrouters
1.1.1.1    www.ssjinyao.com
172.17.0.6    t1.ssjinyao.com t1
将容器的端口进行暴露
# docker run --name myweb --rm -p 80 ssjinyao/httpd:v0.1.1.1-2
# docker container ps
CONTAINER ID        IMAGE                       COMMAND                  CREATED             STATUS              PORTS                   NAMES
97212485437e        ssjinyao/httpd:v0.1.1.1-3   "/bin/httpd -f -h /d…"   4 minutes ago       Up 4 minutes        0.0.0.0:32773->80/tcp   myweb

Opening inbound communication
-p 选项的使用格式
    -p <containerPort>
    将指定的容器端口映射至主机所有地址的一个动态端口;
    -p <hostPort>:<containerPort>
    将容器端口<containerPort>映射至指定的主机端口<hostPort>
    -p <ip>::<containerPort>
    将指定的容器端口<containerPort>映射至主机指定<ip>的端口<hostPort>
# docker run --name myweb --rm -p 10.180.66.11:8080:80 ssjinyao/httpd:v0.1.1.1-3
# docker port myweb
80/tcp -> 10.180.66.11:8080
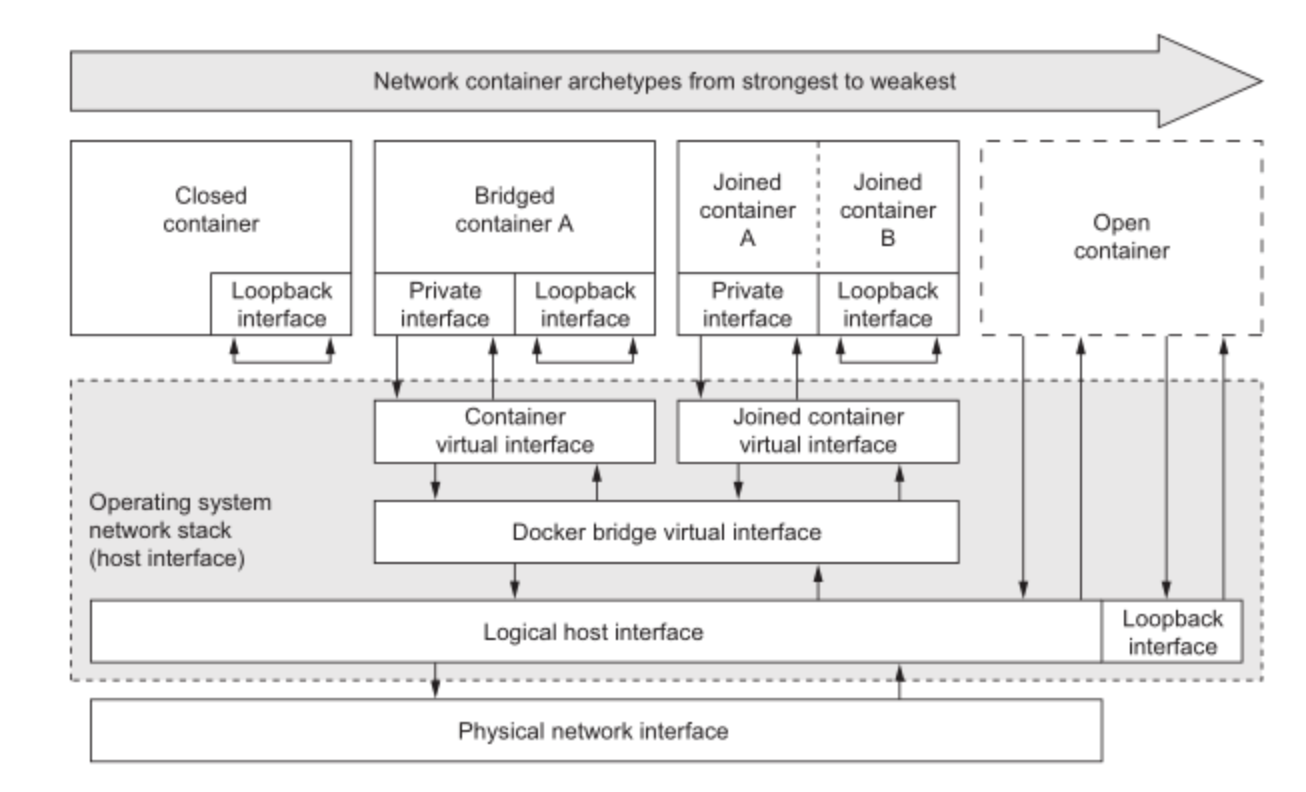
Joined container(联盟式容器)
共享b1容器的网络
# docker run --name b1 -it --rm busybox
# docker run --name b2 --network container:b1 -it --rm busybox
/ # ifconfig
eth0      Link encap:Ethernet  HWaddr 02:42:AC:11:00:02
          inet addr:172.17.0.2  Bcast:172.17.255.255  Mask:255.255.0.0
          UP BROADCAST RUNNING MULTICAST  MTU:1500  Metric:1
          RX packets:8 errors:0 dropped:0 overruns:0 frame:0
          TX packets:0 errors:0 dropped:0 overruns:0 carrier:0
          collisions:0 txqueuelen:0
          RX bytes:648 (648.0 B)  TX bytes:0 (0.0 B)

lo        Link encap:Local Loopback
          inet addr:127.0.0.1  Mask:255.0.0.0
          UP LOOPBACK RUNNING  MTU:65536  Metric:1
          RX packets:0 errors:0 dropped:0 overruns:0 frame:0
          TX packets:0 errors:0 dropped:0 overruns:0 carrier:0
          collisions:0 txqueuelen:1
          RX bytes:0 (0.0 B)  TX bytes:0 (0.0 B)

/ # echo "Joined container" > /tmp/index.html
/ # httpd -h /tmp/
/ # netstat  -tnl
Active Internet connections (only servers)
Proto Recv-Q Send-Q Local Address           Foreign Address         State
tcp        0      0 :::80                   :::*                    LISTEN
/ # wget -O - -q 127.0.0.1
Joined container
共享宿主机网络
# docker run --name b2 --network host -it --rm busybox
/ #
/ # ifconfig
docker0   Link encap:Ethernet  HWaddr 02:42:88:C6:40:EF
          inet addr:172.17.0.1  Bcast:172.17.255.255  Mask:255.255.0.0
          inet6 addr: fe80::42:88ff:fec6:40ef/64 Scope:Link
          UP BROADCAST MULTICAST  MTU:1500  Metric:1
          RX packets:347 errors:0 dropped:0 overruns:0 frame:0
          TX packets:371 errors:0 dropped:0 overruns:0 carrier:0
          collisions:0 txqueuelen:0
          RX bytes:35796 (34.9 KiB)  TX bytes:40247 (39.3 KiB)

ens33     Link encap:Ethernet  HWaddr 00:0C:29:F8:70:D5
          inet addr:10.180.66.11  Bcast:10.180.66.255  Mask:255.255.255.0
          inet6 addr: fe80::20c:29ff:fef8:70d5/64 Scope:Link
          UP BROADCAST RUNNING MULTICAST  MTU:1500  Metric:1
          RX packets:123421 errors:0 dropped:0 overruns:0 frame:0
          TX packets:39524 errors:0 dropped:0 overruns:0 carrier:0
          collisions:0 txqueuelen:1000
          RX bytes:81346864 (77.5 MiB)  TX bytes:8253033 (7.8 MiB)

lo        Link encap:Local Loopback
          inet addr:127.0.0.1  Mask:255.0.0.0
          inet6 addr: ::1/128 Scope:Host
          UP LOOPBACK RUNNING  MTU:65536  Metric:1
          RX packets:80 errors:0 dropped:0 overruns:0 frame:0
          TX packets:80 errors:0 dropped:0 overruns:0 carrier:0
          collisions:0 txqueuelen:1
          RX bytes:6944 (6.7 KiB)  TX bytes:6944 (6.7 KiB)
更改docker0 桥的ip地址
# vim /etc/docker/daemon.json
{
    "registry-mirrors":["https://registry.docker-cn.com"],
    "bip": "10.0.0.1/16",
    "hosts": ["tcp://0.0.0.0:2375","unix:///var/run/docker.sock"]
}
# ifconfig
docker0: flags=4099<UP,BROADCAST,MULTICAST>  mtu 1500
        inet 10.0.0.1  netmask 255.255.0.0  broadcast 10.0.255.255
        inet6 fe80::42:88ff:fec6:40ef  prefixlen 64  scopeid 0x20<link>
        ether 02:42:88:c6:40:ef  txqueuelen 0  (Ethernet)
        RX packets 347  bytes 35796 (34.9 KiB)
        RX errors 0  dropped 0  overruns 0  frame 0
        TX packets 371  bytes 40247 (39.3 KiB)
        TX errors 0  dropped 0 overruns 0  carrier 0  collisions 0
# docker -H 10.180.66.11:2375 image ls
创建网桥
# docker network create -d bridge --subnet "172.26.0.0/16" --gateway "172.26.0.1" mbr0
# ifconfig
br-76b59a5dfce3: flags=4099<UP,BROADCAST,MULTICAST>  mtu 1500
        inet 172.26.0.1  netmask 255.255.0.0  broadcast 172.26.255.255
        ether 02:42:ea:15:d6:9e  txqueuelen 0  (Ethernet)
        RX packets 0  bytes 0 (0.0 B)
        RX errors 0  dropped 0  overruns 0  frame 0
        TX packets 0  bytes 0 (0.0 B)
        TX errors 0  dropped 0 overruns 0  carrier 0  collisions 0
# ip link set dev br-76b59a5dfce3 name docker1
RTNETLINK answers: Device or resource busy
# ifconfig br-76b59a5dfce3 down
# ifconfig docker1 up
# ifconfig docker1 down  # 更改名称后默认docker 调用时会找不到docker1这个虚拟网卡
# ip link set dev docker1 name br-76b59a5dfce3
# docker run --name t1 -it --net mbr0 busybox:latest
/ # ifconfig
eth0      Link encap:Ethernet  HWaddr 02:42:AC:1A:00:02
          inet addr:172.26.0.2  Bcast:172.26.255.255  Mask:255.255.0.0
          UP BROADCAST RUNNING MULTICAST  MTU:1500  Metric:1
          RX packets:3 errors:0 dropped:0 overruns:0 frame:0
          TX packets:0 errors:0 dropped:0 overruns:0 carrier:0
          collisions:0 txqueuelen:0
          RX bytes:258 (258.0 B)  TX bytes:0 (0.0 B)
自定义docker0桥的网络属性信息: /etc/docker/daemon.json文件
{
    "bip": "192.168.1.5/24",
    "fixed-cidr": "10.20.0.0/16",
    "fixed-cidr-v6": "2001:db8::/64",
    "mtu": 1500,
    "default-gateway": "10.20.1.1",
    "default-gateway-v6": "2001:db8:abcd::89",
    "dns": ["10.20.1.2", "10.20.1.3"]
docker守护进程的C/S,其默认监听Unix SOcket格式的地址,/var/run/docker.sock;如果使用TCP套接字, /etc/docker/daemon.json:
“hosts”: [“tcp://0.0.0.0:2375”, “unix:///var/run/docker.sock”]