


整合Jenkins、GitLab和Ansible:实现多套集群Nginx配置生成与分发。 - 解决问题: 1. 强一致性同步:通过钩子触发同步,解决不一致问题; 2. 配置历史记录:记录人员变更配置,保留变更历史; 3. 快速回滚:利用版本控制和Ansible回滚实现配置迅速还原; 4. 自动检验变更:使用GitLab钩子触发重载,确保变更生效; 5. 提升同步速度和稳定性:优化同步机制,解决同步慢和中断问题; - 这方案有助于高效管理配置和确保Nginx集群稳定。适合DevOps和管理员,保障配置变更可控和Nginx稳定性。
[toc]
Jenkins+Gitlab+ansible实现Nginx配置集群分发
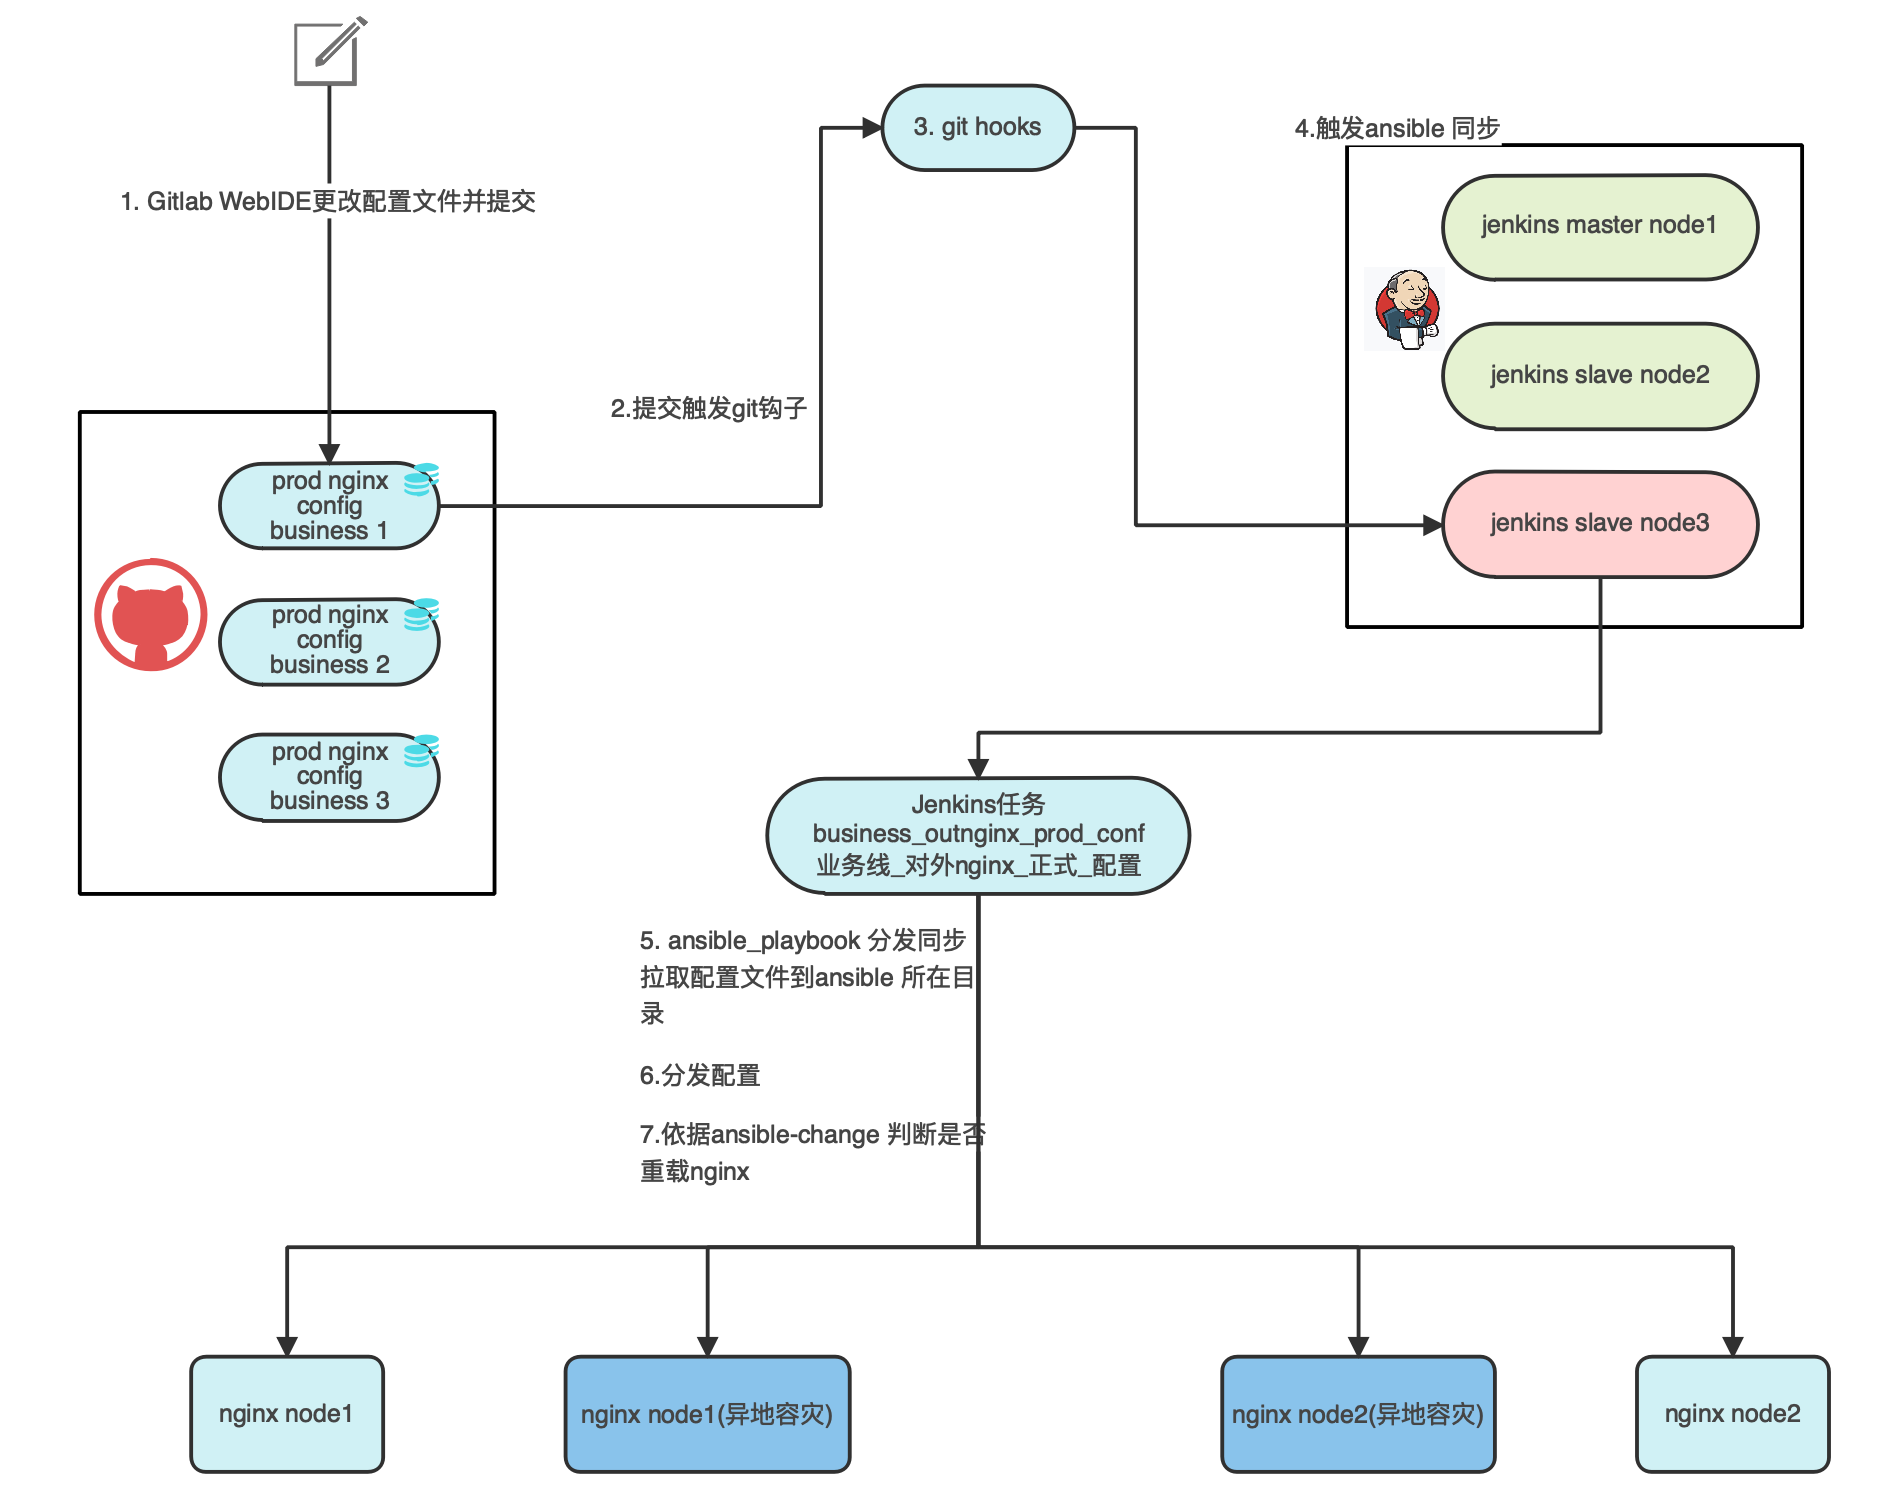
实现初衷
- 解决同步不一致问题,触发钩子强一致同步;
- 保留nginx配置文件的人员变更配置记录;
- 实现配置的快速回滚;
- 一次性检验配置文件是否变更,变更后触发重载;
- 解决同步慢同步中断,nginx触发重载未知等问题,优ansible分发逻辑;
Jenkins 主节点的安装这里不在说明,大家可以在网上查找相关的资料,这里不在说明
从节点加入集群
从节点安装配置
1. jdk安装
yum -y install java-1.8.0-openjdk java-1.8.0-openjdk-devel

2.安装ansible 工具安装
yum install ansible

3.创建用户信息,并加入root组(用于主从验证)
useradd produser
passwd produser
usermode -g root produser

4.修改/etc/sudiers在最后一行添加如下信息,实现免密执行命令否则从节点构建时会报错“no tty present and no askpass program specified”
 produser ALL=(root) NOPASSWD: ALL


5.新建从节点工作目录并增加权限
mkdir produser
chown -R produser.root produser/
加入从节点
可以用ssh-keygen 生成密码方便调用
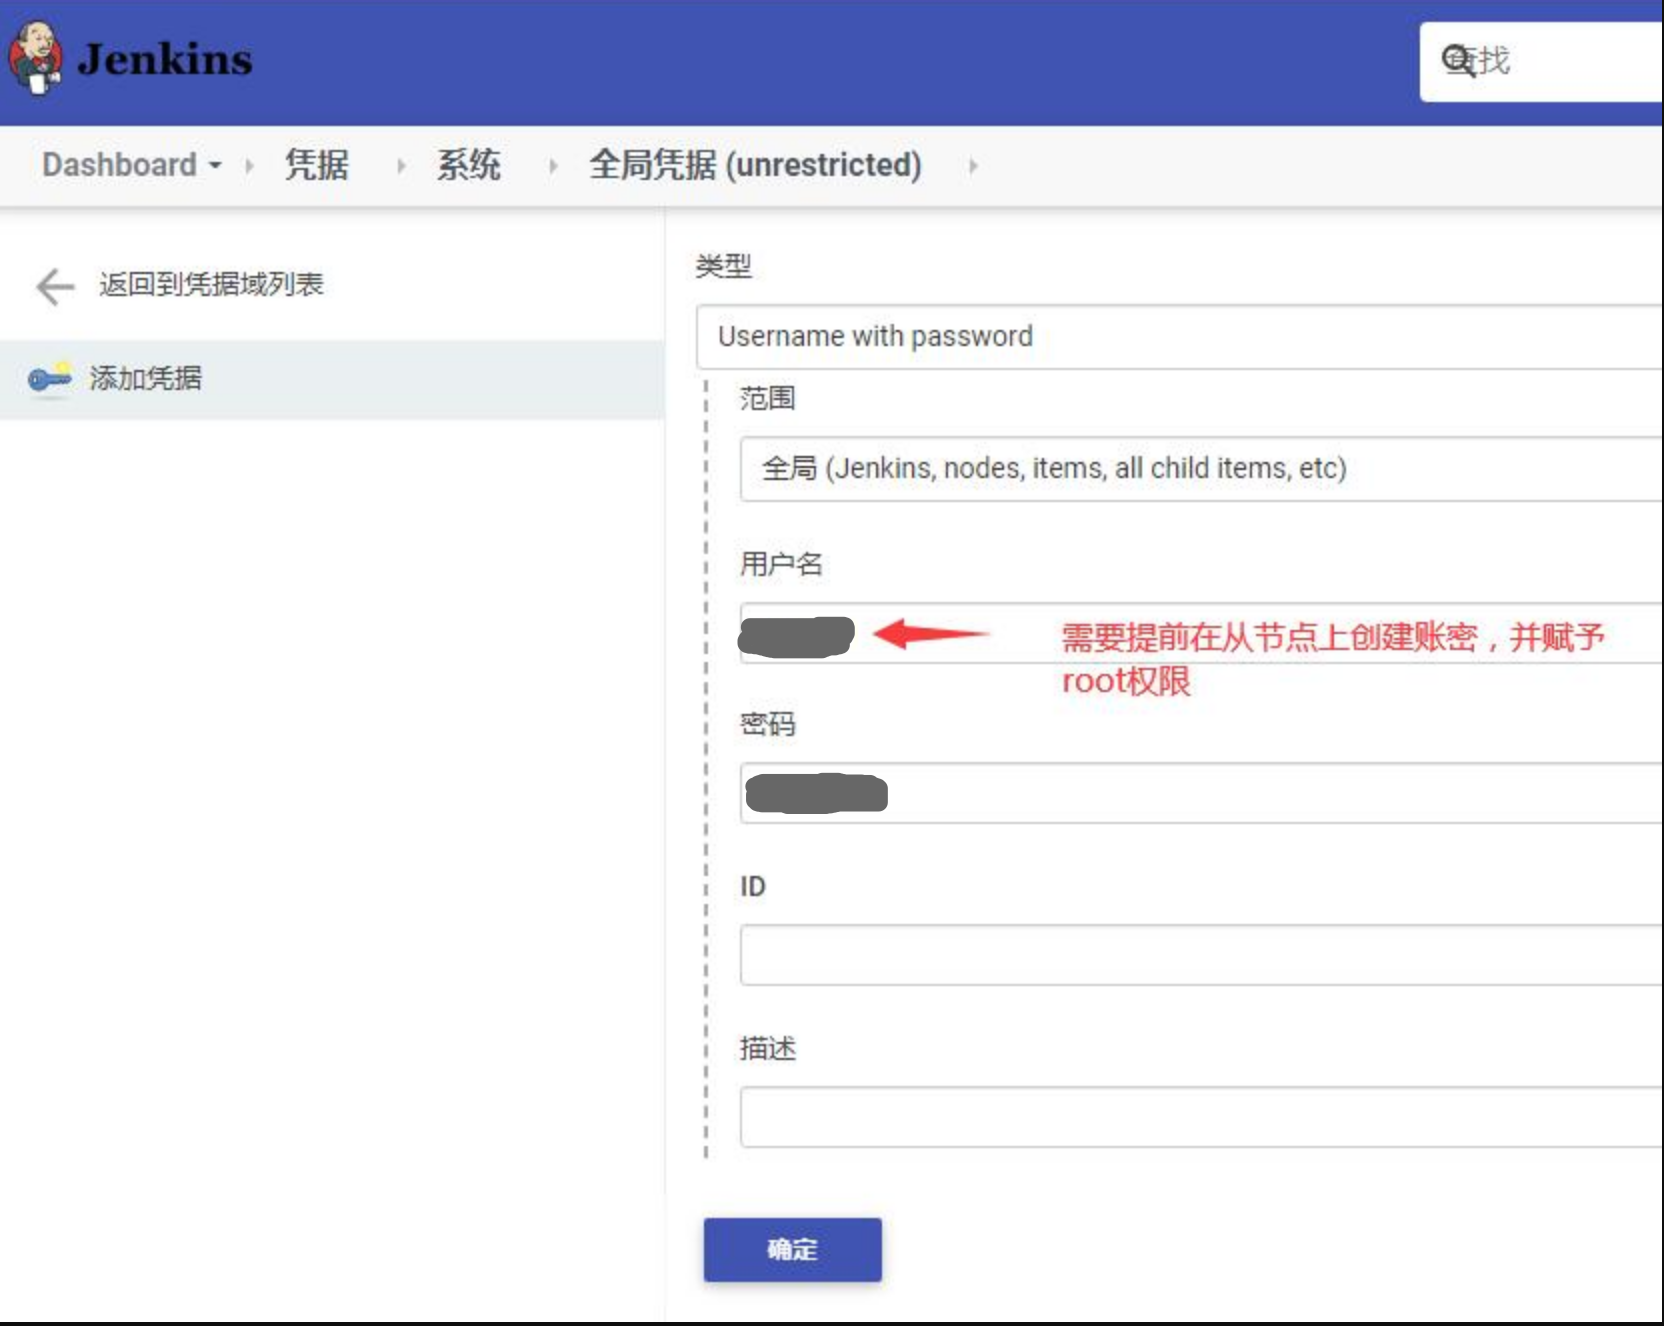
1. 添加从节点凭证信息
点击 ‘Manage’ ——-> ‘Manage Credentials’ ——->’全局凭据’——->’添加凭据’
把从节点新建的用户信息produser添加master主节点的凭据信息里
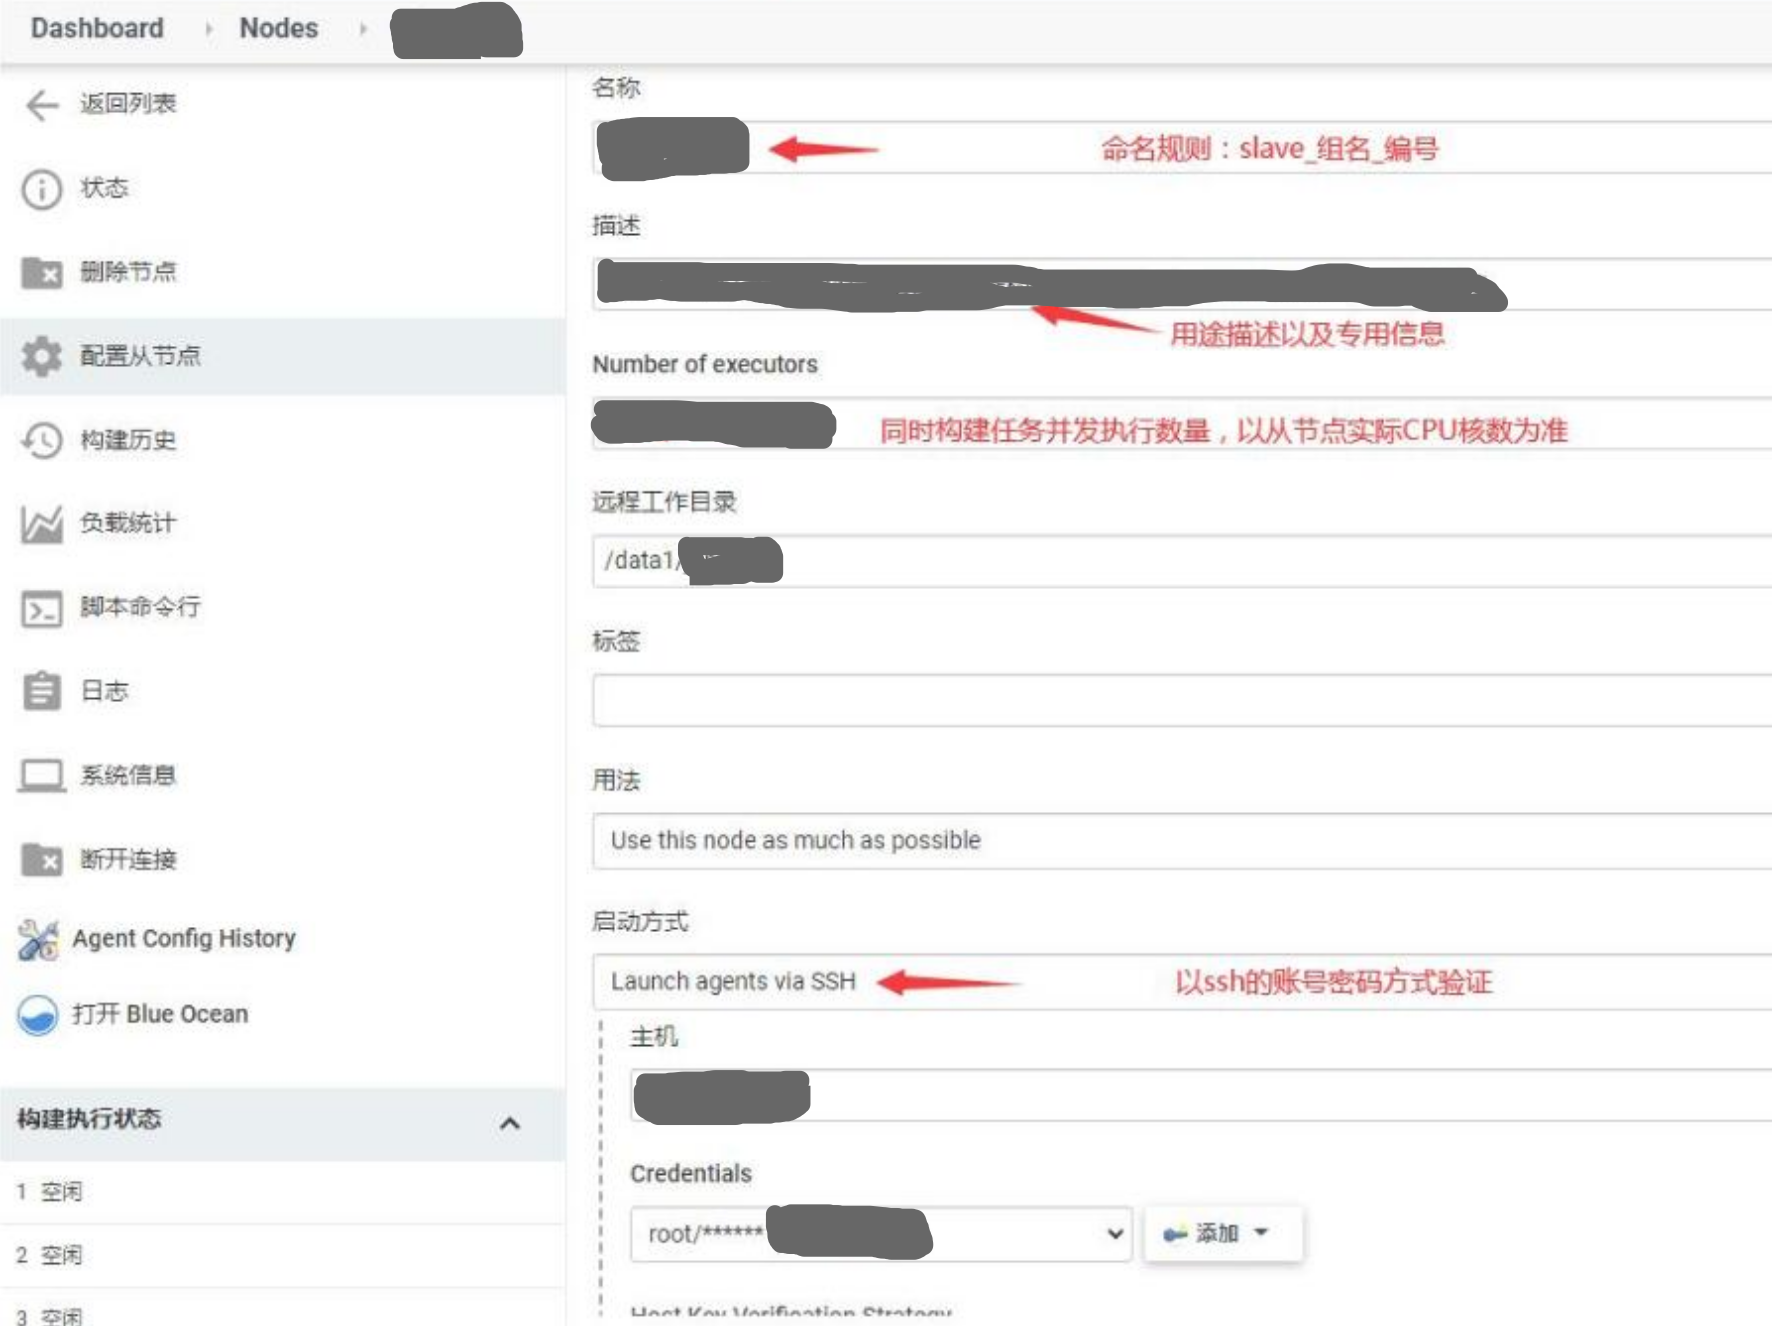
2. master主节点新建从节点信息配置
- master节点上要安装插件: Command Agent Launcher 和SSH Build Agents plugin
- 点击 ‘Manage’——->’Manage Nodes and Clouds’——->’新建节点’,配置节点名称然后勾选‘Permanent Agent’
- 新建slave节点的命名规则为:slave [组名] [编号], 示例:如运维组:slave_prodnode_01, ssh端口配置为从节点的
59521 - 新建slave节点的描述 项目需要写清楚用途、从节点归属,其中所构建的内容概要
启动从节点信息,注意查看日志信息报错
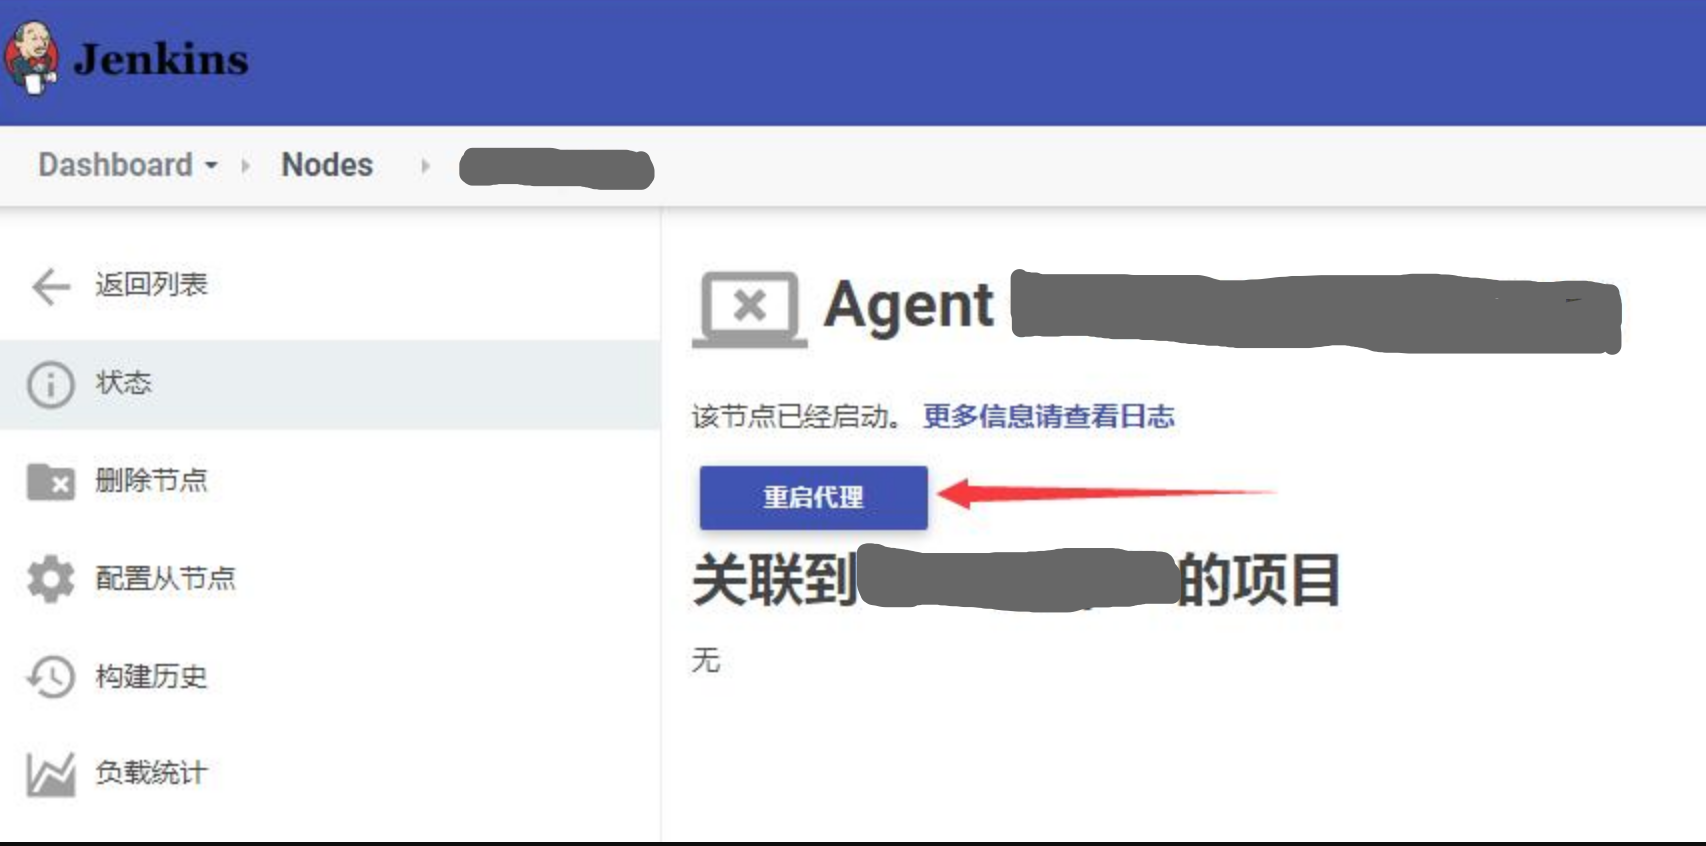
点击‘重启代理’后注意查看日志输出
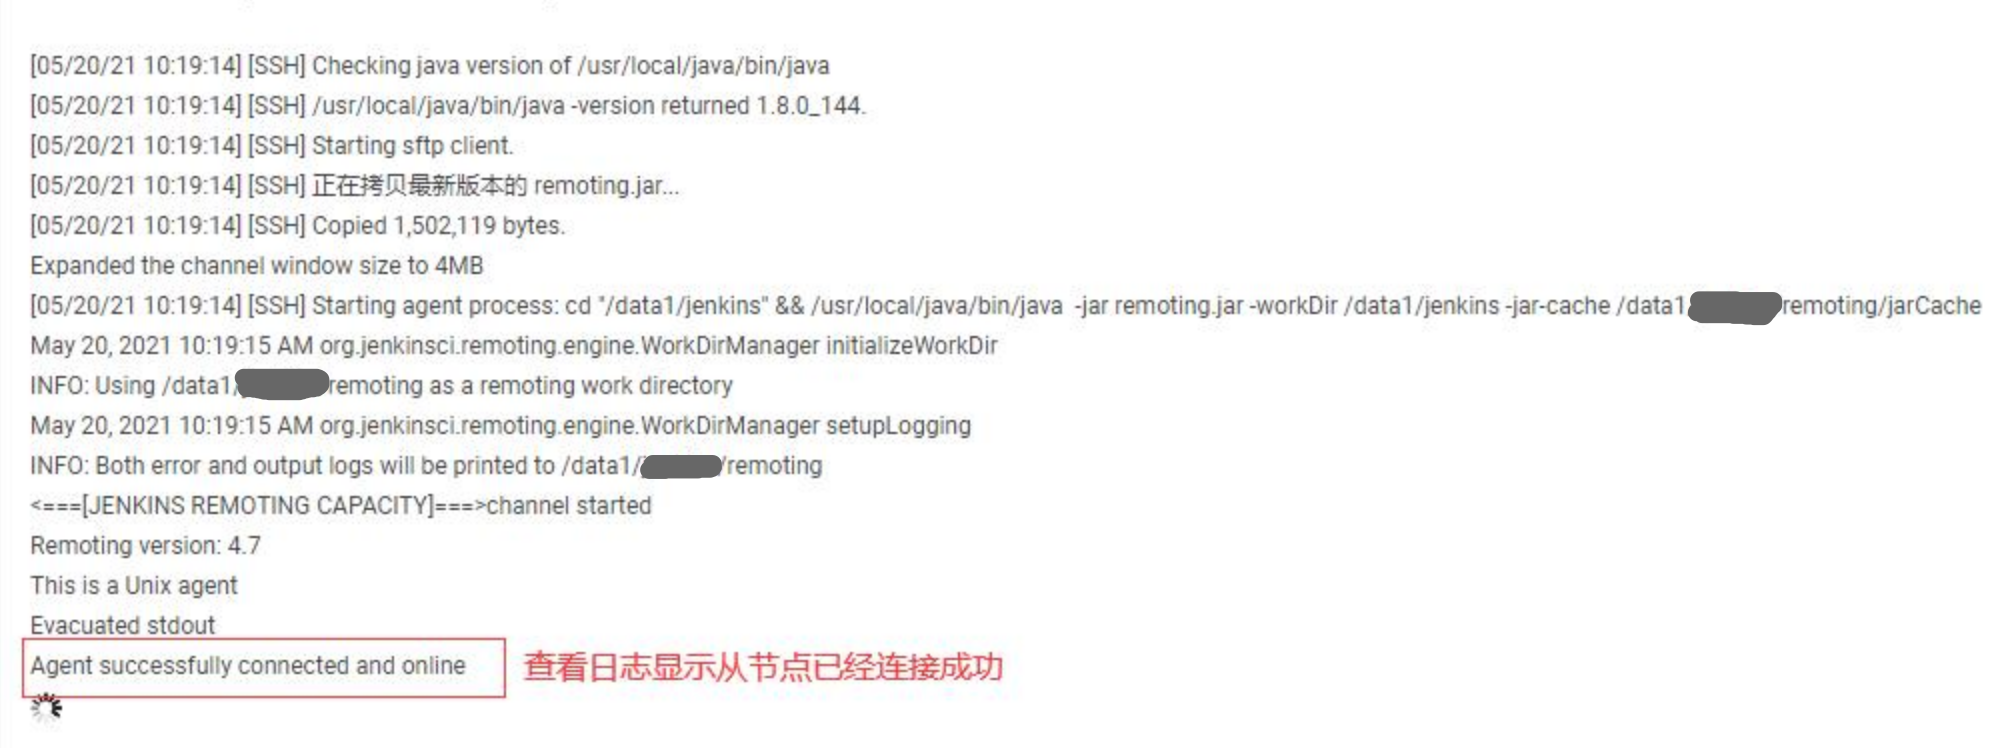
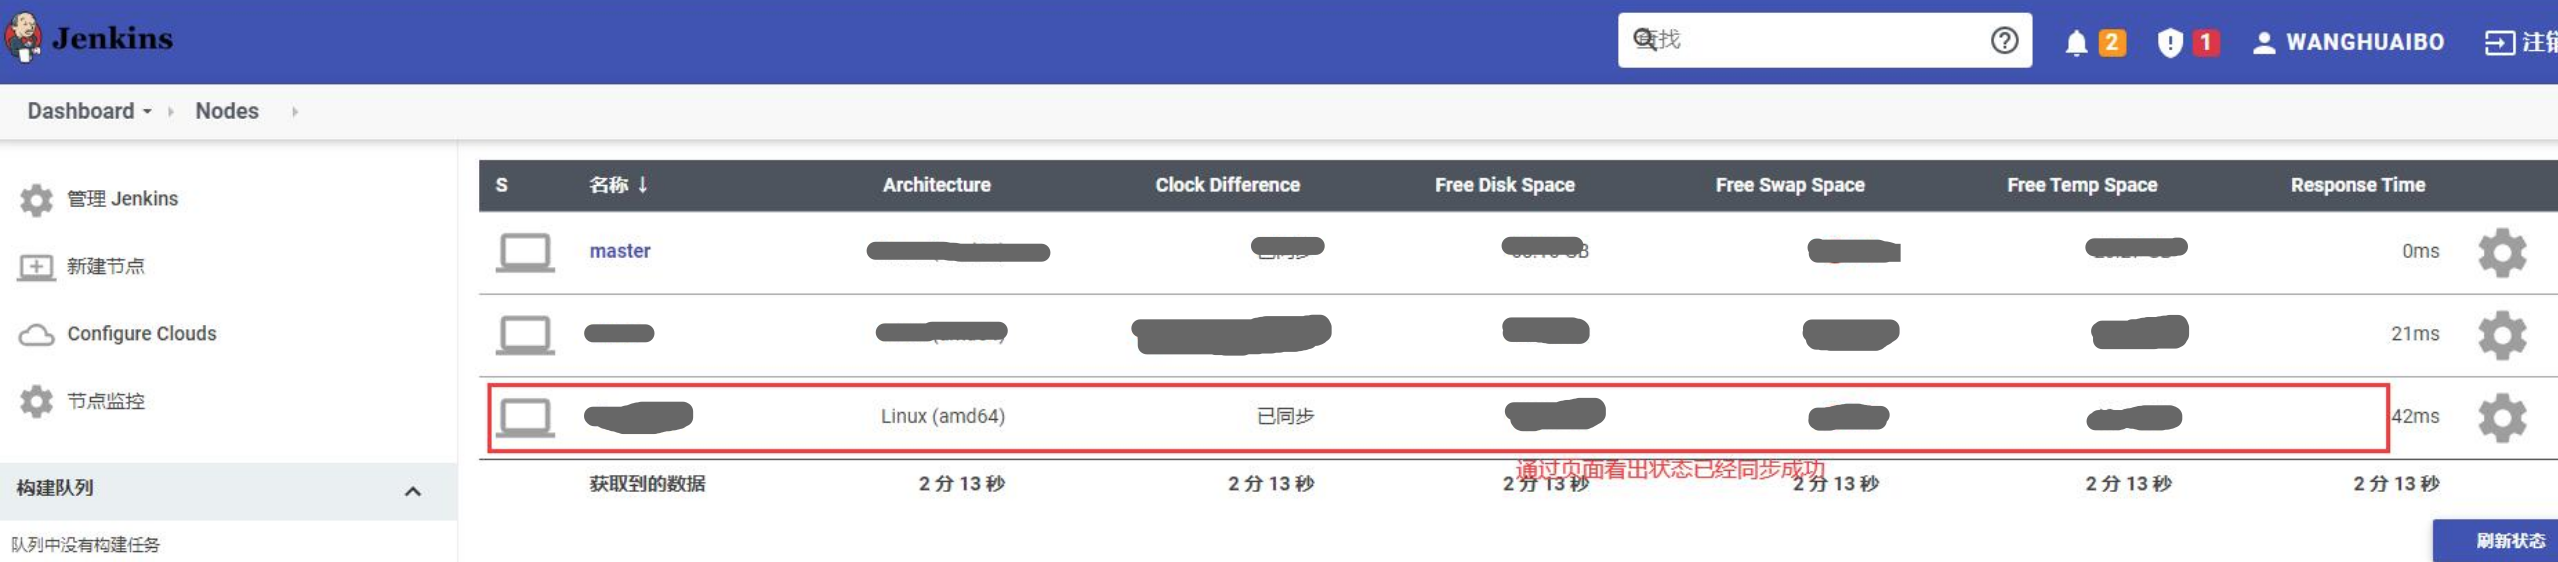
检查同步信息是否正常
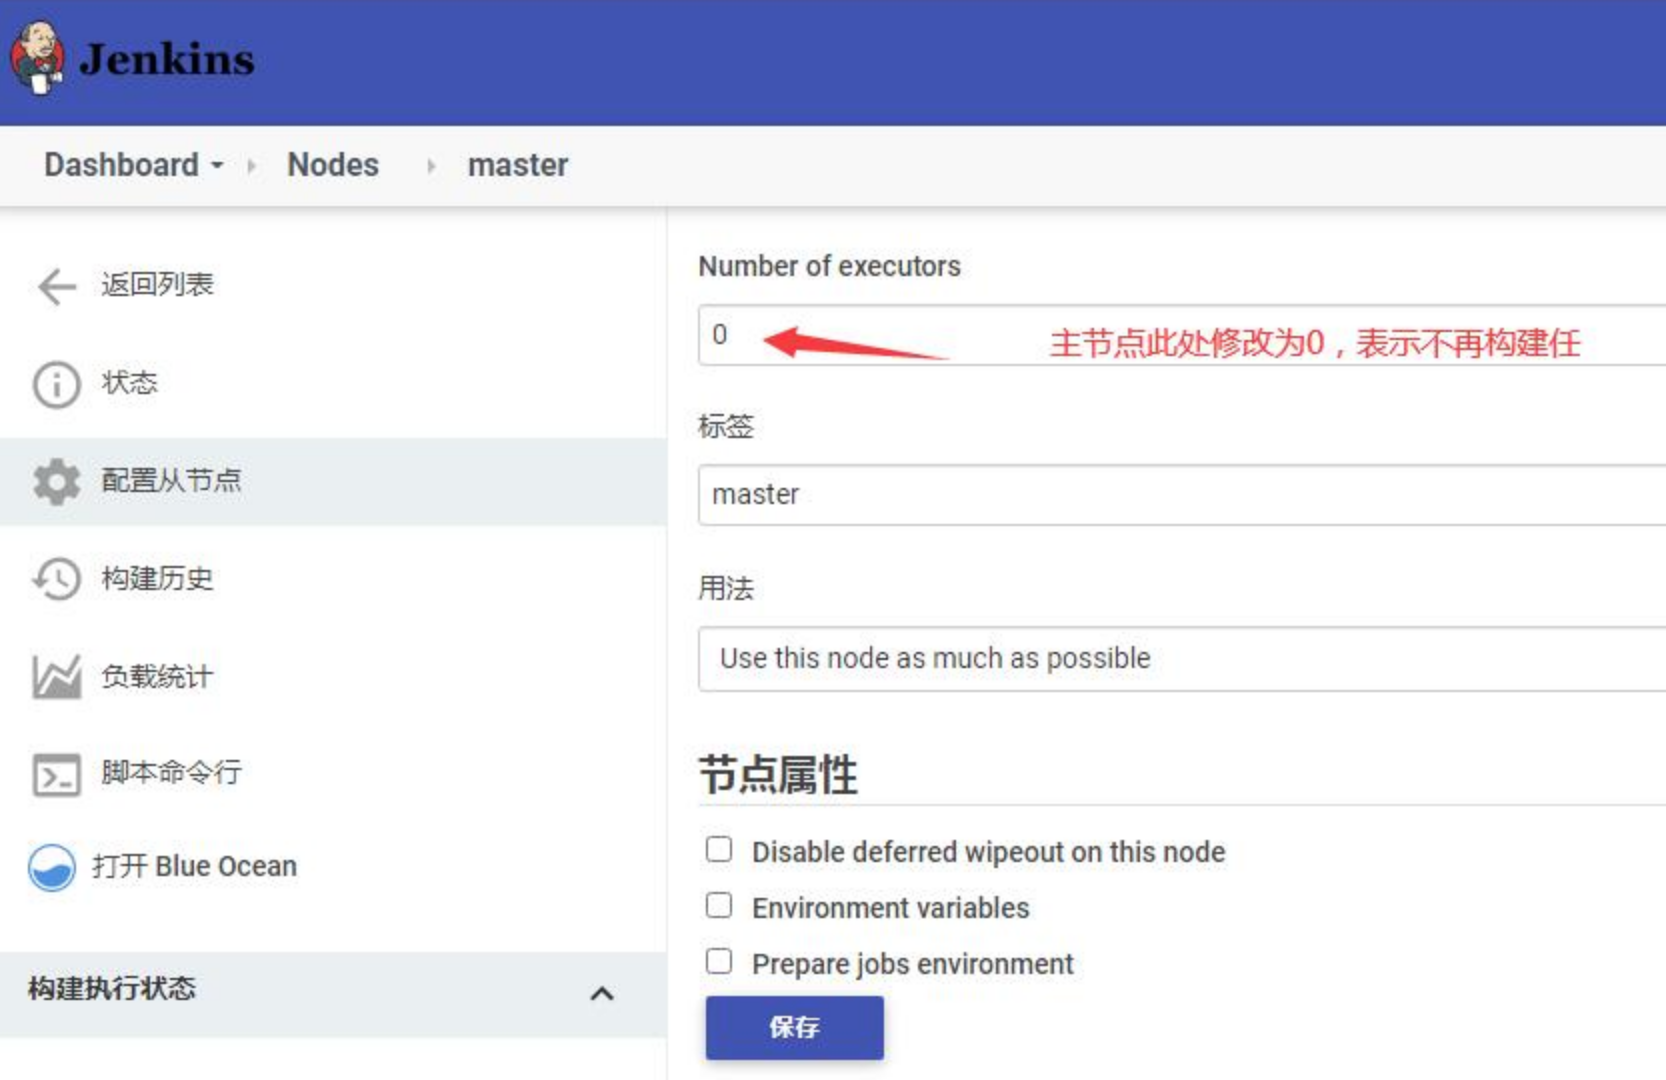
将主节点该配置修改为0,意思为主节点不允许构建项目
新建nginx同步流程
准备工作: 免密登录
登录
slave_prodnode_01节点(即 jenkins ansible 从节点)su - slavesre
查看当前用户的公钥 并添加到要同步到nginx 节点,且尝试用slavesre登录回答了yes
新建Giltab仓库
1. 新建仓库创建master分支
首先要配置gitlab项目,在规范的Nginx配置文件的组内,新建一套nginx配置为项目名称
比如 prod_conf_manage 组下面再建一个指定一套business_outnginx_prod_conf 为项目名称
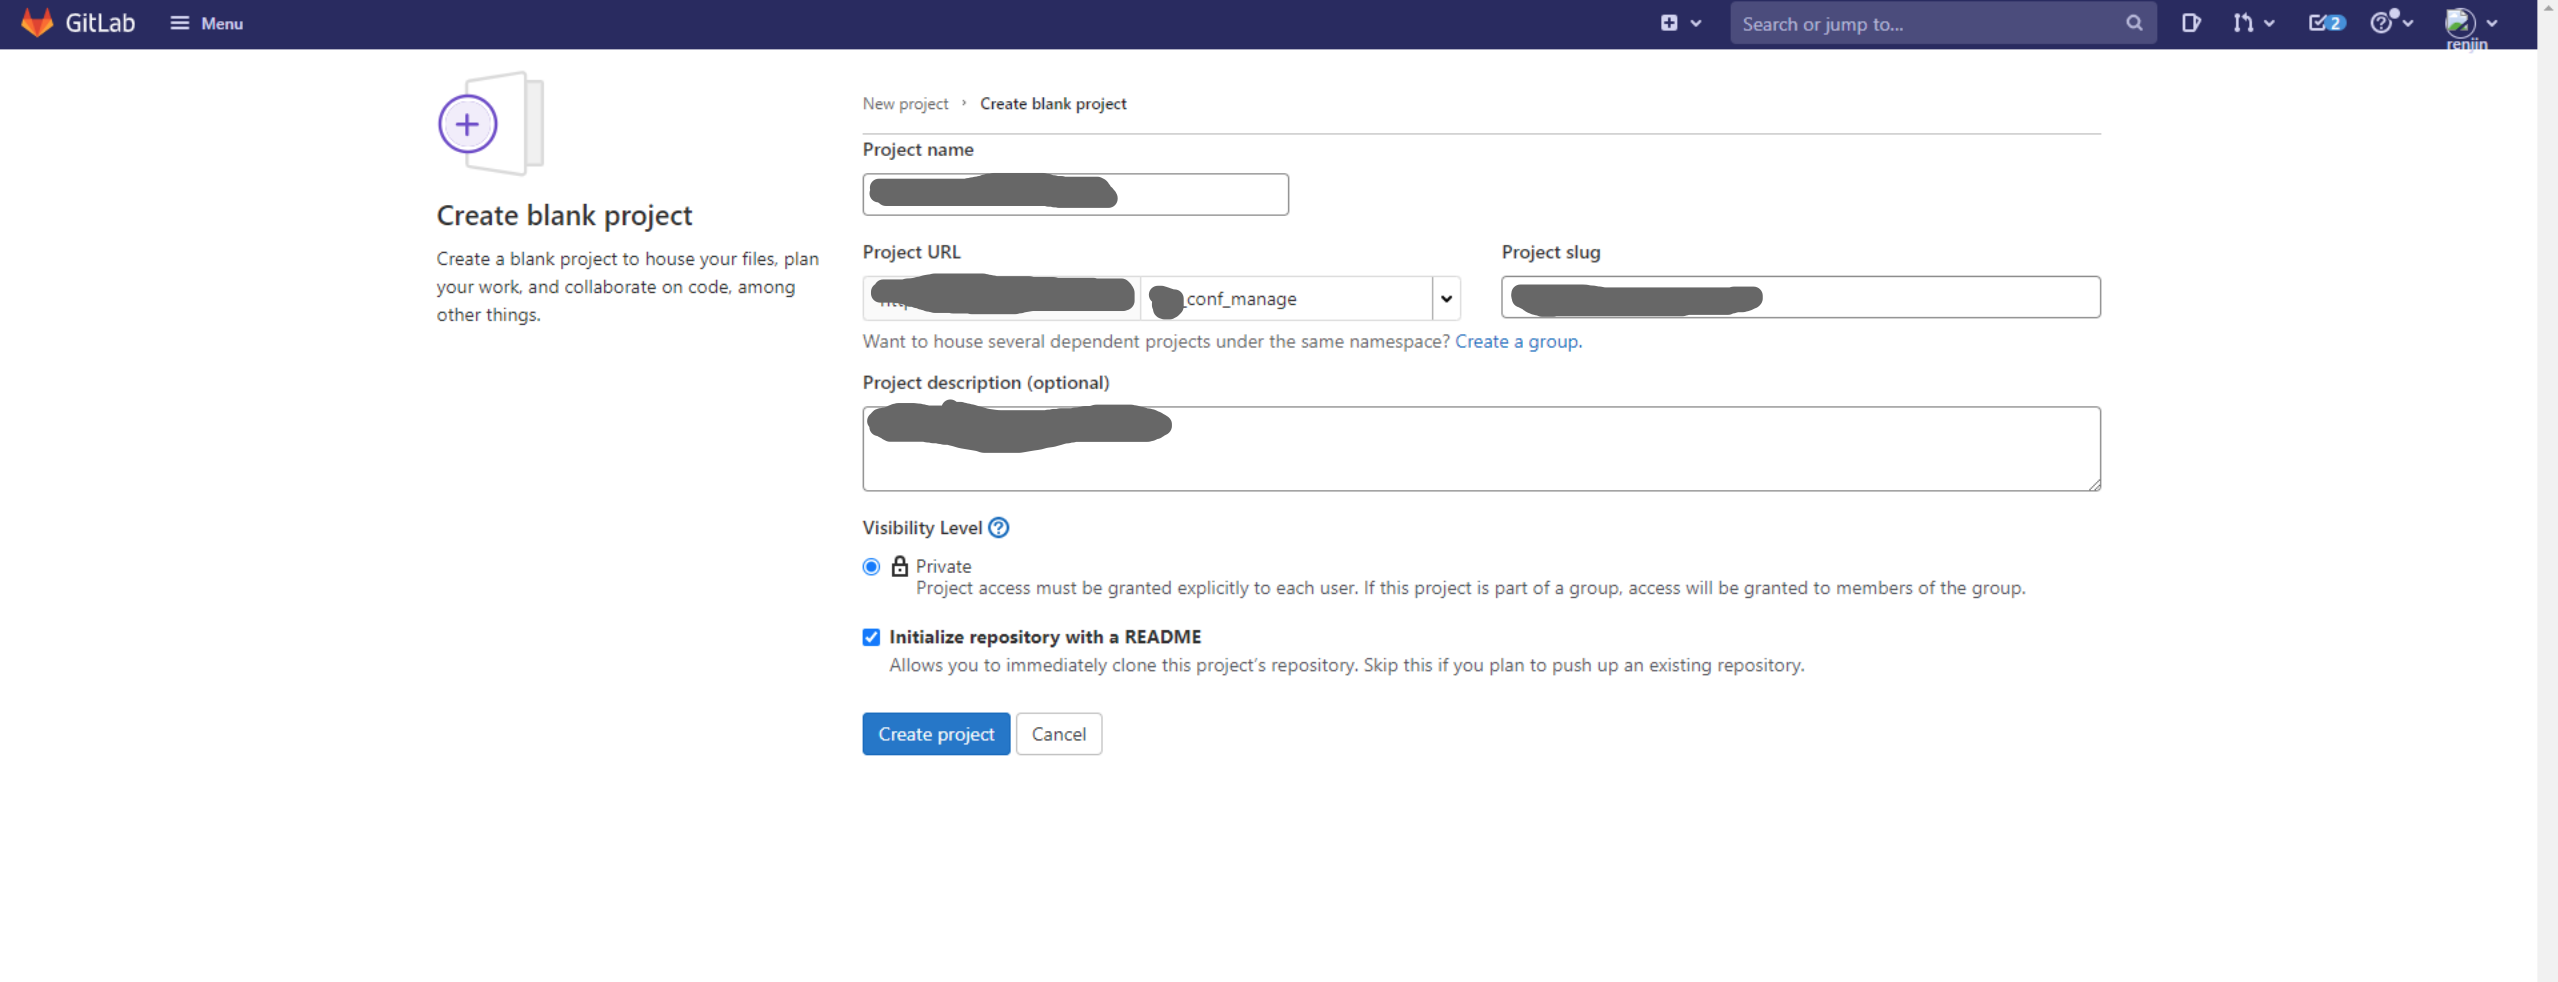
描述信息可以对应项目的应用名称,例 业务线-对外nginx配置-正式-配置
默认新建的分支是main分支,点击-项目名—-> branch —-> New branch —-> 新建master分支
点击-项目名—->setting—-> Reposiotry —-> default branch —-> master
最后再从 branch 里把 main 分支移除,这里配置发生改变后是需要合并到 master分支才会触发jenkins构建
2. 授权jenkins 用户访问

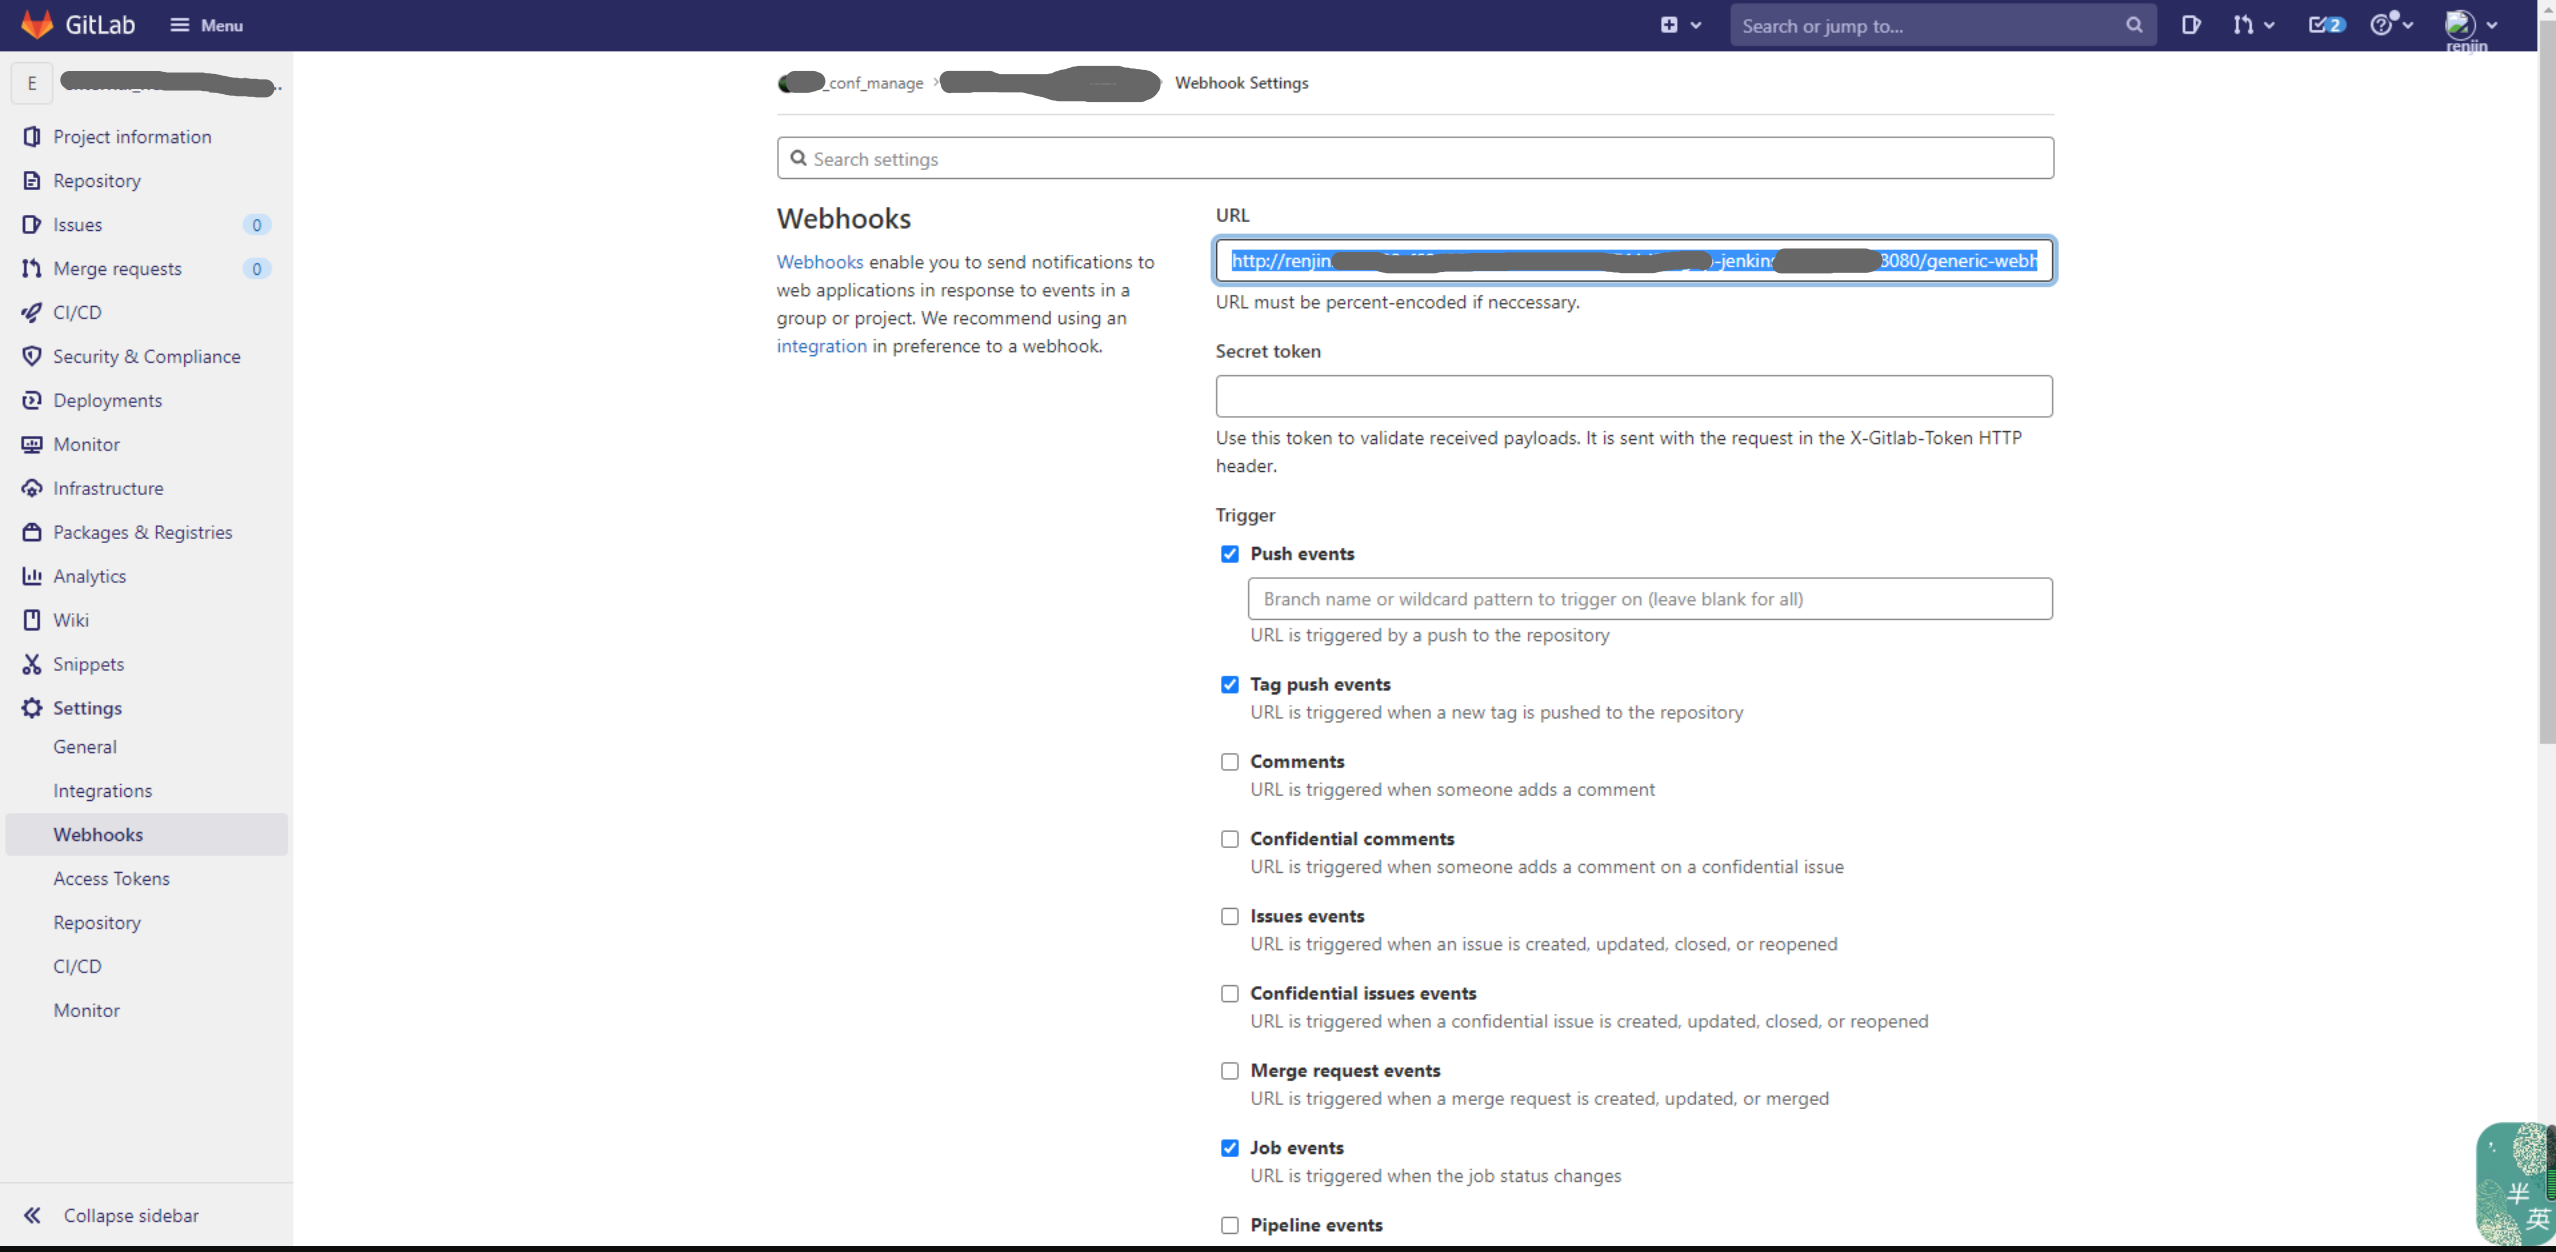
3. 配置项目对应的webhook钩子与token授权
token创建可以在jenkins 中去创建授权用户调用的token
找到 setting —> webhooks —> 开始配置
访问链接需要加入 renjin:token
http://renjin:xxxxxxxxxxxxxxxxxxxx@xxx-jenkins.xxx.com:8080/generic-webhook-trigger/invoke
配置如下并保存,此外还要注意把Enable SSL verification 勾掉
新建Jenkins流程
添加配置注意项
描述信息
Do not allow concurrent builds 禁止并发构建
Build periodically 首次构建、为确保安全性、先不开流程跑通后再打开 , 定时任务,这里作用于同步一致性
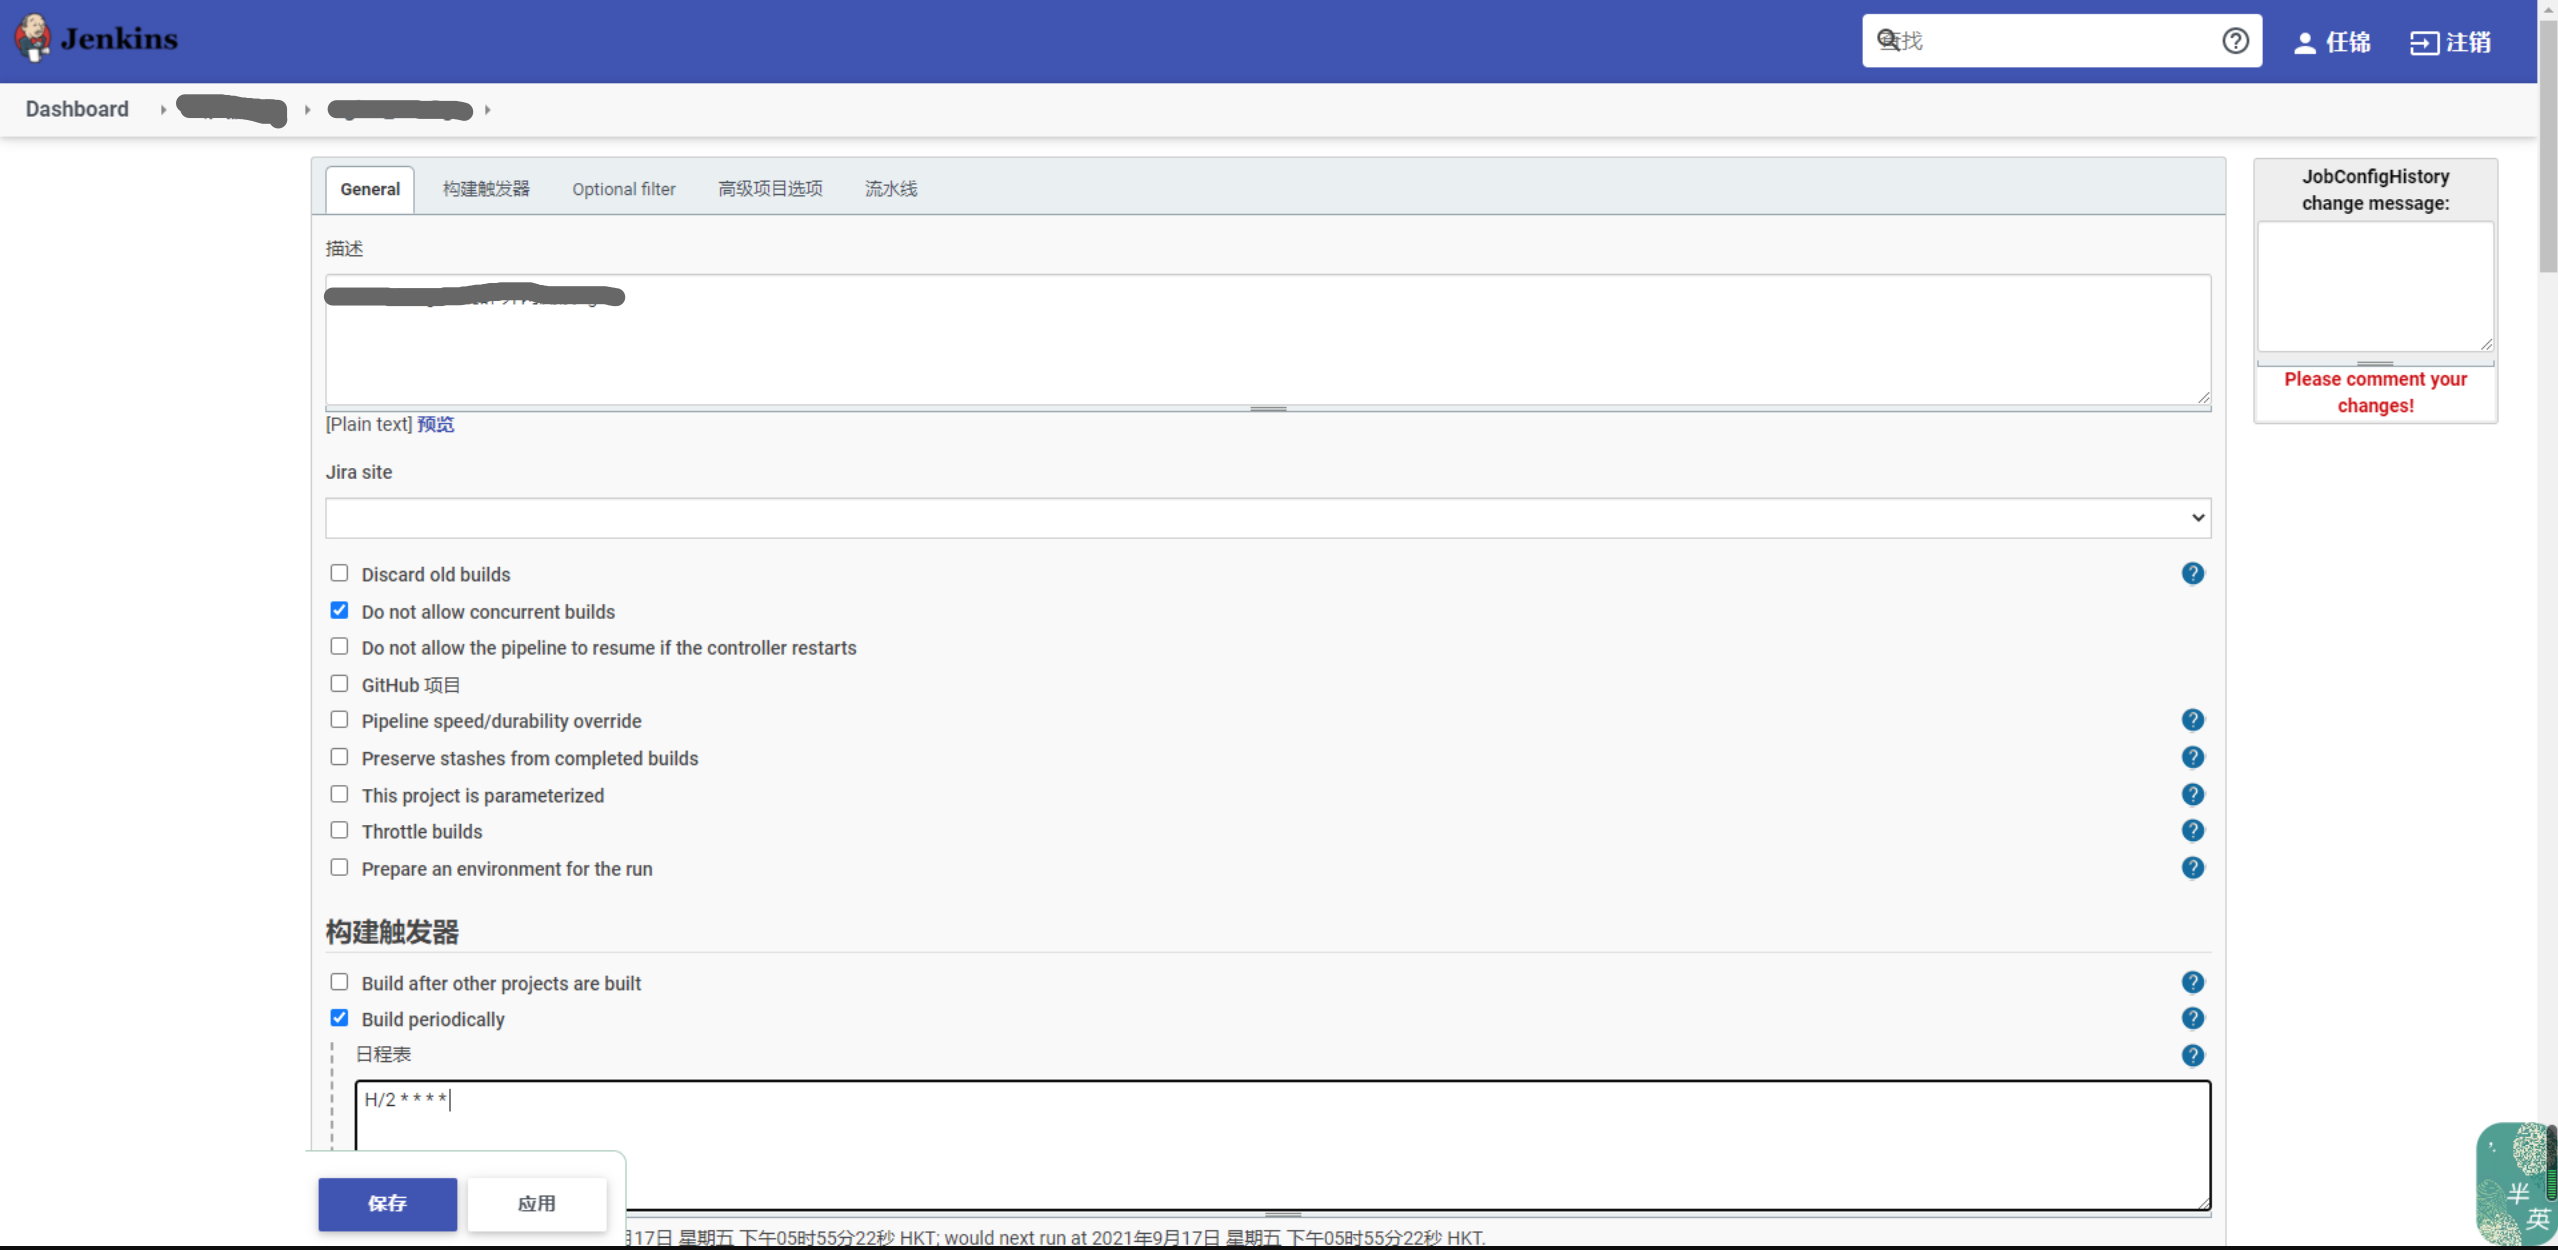
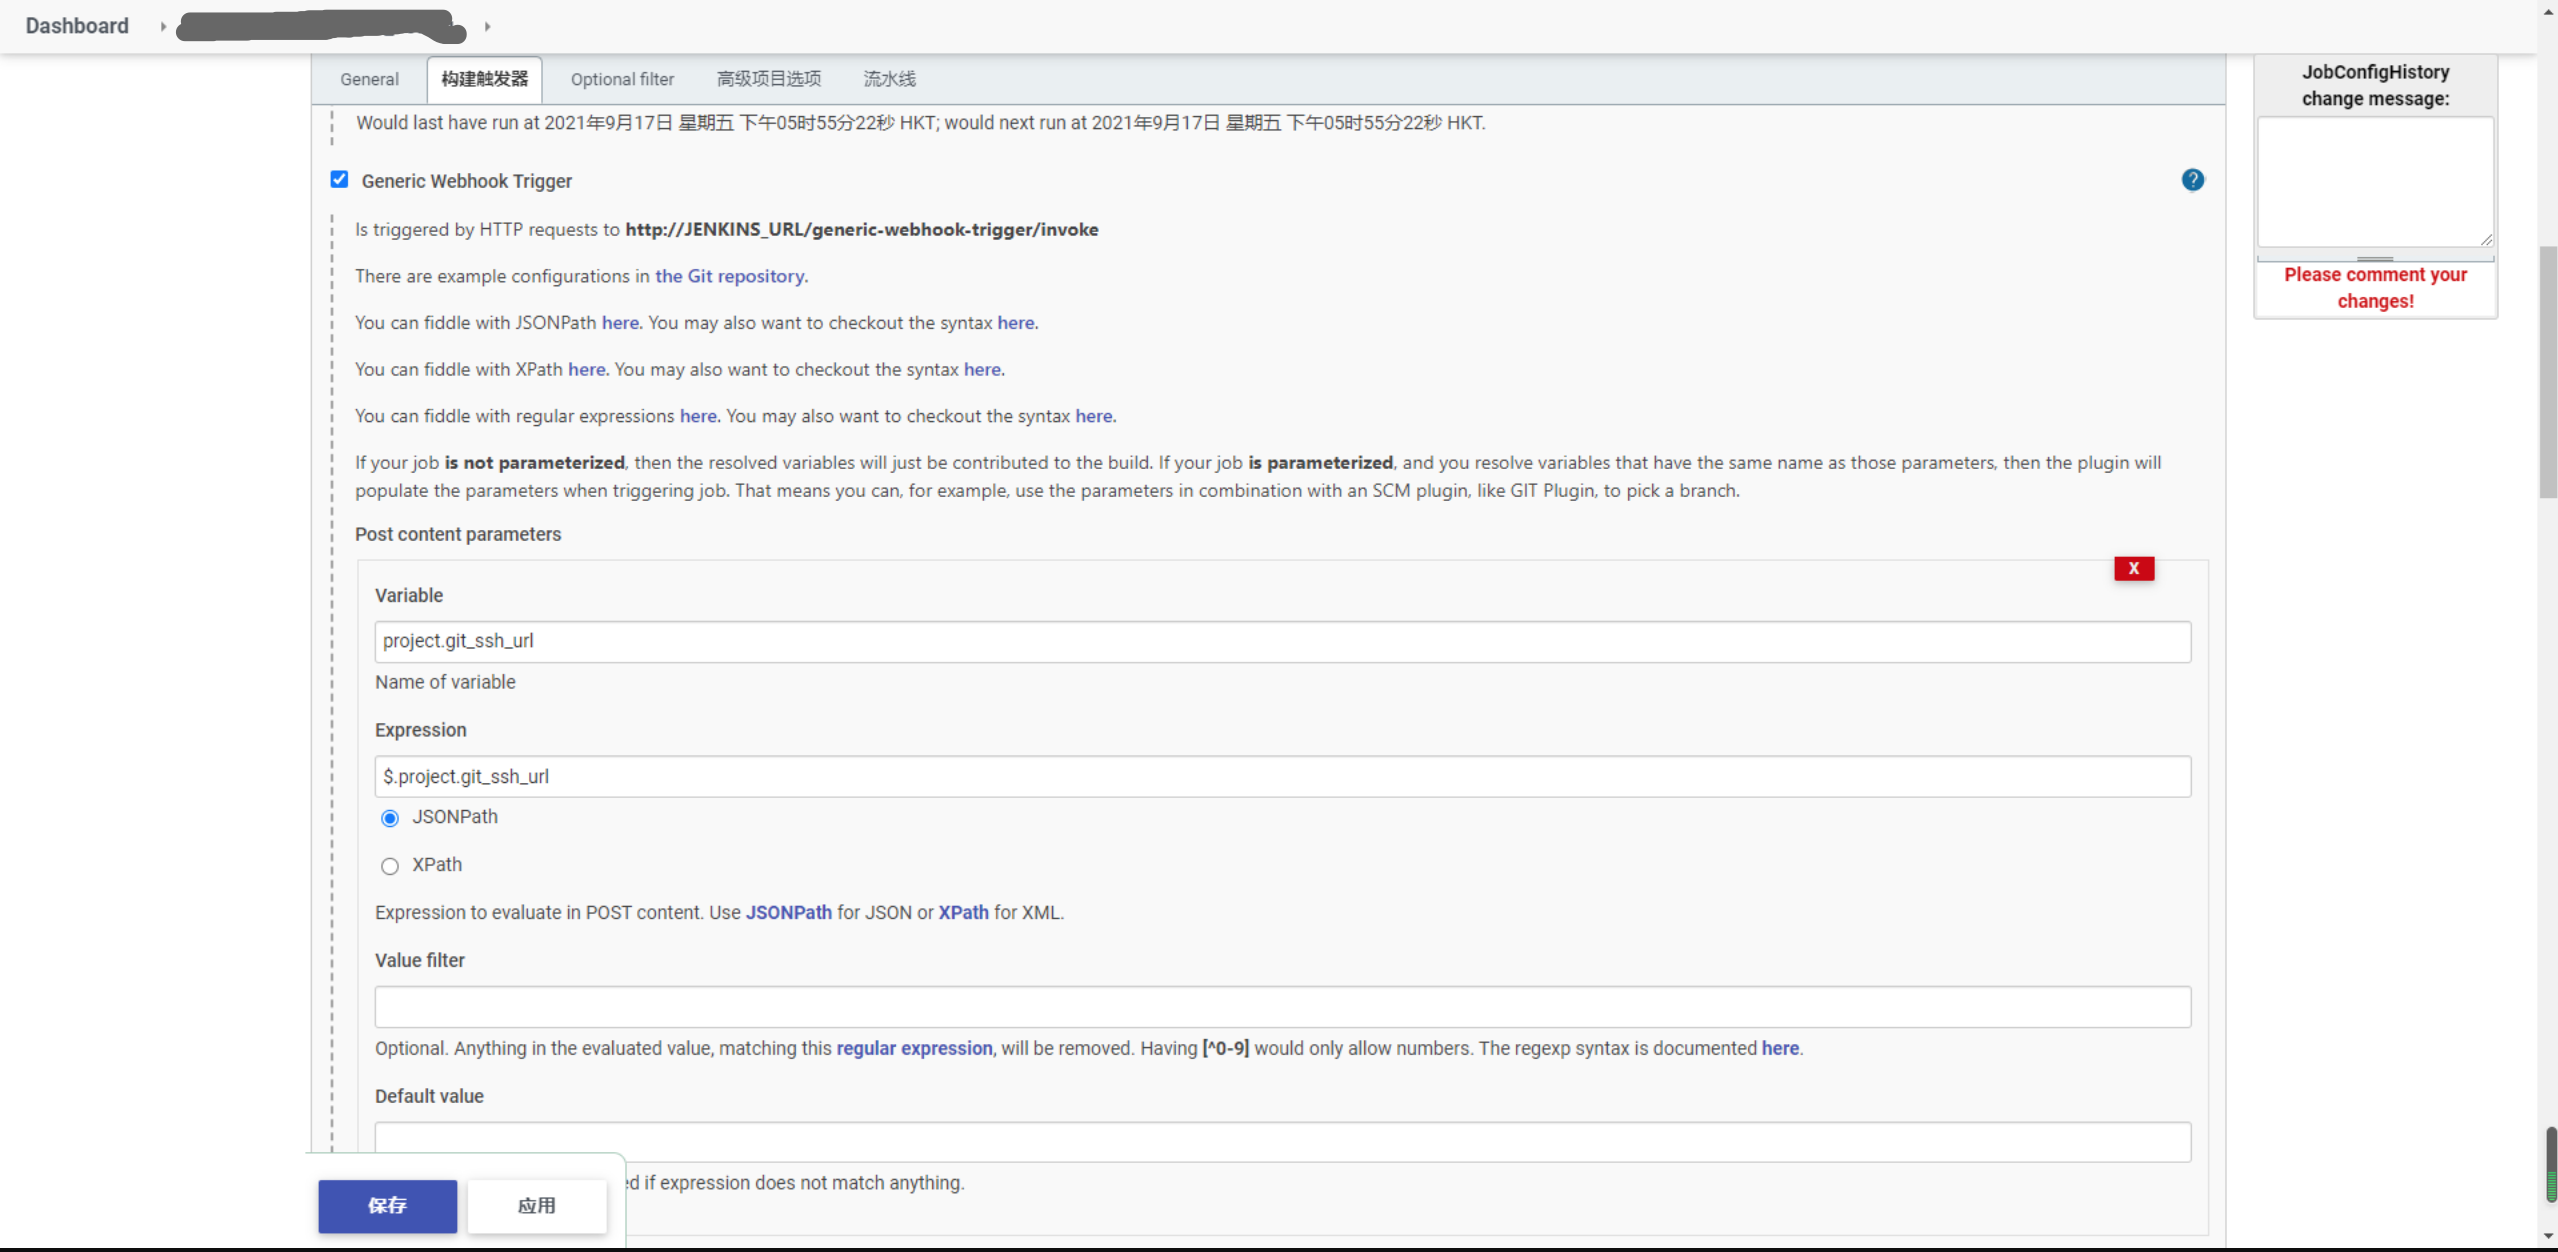
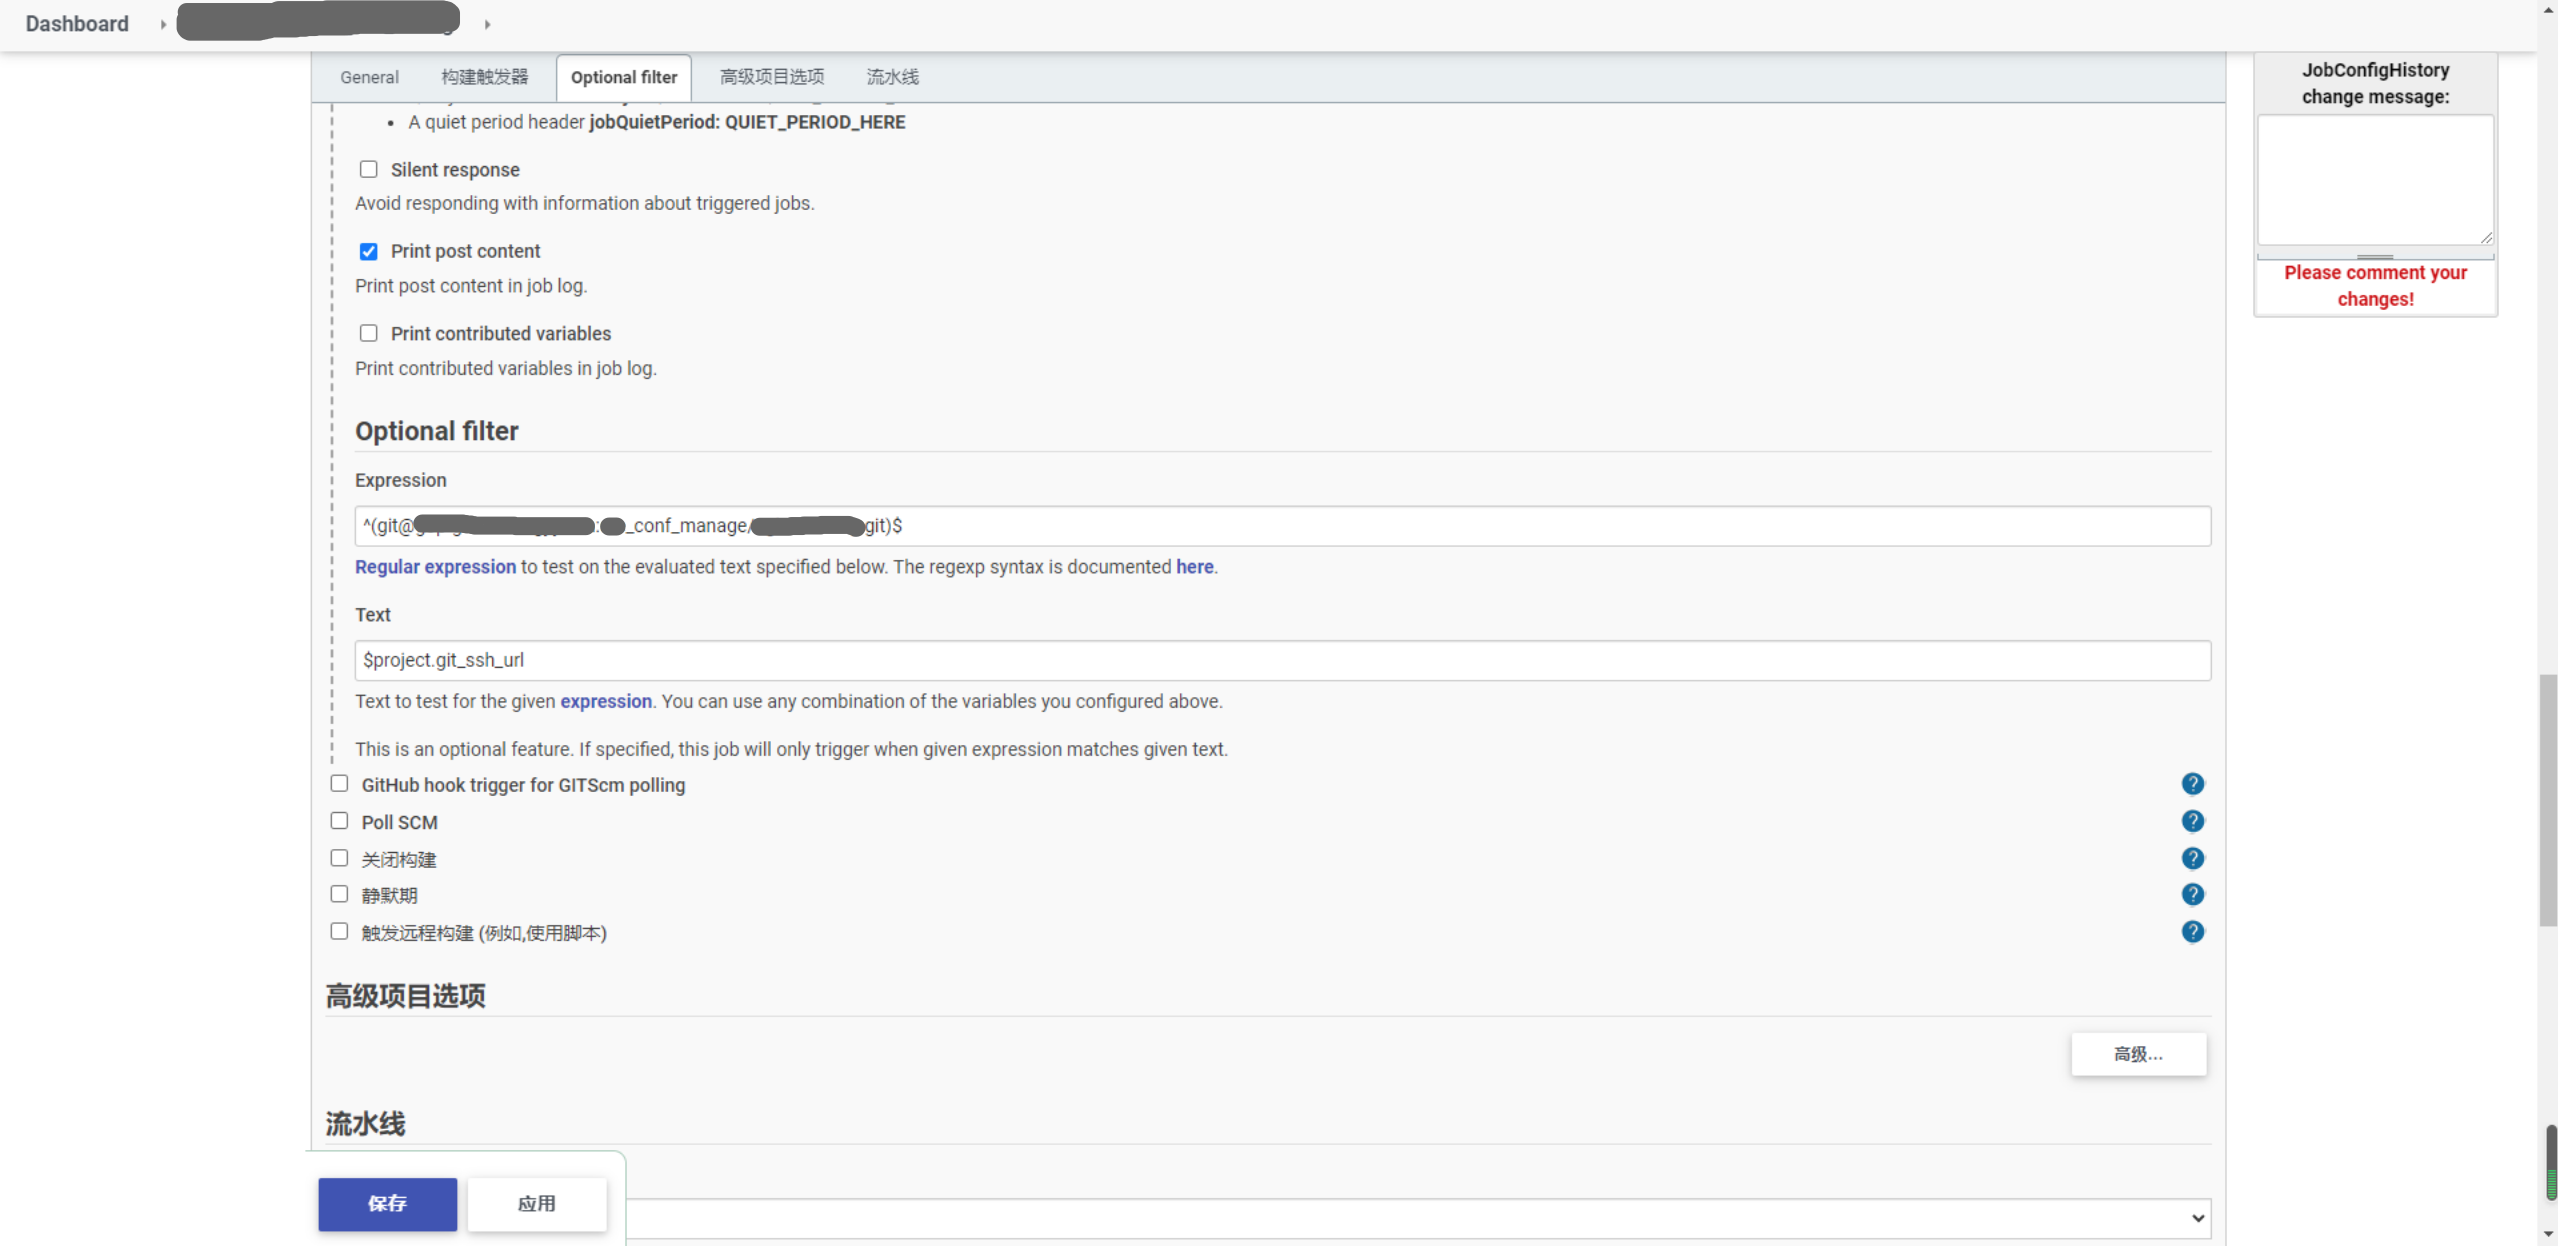
钩子触发的地址: 这里不要写错
仓库构建的流水线
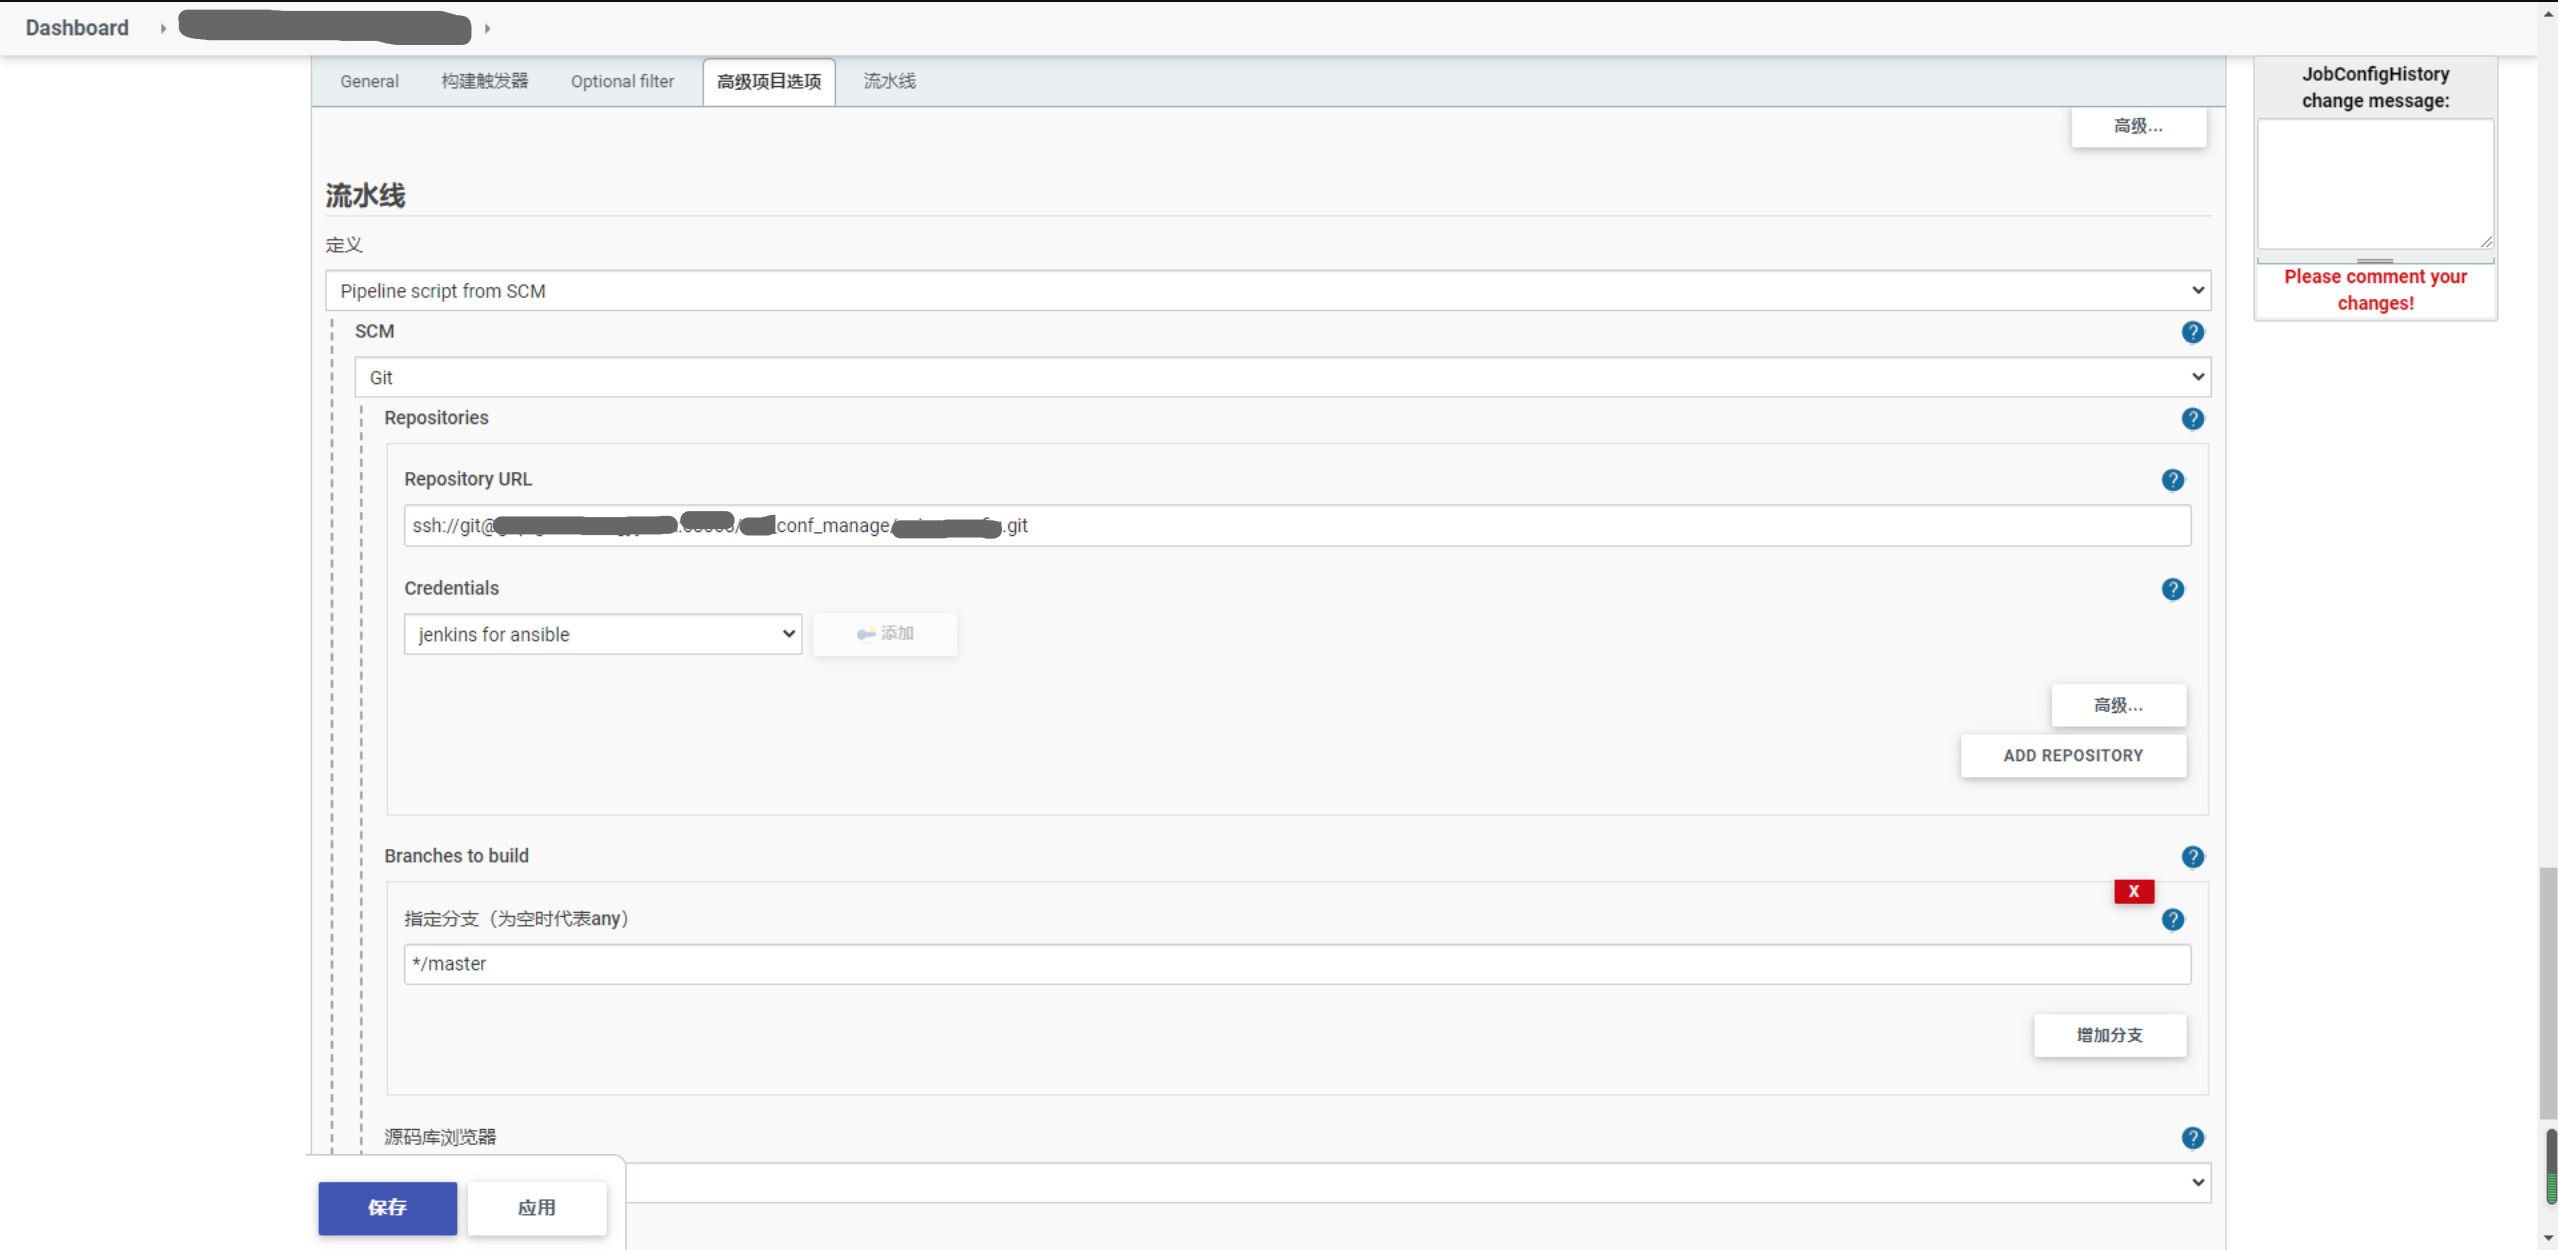
jenkinsfile 调用 即流程化执行入口

Jenkinsfile 阶段使用说明
第一阶段、使用ansible template 与 synchronize 生成且同步配置文件
第二阶段、使用脚本检测ansible 同步的change结果、若发生改变、则要出发( nginx -t 检测 —> nginx -s reload 重载 && 企业微信群通知)
这里要注意的是、生产环境首次使用这样的模式时建议要第二阶段先关了、这样避免同步错了配置文件发生了重载。
Git仓库实例结构
$tree  -L 5
.
|-- check.sh
|-- hosts
|-- Jenkinsfile
|-- output.log
|-- README.md
|-- result.txt
|-- roles
|   `-- new
|       |-- files
|       |   |-- conf
|       |   |   |-- error.conf
|       |   |   |-- fastcgi.conf
|       |   |   |-- fastcgi.conf.default
|       |   |   |-- fastcgi_params
|       |   |   |-- fastcgi_params.default
|       |   |   |-- head_account.gyyx.cn.conf
|       |   |   |-- head_action.conf
|       |   |   |-- head.conf
|       |   |   |-- ip_list.conf
|       |   |   |-- koi-utf
|       |   |   |-- koi-win
|       |   |   |-- mime.types
|       |   |   |-- mime.types.default
|       |   |   |-- nginx.conf
|       |   |   |-- resp.conf
|       |   |   |-- scgi_params
|       |   |   |-- scgi_params.default
|       |   |   |-- ssl
|       |   |   |-- nginx_check.conf
|       |   |   |-- uwsgi_params
|       |   |   |-- uwsgi_params.default
|       |   |   |-- vhosts
|       |   |   `-- win-utf
|       |-- handlers
|       |   `-- main.yaml
|       |-- tasks
|       |   |-- main.yml
|       |   `-- templatesync.yml
|       |-- templates
|       |   |-- testweb2.asjin.com.j2
|       |   |-- testweb.asjin.com.j2
|       `-- vars
|           `-- main.yml
|-- send_message.py
`-- update.yml
流程入口文件Jenkinsfile
pipeline {
    agent {node {label 'slave_prodnode_01'}}
    stages {
        stage("ansible sync configuration") {
            steps {
                sh """
                    set -o pipefail
                ansible-playbook update.yml -i hosts | tee output.log
                """
            }
                    }
            stage("check nginx reload") {
                    steps {
                            sh """
                                bash -x check.sh
                                """
                        }

                    }
         }
     post {
             failure {
                           sh """ touch result.txt && sudo chmod 777 result.txt && sudo echo '' > result.txt
                               echo "'${currentBuild.projectName}' 构建完成, 构建结果: ${currentBuild.currentResult}, 构建耗时: ${currentBuild.durationString}" > result.txt
                               python send_message.py
                             """
                      }
         }
}
第一阶段ansible roles
~ cat update.yml
---
- hosts: all
  user: root
  roles:
    - new
判断同步的集群
~ cat roles/new/tasks/main.yml
---
- name: sync TX nginx server
  include: templatesync.yml
  when: IDC == 'TX'
- name: sync TX nginx server
  include: templatesync.yml
  when: IDC == 'SH'
- name: sync TX nginx server
  include: templatesync.yml
  when: IDC == 'AL'
同步流程
~ cat roles/new/tasks/templatesync.yml
- name: Local predistribution
  command: /bin/rsync -avu --delete  {{ playbook_dir }}/roles/new/files/conf/ {{ playbook_dir }}/roles/new/files/{{ IDC }}/
  delegate_to: localhost
  changed_when: false

- name: config_web1
  template: src={{ playbook_dir }}/roles/new/templates/testweb1.asjin.com.j2 dest={{ playbook_dir }}/roles/new/files/{{ IDC }}/vhosts/testweb1.asjin.com.conf
  delegate_to: localhost
  changed_when: false
- name: config_web2
  template: src={{ playbook_dir }}/roles/new/templates/testweb2.asjin.com.j2 dest={{ playbook_dir }}/roles/new/files/{{ IDC }}/vhosts/upstream/testweb2.asjin.com.j2
  delegate_to: localhost
  changed_when: false

- name: copy conf file
  synchronize: src={{ item.src }} dest={{ nginx_basedir }}/{{ item.dest }} delete=yes owner=no checksum=yes  times=no perms=no rsync_opts='--exclude=*.swp' #  backup=yes owner=root group=root mode=0644
  with_items:
      - { src: "{{IDC}}/", dest: /conf/ }
变量文件
nginx_basedir: /usr/local/nginx
TX: 10.xx
AL: 10.xx
SH: 10.xx
template 模板文件
cat roles/template/taskstestweb1.asjin.com.j2
{% if IDC == "TX" %}
    upstream testweb1.asjin.com {
     server {{  TX }}.xxx.11:xxxxx max_fails=0;
     server {{  TX }}.xxx.14:xxxxx max_fails=0;
     server {{  TX }}.xxx.23:xxxxx max_fails=0;
     server {{  TX }}.xxx.16:xxxxx max_fails=0;
    }
{% elif IDC == "AL" %}
    upstream testweb1.asjin.com{
    server {{ AL }}.xxx.14:xxxxx max_fails=0;
    server {{ AL }}.xxx.15:xxxxx max_fails=0;
    server {{ AL }}.xxx.193:xxxxx max_fails=0;
    server {{ AL }}.xxx.194:xxxxx max_fails=0;
    server {{ AL }}.xxx.195:xxxxx max_fails=0;
    }
{% elif IDC == "SH" %}
    upstream testweb1.asjin.com{
    server {{ SH }}.xxx.11:xxxxx max_fails=0;
    server {{ SH }}.xxx.12:xxxxx max_fails=0;
    server {{ SH }}.xxx.13:xxxxx max_fails=0;
    server {{ SH }}.xxx.14:xxxxx max_fails=0;
    }
{% endif %}
cat roles/template/taskstestweb2.asjin.com.j2
{% if IDC == "TX" %}
    upstream testweb2.asjin.com {
     server {{  TX }}.xxx.11:xxxxx max_fails=0;
     server {{  TX }}.xxx.14:xxxxx max_fails=0;
     server {{  TX }}.xxx.23:xxxxx max_fails=0;
     server {{  TX }}.xxx.16:xxxxx max_fails=0;
    }
{% elif IDC == "AL" %}
    upstream testweb2.asjin.com{
    server {{ AL }}.xxx.14:xxxxx max_fails=0;
    server {{ AL }}.xxx.15:xxxxx max_fails=0;
    server {{ AL }}.xxx.193:xxxxx max_fails=0;
    server {{ AL }}.xxx.194:xxxxx max_fails=0;
    server {{ AL }}.xxx.195:xxxxx max_fails=0;
    }
{% elif IDC == "SH" %}
    upstream testweb2.asjin.com{
    server {{ SH }}.xxx.11:xxxxx max_fails=0;
    server {{ SH }}.xxx.12:xxxxx max_fails=0;
    server {{ SH }}.xxx.13:xxxxx max_fails=0;
    server {{ SH }}.xxx.14:xxxxx max_fails=0;
    }
{% endif %}
- files目录用于存放nginx集群的配置文件
- hosts 文件
10.xx.xxx.xx  IDC=TX
10.xx.xxx.xx  IDC=TX
10.xx.xxx.xx  IDC=SH
10.xx.xxx.xx  IDC=AL
第二阶段 shell 检测重启与通知
cat check.sh
#!/bin/bash

set -o pipefail
set -e


ansible_out="./output.log"
hosts_list=`cat $ansible_out  |awk '/PLAY RECAP/,EOF {print $0}' |egrep "([0-9]{1,3}[\.]){3}[0-9]{1,3}" | awk '{print $1}'`
hosts_port=63008
hosts_user="root"


## send weixin
send_message () {
curl 'https://qyapi.weixin.qq.com/cgi-bin/webhook/send?key=xxxxxxxx-xxxx-xxxx-xxxx-xxxxxxxxxxxx' \
   -H 'Content-Type: application/json' \
   -d '
   {
        "msgtype": "markdown",
        "markdown": {
            "content": "'"$JOB_NAME \n $message"'"
        }
   }'
}

## nginx check and reload
nginx_check () {
   ## Loop through all hosts
   check_send_all=""
   for host in $hosts_list; do
      ## find host Corresponding change state
      ansible_change_state=`cat $ansible_out |awk '/PLAY RECAP/,EOF {print $0}' | grep "$host" |  egrep -o  "changed=[[:digit:]]{1,4}" | awk -F '=' '{print $2}'`
      if [[ $ansible_change_state -gt 0 ]] ;then
         ## nginx config test and reload or return failure num 1
         reload_stat=`ssh -p $hosts_port $hosts_user@$host  "(/usr/local/nginx/sbin/nginx -t &> /dev/null && /usr/local/nginx/sbin/nginx -s reload  &> /dev/null) || echo 1"`
         ## Judge state
         if [[ $reload_stat -eq 1 ]]; then
            check_send="> **$host:**  nginx 配置检测 **没通过** !"
            check_send_all="$check_send\n$check_send_all"
         else
            check_send="> **$host:**  nginx 配置文件重载 **成功**"
            check_send_all="$check_send\n$check_send_all"
         fi
      fi
   done
}

## check ansible failed
ansible_failed_check () {
    ## Loop through all hosts
    failed_send_all=""
    for host in $hosts_list; do
        ## find ansible failed state
        ansible_change_state=`cat $ansible_out |awk '/PLAY RECAP/,EOF {print $0}' | grep "$host" |  egrep -o  "$1=[[:digit:]]{1,4}" | awk -F '=' '{print $2}'`
        if [[ $ansible_change_state -gt 0 ]]; then
           failed_send="> **$host:**  同步nginx配置**失败**,ansible 执行状态**$1** 请检查 **ansible 同步主机与脚本**!"
           failed_send_all="$failed_send\n$failed_send_all"
        fi
    done
}


nginx_check


## send message
if [ "$check_send_all" != "" ] ; then
    echo -e $check_send_all
    message=`echo -e $check_send_all | tr -s "n"`
    send_message
fi

ansible_failed_check failed
## send message
if [ "$failed_send_all" != "" ] ; then
    echo -e $failed_send_all
    message=`echo -e $failed_send_all | tr -s "n"`
    send_message
fi

ansible_failed_check unreachable
## send message
if [ "$failed_send_all" != "" ] ; then
    echo -e $failed_send_all
    message=`echo -e $failed_send_all | tr -s "n"`
    send_message
fi
第三阶段 python 流程阶段检测脚本
#!/usr/bin/env python
#_*_coding:utf-8_*_

import requests
import json

def send_message(info):
    url = "https://qyapi.weixin.qq.com/cgi-bin/webhook/send?key=send?key=xxxxxxxx-xxxx-xxxx-xxxx-xxxxxxxxxxxx"
    headers = {'Content-Type': 'application/json'}
    data = {"msgtype": "markdown","markdown": {"content": info}}
    response  = requests.post(url, json = data, headers = headers)

if __name__ == '__main__':
    with open('result.txt','r') as f:
        info = f.read().strip()
    send_message(str(info))
流程迁移注意项
Git提并配置前说明
- 同步到测试服务器验证配置文件 —> 当前gitlab项目 hosts 文件中
- 关掉stage2 重载nginx —> Jenkinsfile stage2 去掉
- 关掉定时执行 —> Build periodically 勾掉
- update.yml 变更为all
- 报警接口到测试
- 使用线上的conf 目录 —> 将线上的conf 目录放到 roles 目录的files 下
- ansible template 生成器,生成于本地,且synchronize 模块优先级置于最后 —> ansible tasks 调整
- 注意新建分支使用master —> 钩子触发的是master分支,纺一使用master分支
- 备份线上nginx目录 —> 触发提交前、先备份线上nginx
Git提交配置后说明
首要对比线上 nginx配置 md5deep -r /usr/local/nginx/conf/ | sort -k2
- 关闭之前生产同步的配置脚本与定时任务。
- 备份线上nginx目录 —> 触发提交前、先备份线上nginx
3.关掉stage2 重载nginx —> Jenkinsfile stage2 开启- 使用线上的conf 目录 —> 将线上的conf 目录放到 roles 目录的files 下
- 关掉定时执行 —> Build periodically 开启
- 加上灾备服务器
- 生产环境root免密登录
- 校验两集群目录
- 准备恢复命令
- 注意有没有切换到tenginx (check.sh handlers:未用,但建议修改 vars )
- 将hosts中的地址切换到生产 —> 验证通步的文件都没有问题,再将hosts 改到生产服务器
- 报警接口sre
- 关了stage2
- 再次校验,并开启stage2
使用
从gitlab 的仓库里变更配置并提交
注意要在web IDE 中变更
注意 Commit to master branch
建议大家每次变更配置,或新建配置的时候,把commit message 都写全,以便明确做了哪些变更
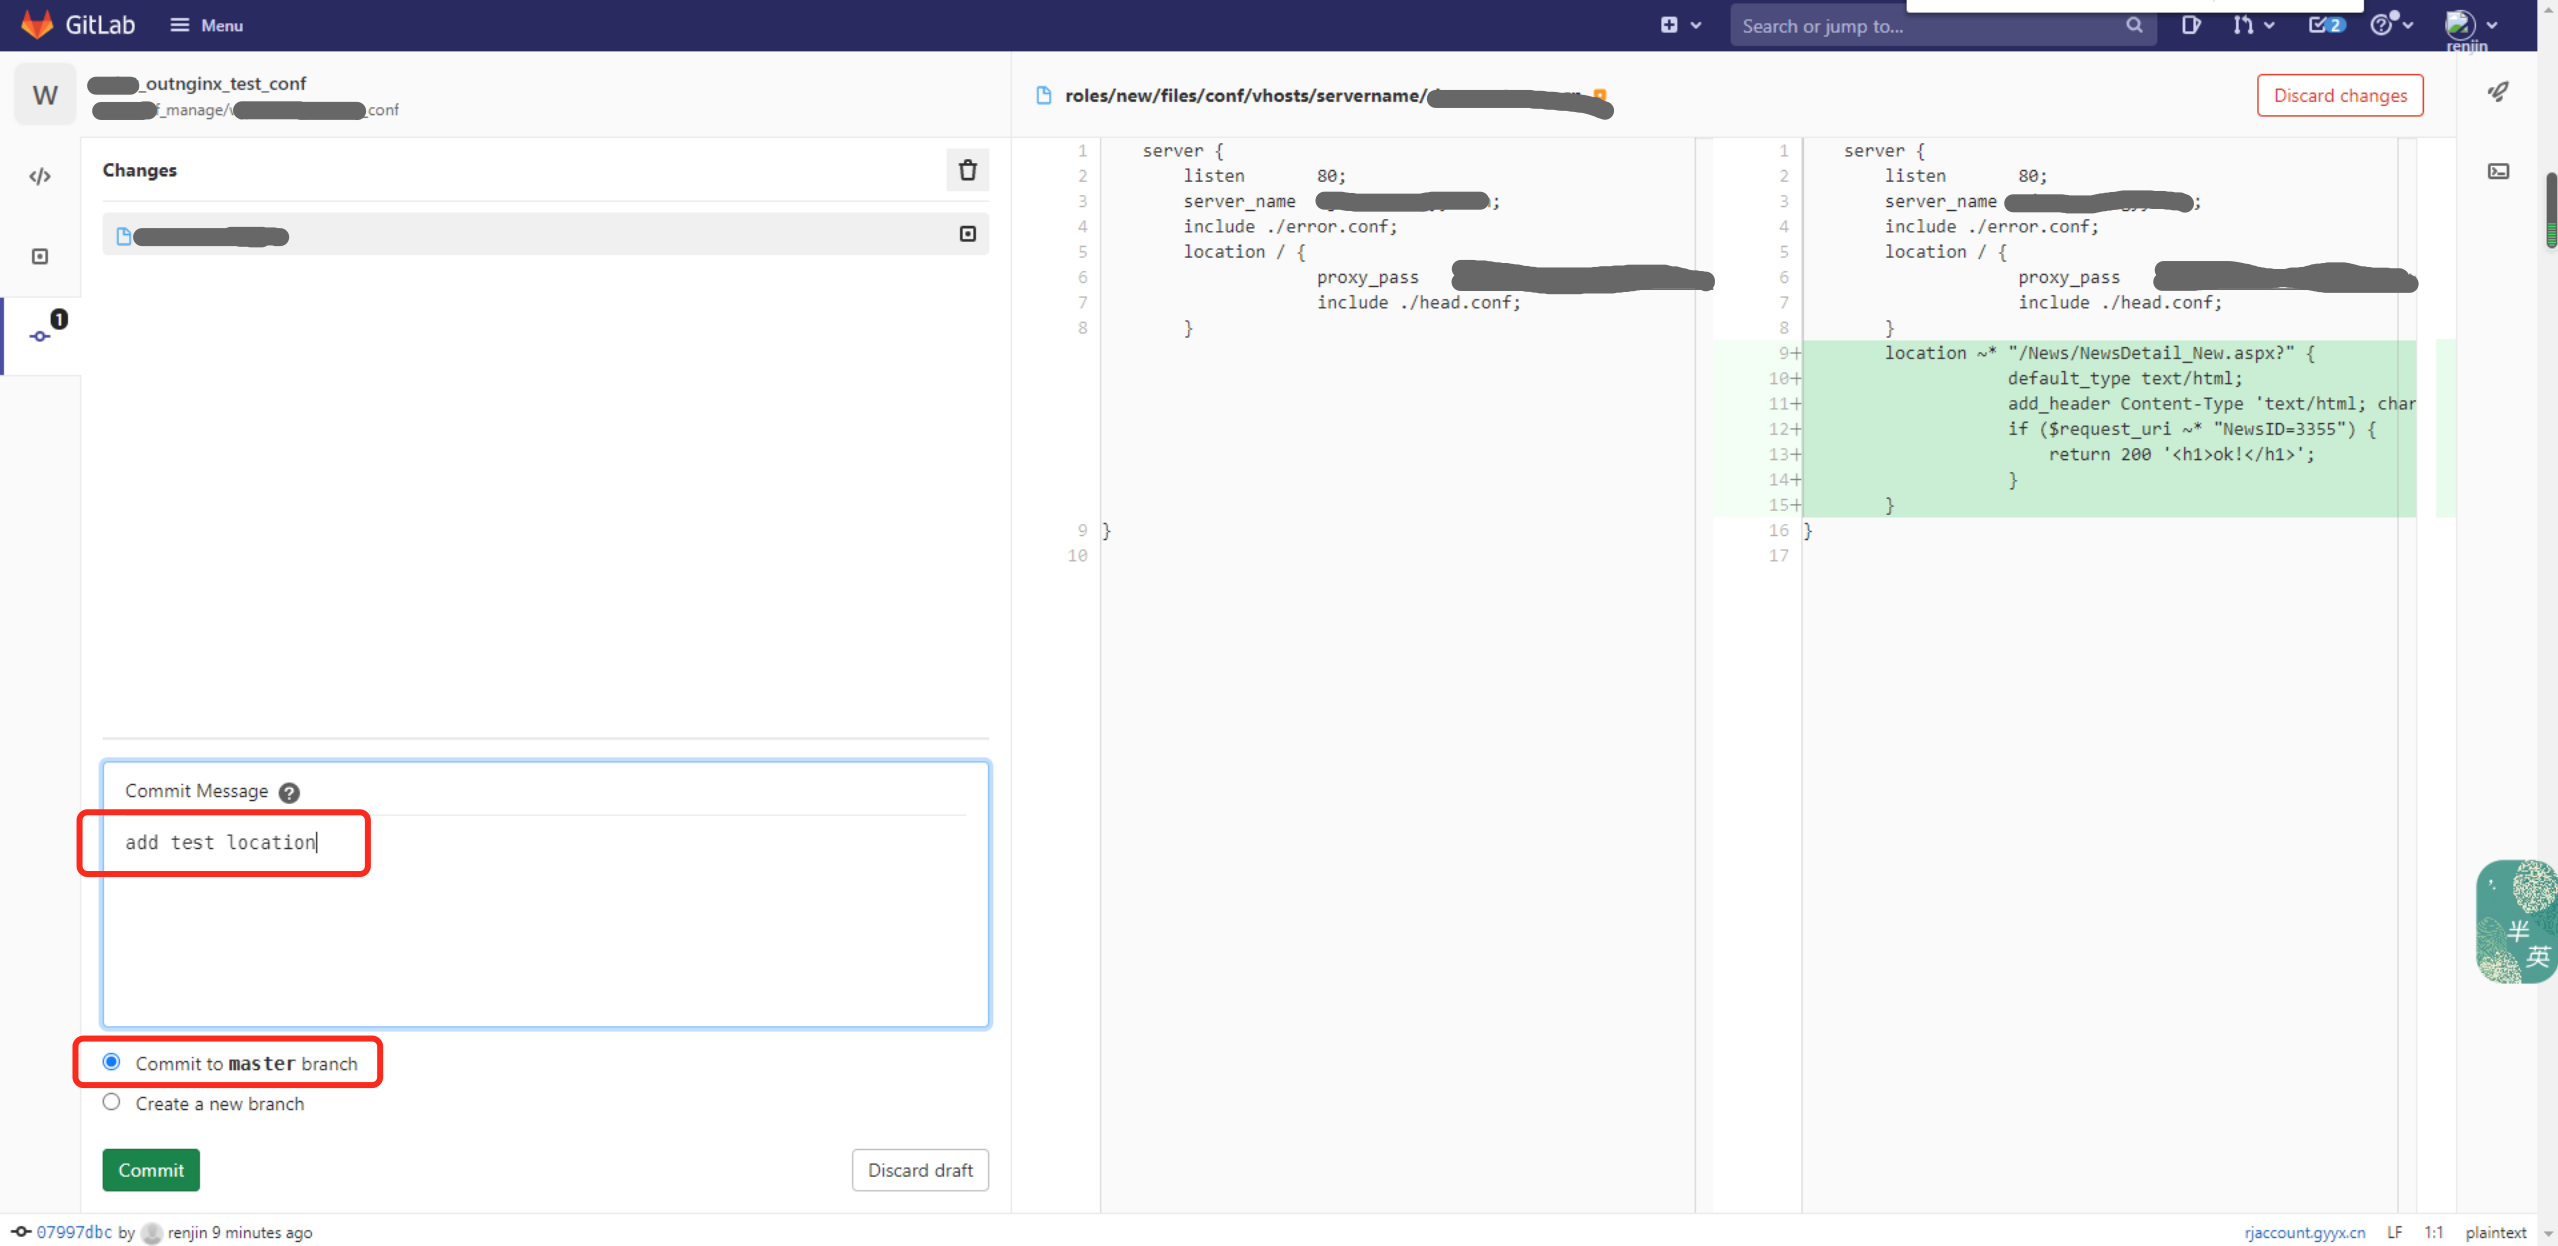
提交配置几秒后群里通知
nginx_prod/business1_outnginx_test_conf
10.xx.xxx.xx:nginx 配置文件重载 成功
10.xx.xxx.xx:nginx 配置文件重载 成功
10.xx.xxx.xx:nginx 配置文件重载 成功
``


### 补充

Jenkinsfile添加 pipeline样例

```pipline
pipeline {
    agent {node {label 'jenkins'}}
    stages {

        stage("Checkout") {
        steps {
            // 使用Git插件来检出代码
            script {
            checkout([$class: 'GitSCM', branches: [[name: '*/master']], doGenerateSubmoduleConfigurations: false, extensions: [], submoduleCfg: [], userRemoteConfigs: [[url: 'git@gitlab.test.com:xxx/ansible-deploy/xxx.git']]])
            }
            }
        }

        stage("ansible check run") {
            steps {
                sh """
                    set -o pipefail
                ansible-playbook run.yml -i hosts --check
                """
            }
                    }
        stage("ansible sync run") {
            steps {
                sh """
                    set -o pipefail
                ansible-playbook run.yml -i hosts | tee output.log
                """
            }
                    }

            stage("check reload") {
                    steps {
                        script {
                            // 获取GitLab提交人的用户名
                            def commitUserName = sh(script: 'git log -1 --pretty=format:%an', returnStdout: true).trim()

                            // 获取GitLab提交人的电子邮件地址
                            def commitUserEmail = sh(script: 'git log -1 --pretty=format:%ae', returnStdout: true).trim()

                            echo "提交执行用户: ${commitUserName}"
                            echo "提交执行用户邮箱: ${commitUserEmail}"

                            // 执行 check.sh,传递 commitUserName 和 commitUserEmail
                            withEnv(["COMMIT_USER_NAME=${commitUserName}", "COMMIT_USER_EMAIL=${commitUserEmail}"]) {
                                // 执行 check.sh,不使用位置变量,而是通过环境变量获取内容
                                sh "bash -x check.sh"
                            }
                        }
                        }

                    }
         }
     post {
             failure {
                           sh """ touch result.txt && sudo chmod 777 result.txt && sudo echo '' > result.txt
                               echo -e "> Jenkins-ansible-** ${currentBuild.projectName} ** \n 构建完成 \n > 构建结果: ** ${currentBuild.currentResult} ** \n > 构建耗时: ** ${currentBuild.durationString} **" > result.txt
                               python send_message.py
                             """
                      }
         }
}