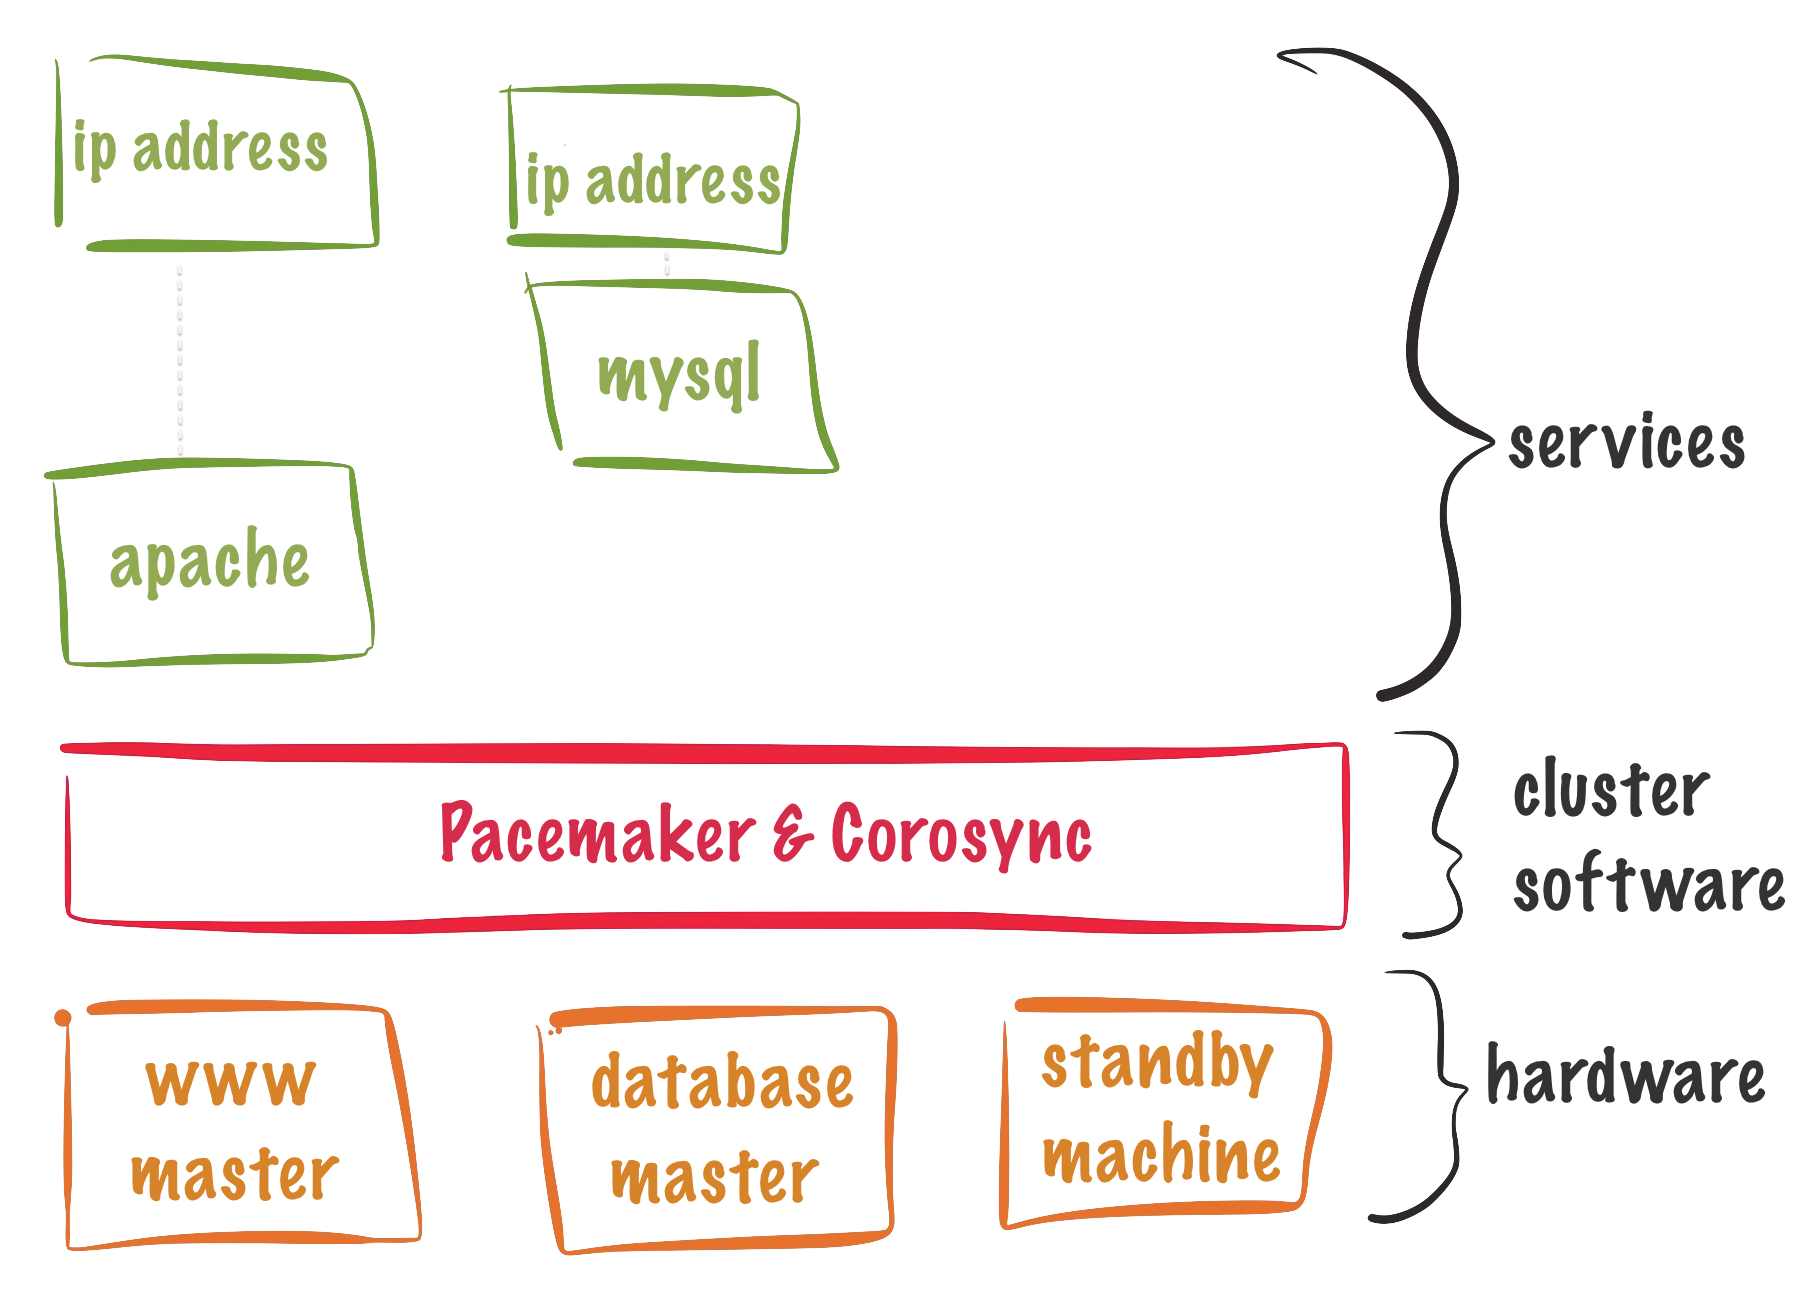
RHCA436-基于CentOS8pacemaker+corosync 集群资源管理
一、管理资源命令
1.列出资源
pcs resource list
pcs resource config [myweb]

2.查看资源帮助
pcs resource describe Filesystem

3.查看已经创建的资源
pcs status resources
pcs resource
pcs resource show myweb

4.创建资源,指定资源组
pcs resource create myfs Filesystem device=storage.san01.example.com:/myweb directory=/var/www/html  fstype=nfs --group=mygroup

5.查看资源配置参数
pcs resource config
pcs resource show myfs

6.删除资源参数
pcs resource op remove myfs minotor

7.添加资源参数
pcs resource op add myfs monitor interval=10s timeout=20s

8.修改资源控制参数
pcs resource update myfs op monitor interval=10s timeout=20s  on-fail=fence

测试:
[root@nodec ~]# umount /var/www/html
on-fail=fence  卸载挂载点会被fence掉,fence的默认策略是reboot

9.添加资源到资源组
pcs resource group add mygroup myweb
pcs resource group add mygroup myip

10.从资源组中移除资源
pcs resource group remove mygroup  myip

11.启动资源组中的资源
[root@nodea ~]# pcs resource enable myweb
[root@nodea ~]# pcs resource status
  * Resource Group: mygroup:
    * myfs  (ocf::heartbeat:Filesystem):   Started nodeb.private.example.com
    * myip  (ocf::heartbeat:IPaddr2):   Started nodeb.private.example.com
    * myweb  (systemd:httpd):   Starting nodeb.private.example.com

12.关闭资源组中的资源
[root@nodea ~]# pcs resource disable myweb
[root@nodea ~]# pcs resource status
  * Resource Group: mygroup:
    * myfs  (ocf::heartbeat:Filesystem):   Started nodeb.private.example.com
    * myip  (ocf::heartbeat:IPaddr2):   Started nodeb.private.example.com
    * myweb  (systemd:httpd):   Stopped (disabled)

pcs resource disable mygroup  停止资源组
pcs resource enable mygroup   启动资源组

13.清空资源报错信息
pcs resource cleanup
二、实验:创建文件系统资源,并加入资源组
1.在存储节点配置NFS共享存储
[root@storage ~]# mkdir /myweb
[root@storage ~]# chmod 777 /myweb
[root@storage ~]# cat /etc/exports
/myweb  *(rw)
[root@storage ~]# systemctl enable nfs-server
[root@storage ~]# systemctl restart nfs-server
[root@storage ~]# firewall-cmd  --permanent --add-service=nfs
[root@storage ~]# firewall-cmd  --permanent --add-service=rpc-bind
[root@storage ~]# firewall-cmd  --permanent --add-service=mountd
[root@storage ~]# firewall-cmd  --reload
2.创建文件系统资源
[root@nodea ~]# pcs resource create myfs Filesystem device=storage.san01.example.com:/myweb directory=/var/www/html  fstype=nfs --group=mygroup

[root@nodea ~]# pcs status resources
  * Resource Group: mygroup:
    * myfs  (ocf::heartbeat:Filesystem):   Started nodea.private.example.com
3.将资源移动到其他节点
pcs resource move myfs    将资源自动到其他任意节点,当前节点会变成负无穷
pcs resource move myfs nodec.private.example.com  将资源移动到nodec节点,nodec节点会变成正无穷
pcs resource ban myweb nodea.private.example.com  将某个节点设置为负无穷

查看限制规则:
[root@nodeb ~]# pcs constraint list
Location Constraints:
  Resource: myfs
    Enabled on:
      Node: nodec.private.example.com (score:INFINITY) (role:Started)
    Disabled on:
      Node: nodea.private.example.com (score:-INFINITY) (role:Started)
Ordering Constraints:
Colocation Constraints:
Ticket Constraints:

清除规则:
pcs resource clear myfs

说明:如果nodec故障,则会自动移动到nodeb节点,处于负无穷状态的节点是不会运行该资源的,即使没有其他节点可以使用,如果只有处于负无穷状态的主机存活,那么该资源会停止运行。
三、资源操作参数,修改参数可以对资源进行调优
#创建资源
[root@nodea ~]# pcs resource create myfs Filesystem device=storage.san01.example.com:/myweb directory=/var/www/html  fstype=nfs --group=mygroup

#修改资源控制参数
[root@nodea ~]# pcs resource update myfs op monitor interval=10s timeout=20s  on-fail=fence

#查看资源参数
[root@nodea ~]# pcs resource show myfs
[root@nodea ~]# pcs resource config
 Group: mygroup
  Resource: myfs (class=ocf provider=heartbeat type=Filesystem)
   Attributes: device=storage.san01.example.com:/myweb directory=/var/www/html fstype=nfs
   Operations: monitor interval=10s on-fail=fence timeout=20s (myfs-monitor-interval-10s)
               start interval=0s timeout=60s (myfs-start-interval-0s)
               stop interval=0s timeout=60s (myfs-stop-interval-0s)


#参数说明
1.name=value,value等于start,stop或者monitor
  start:启动时的配置
  stop:停止时的配置

2.interval=value,资源检测的间隔时间,默认是60s

3.timeout=value,检测到资源故障时的等待时间,超时后如果没有恢复再处理

4.on-fail=action,action等于ignore,block,stop,restart,fence,standby
  ignore:忽略故障,资源不做任何处理,仍然显示正常启动,手动恢复故障后,资源依然可用
      * myweb  (systemd:httpd):   Started nodea.private.example.com

  block:如果集群没有配置fence,那么资源会停止
      * myweb  (systemd:httpd):   FAILED nodea.private.example.com (blocked)

  stop:停止该节点的资源,资源组不会切换,手动恢复服务后,资源仍然不会运行
      * myweb  (systemd:httpd):   Stopped
      pcs resource refresh 会重新启动该资源

  restart:重启该节点的服务,尝试在该节点恢复,这是默认策略,如果不能恢复,则资源组会切换
      systemctl mask httpd; systemctl stop httpd
      说明:演示服务无法恢复的场景,资源组会切换

  fence:如果节点故障,并且配置了fence,则会按照fence的策略执行重启节点,则资源组会切换到其他节点

  standby:让节点进入standby模式。这个模式下的节点可以继续运行corosync和pacemaker但是无法运行资源。任何原本在此节点激活的资源都会被转移。这个特性在执行系统管理任务比如更新资源所需的packages时会非常有用。
四、实验一、添加ip,文件系统和http服务,并加入资源组
1.共享存储已经配置好
2.在所有节点安装http软件包
yum -y install httpd
说明:不需要启动服务,也不需要设置开机自启
3.在所有节点放行http服务
firewall-cmd  --permanent --add-service=http
firewall-cmd  --reload
4.在所有节点设置selinux
setsebool -P httpd_use_nfs=1
5.创建文件系统,ip和http资源
1.创建文件系统
pcs resource create myfs Filesystem device=storage.san01.example.com:/myweb directory=/var/www/html  fstype=nfs --group=mygroup

2.创建ip
pcs resource create myip IPaddr2 ip=172.25.250.99 cidr_netmask=24 --group mygroup

3.创建http服务
pcs resource create myweb systemd:httpd --group=mygroup

4.查看集群状态
[root@nodea ~]# pcs resource status
  * Resource Group: mygroup:
    * myfs  (ocf::heartbeat:Filesystem):   Started nodec.private.example.com
    * myip  (ocf::heartbeat:IPaddr2):   Started nodec.private.example.com
    * myweb  (systemd:httpd):   Started nodec.private.example.com

5.测试
curl 172.25.250.99

[root@nodec ~]# systemctl status httpd  #服务已经启动
[root@nodec ~]# ip a  #查看vip已经创建
五、控制资源迁移
1.查看限制规则:
[root@nodeb ~]# pcs constraint list
Location Constraints:
  Resource: myfs
    Enabled on:
      Node: nodec.private.example.com (score:INFINITY) (role:Started)
    Disabled on:
      Node: nodea.private.example.com (score:-INFINITY) (role:Started)
Ordering Constraints:
Colocation Constraints:
Ticket Constraints:

INFINITY:正无穷,更倾向于运行在该节点
-INFINITY:负无穷,不会运行在该节点,即使没有节点可以运行
2.手动移动集群资源
pcs resource move myfs    将资源自动到其他任意节点,当前节点会变成负无穷
pcs resource move myfs nodec.private.example.com  将资源移动到nodec节点,nodec节点会变成正无穷

#此种规则是临时的,因为可以用以下命令清除
pcs resource clear myfs


pcs constraint location myweb prefers nodea.private.example.com 将某个节点设置为正无穷
pcs constraint location myweb avoids nodec.private.example.com 将某个节点设置为负无穷

#删除以上规则规则
pcs constraint location delete location-myftp-nodec.private.example.com-INFINITY
3.管理节点的优先级
1.设置优先级,数值越大优先级越高
pcs constraint location myweb prefers nodea.private.example.com=200
pcs constraint location myweb prefers nodeb.private.example.com=500

[root@nodea ~]# pcs resource status
  * Resource Group: mygroup:
    * myfs  (ocf::heartbeat:Filesystem):   Started nodeb.private.example.com
    * myip  (ocf::heartbeat:IPaddr2):   Started nodeb.private.example.com
    * myweb  (systemd:httpd):   Started nodeb.private.example.com


2.查看规则,--full可以查看规则的id
[root@nodea ~]# pcs constraint list --full
Location Constraints:
  Resource: myftp
    Enabled on:
      Node: nodec.private.example.com (score:INFINITY) (id:location-myftp-nodec.private.example.com-INFINITY)
  Resource: myweb
    Enabled on:
      Node: nodea.private.example.com (score:200) (id:location-myweb-nodea.private.example.com-200)
      Node: nodeb.private.example.com (score:500) (id:location-myweb-nodeb.private.example.com-500)
    Disabled on:
      Node: nodec.private.example.com (score:-INFINITY) (id:location-myweb-nodec.private.example.com--INFINITY)
Ordering Constraints:
Colocation Constraints:
Ticket Constraints:

3.删除优先级
pcs constraint delete 规则id
pcs constraint delete location-myweb-nodea.private.example.com-200
pcs constraint delete location-myweb-nodeb.private.example.com-500
六、实验:添加另一组资源ip,文件系统和ftp服务,并加入资源组
1.存储端
mkdir /ftp
chmod 777
cat /etc/exports
/ftp *(rw)
systemctl restart nfs-server

2.集群
#每个节点都执行
yum -y install vsftpd
firewall-cmd  --permanent --add-service=ftp
firewall-cmd  --reload
setsebool -P ftpd_use_nfs=1

#对集群的操作,在任意一个节点执行
pcs resource create myftpfs Filesystem device=storage.san01.example.com:/ftp directory=/var/ftp/pub fstype=nfs --group=myftp

pcs resource create myftpip IPaddr2 ip=172.25.250.100 cidr_netmask=24 --group myftp

pcs resource create myftpservice systemd:vsftpd --group=myftp

3.查看集群状态
[root@nodea pub]# pcs resource status
  * Resource Group: mygroup:
    * myfs  (ocf::heartbeat:Filesystem):   Started nodea.private.example.com
    * myip  (ocf::heartbeat:IPaddr2):   Started nodea.private.example.com
    * myweb  (systemd:httpd):   Started nodea.private.example.com
  * Resource Group: myftp:
    * myftpfs  (ocf::heartbeat:Filesystem):   Started nodeb.private.example.com
    * myftpip  (ocf::heartbeat:IPaddr2):   Started nodeb.private.example.com
    * myftpservice  (systemd:vsftpd):   Started nodeb.private.example.com


4.一个集群运行两个资源组

资源组nygroup优先运行在nodea上
资源组myftp 优先运行在nodec上

[root@nodea pub]# pcs constraint location myftp prefers nodec.private.example.com
[root@nodea pub]# pcs constraint list
Location Constraints:
  Resource: myftp
    Enabled on:
      Node: nodec.private.example.com (score:INFINITY)
  Resource: myweb
    Enabled on:
      Node: nodea.private.example.com (score:INFINITY)
    Disabled on:
      Node: nodec.private.example.com (score:-INFINITY)
Ordering Constraints:
Colocation Constraints:
Ticket Constraints:
[root@nodea pub]# pcs resource status
  * Resource Group: mygroup:
    * myfs  (ocf::heartbeat:Filesystem):   Started nodea.private.example.com
    * myip  (ocf::heartbeat:IPaddr2):   Started nodea.private.example.com
    * myweb  (systemd:httpd):   Started nodea.private.example.com
  * Resource Group: myftp:
    * myftpfs  (ocf::heartbeat:Filesystem):   Started nodec.private.example.com
    * myftpip  (ocf::heartbeat:IPaddr2):   Started nodec.private.example.com
    * myftpservice  (systemd:vsftpd):   Started nodec.private.example.com