


[toc]
python 企业微信-微信信息发送

主要用到的模块 urllib,json,simplejson,requests,bs4
- urllib: urllib的request模块可以非常方便地抓取URL内容,也就是发送一个GET请求到指定的页面,然后返回HTTP的响应;
- json: JSON(JavaScript Object Notation) 是一种轻量级的数据交换格式。易于人阅读和编写。同时也易于机器解析和生成;
- simplesjon: simplejson 是 json 标准模块的扩展(基础功能相同),是 pypi 提供的拓展模块,需要另行安装。不过可以使用 python 自带的 json 库,基本是相同的使用方法(提供的接口功能基本一致)。在 python 的 library 文档中将 JSON 归为网络数据控制类,很好的说明了他们的用途,主要用于网络数据控制,编解码等。但是也具有其他的用途,比如可以用来作为配置文件的读写模块,简单的文件操作等;
- requests: python HTTP库,一般用于爬虫;
- Beautiful Soup提供一些简单的、python式的函数用来处理导航、搜索、修改分析树等功能。它是一个工具箱,通过解析文档为用户提供需要抓取的数据,因为简单,所以不需要多少代码就可以写出一个完整的应用程序;
创建企业微信用应用
注: 这里我使用的是个人注册的企业微信,因为需要管理员的权限
用企业微信管理员登录后,我们可以新建一个应用程序用于送通知信息
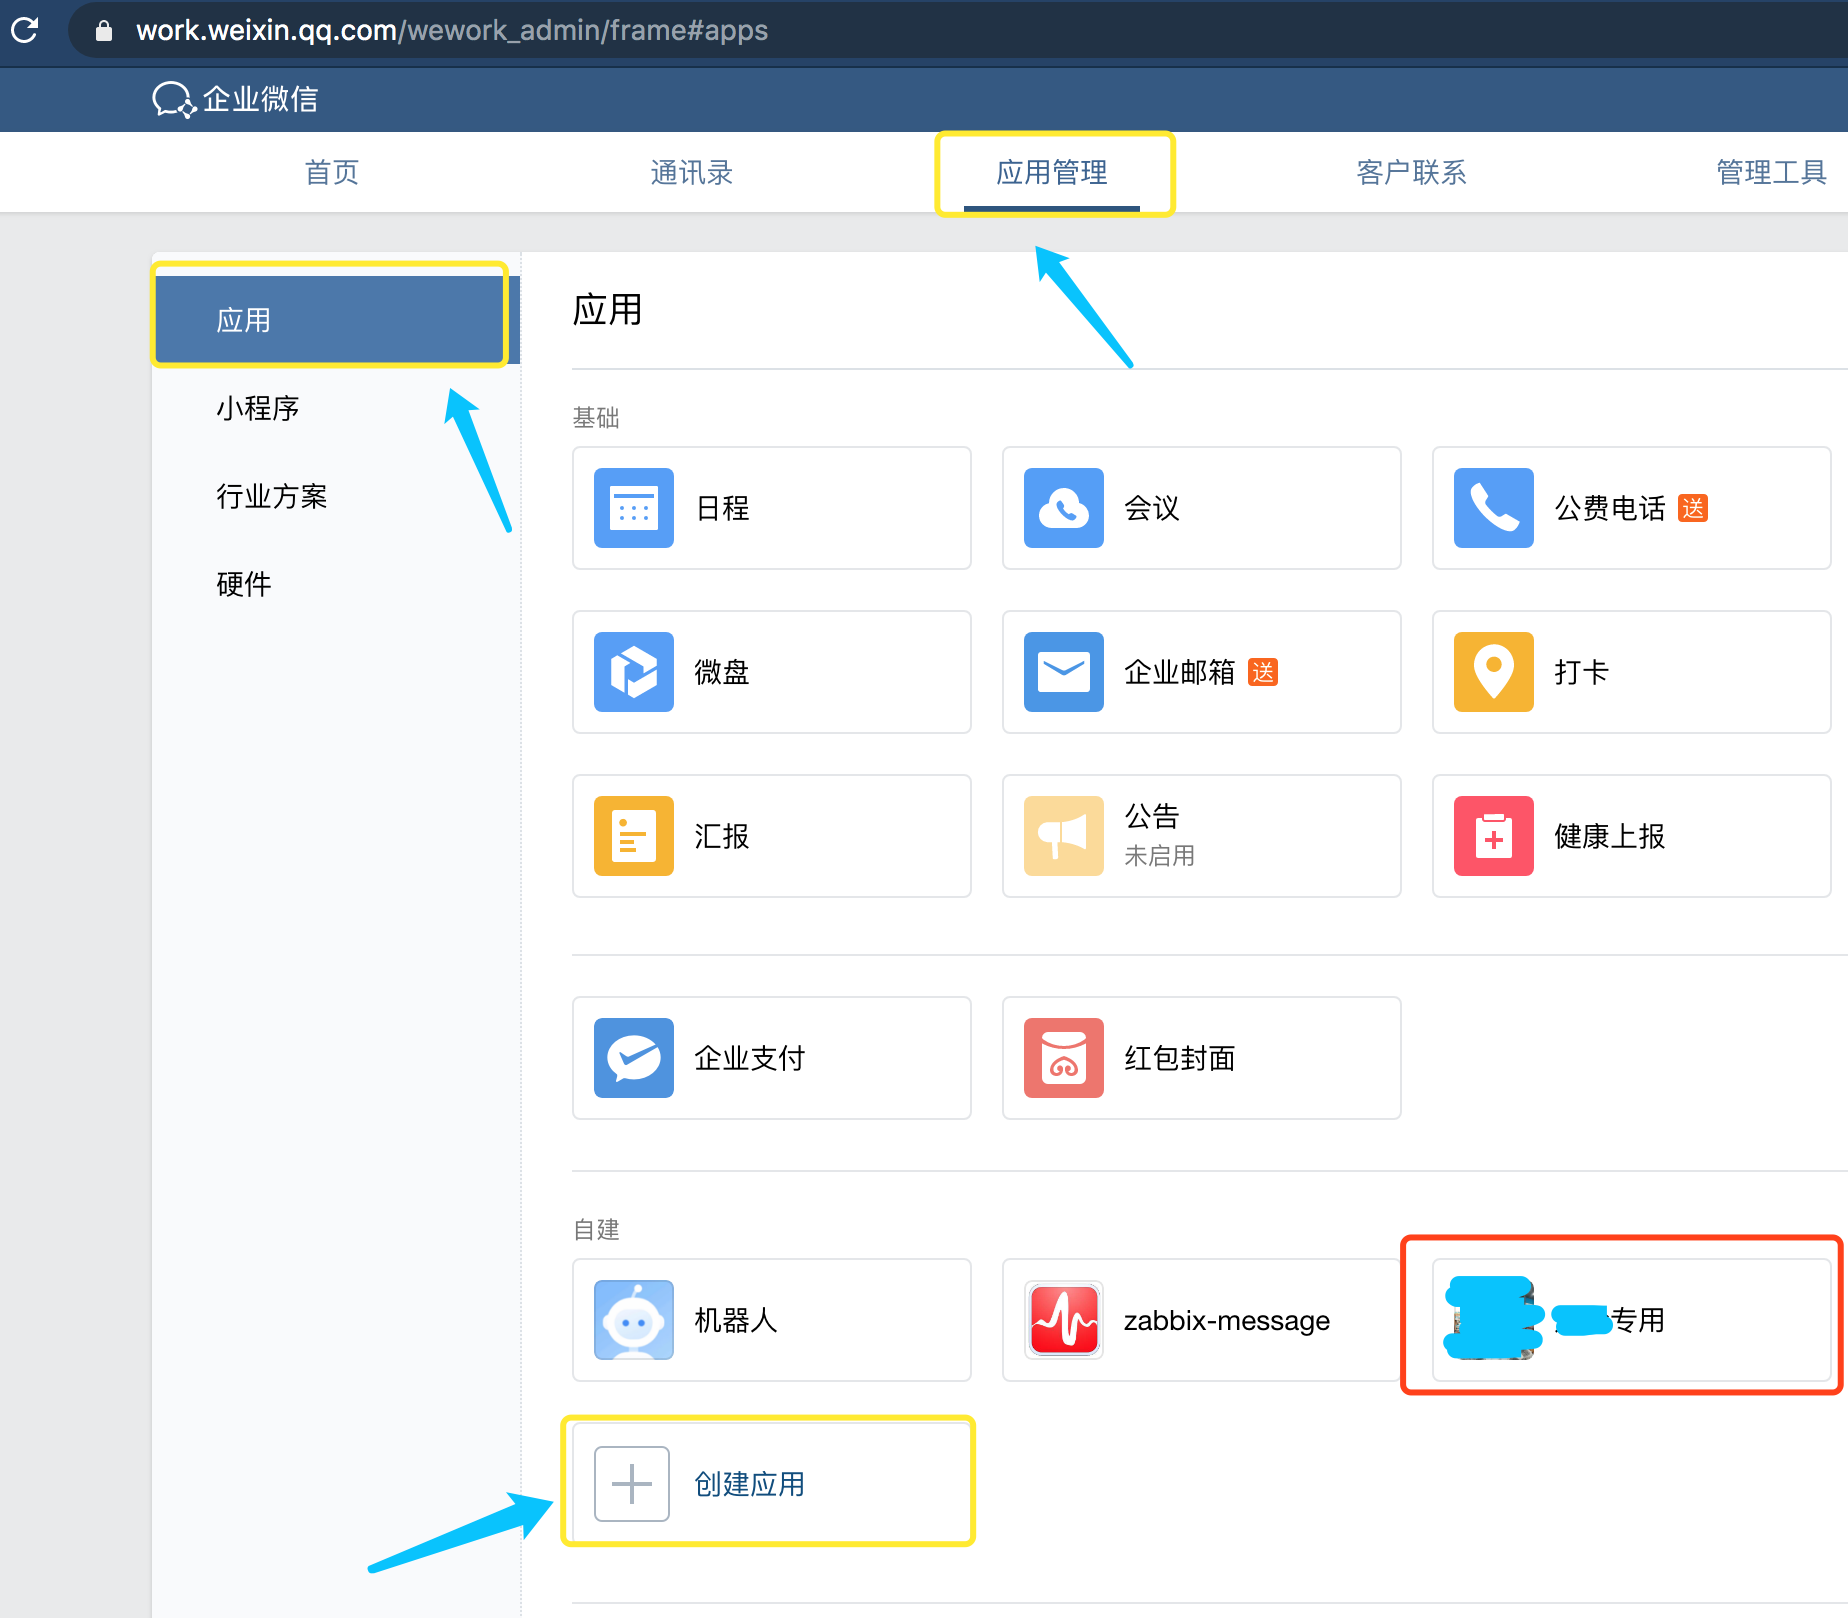
我这里已经新建好了专用应用,点进去后添加可见应用的人。也就是所谓的应用授权。
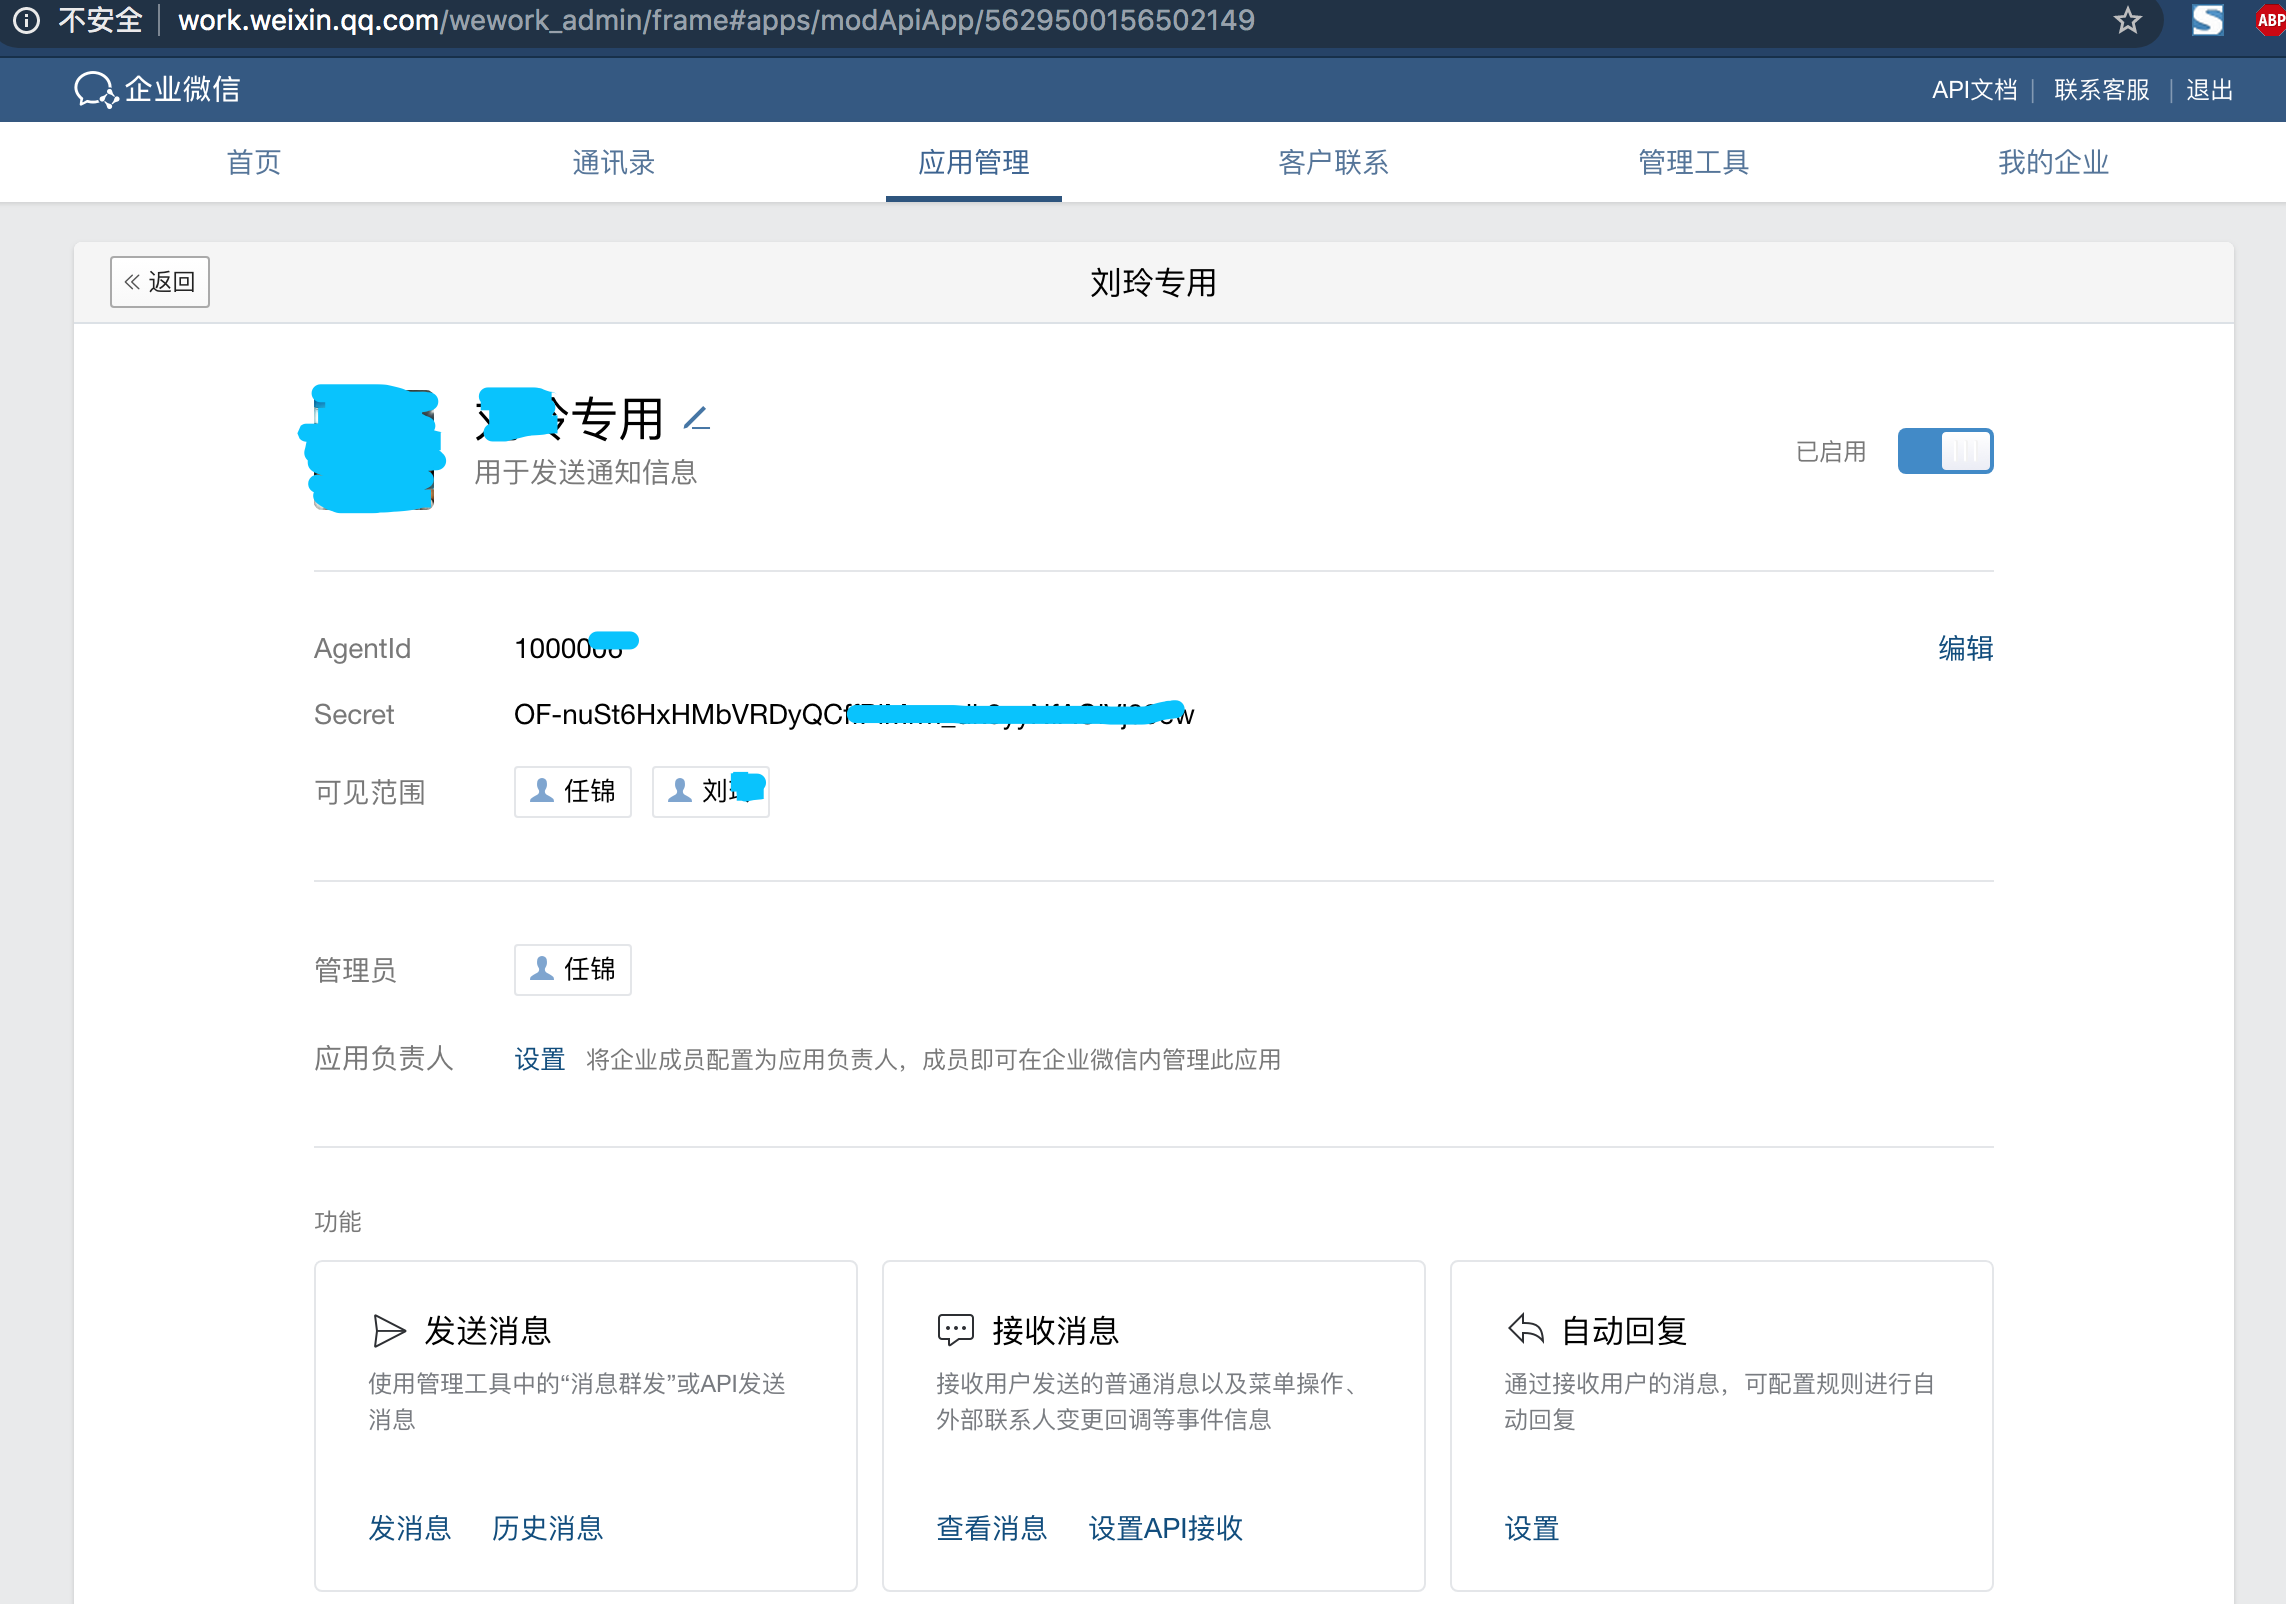
在这里要记录下 Agentid 和 Secert 用于发送通时的认证口令
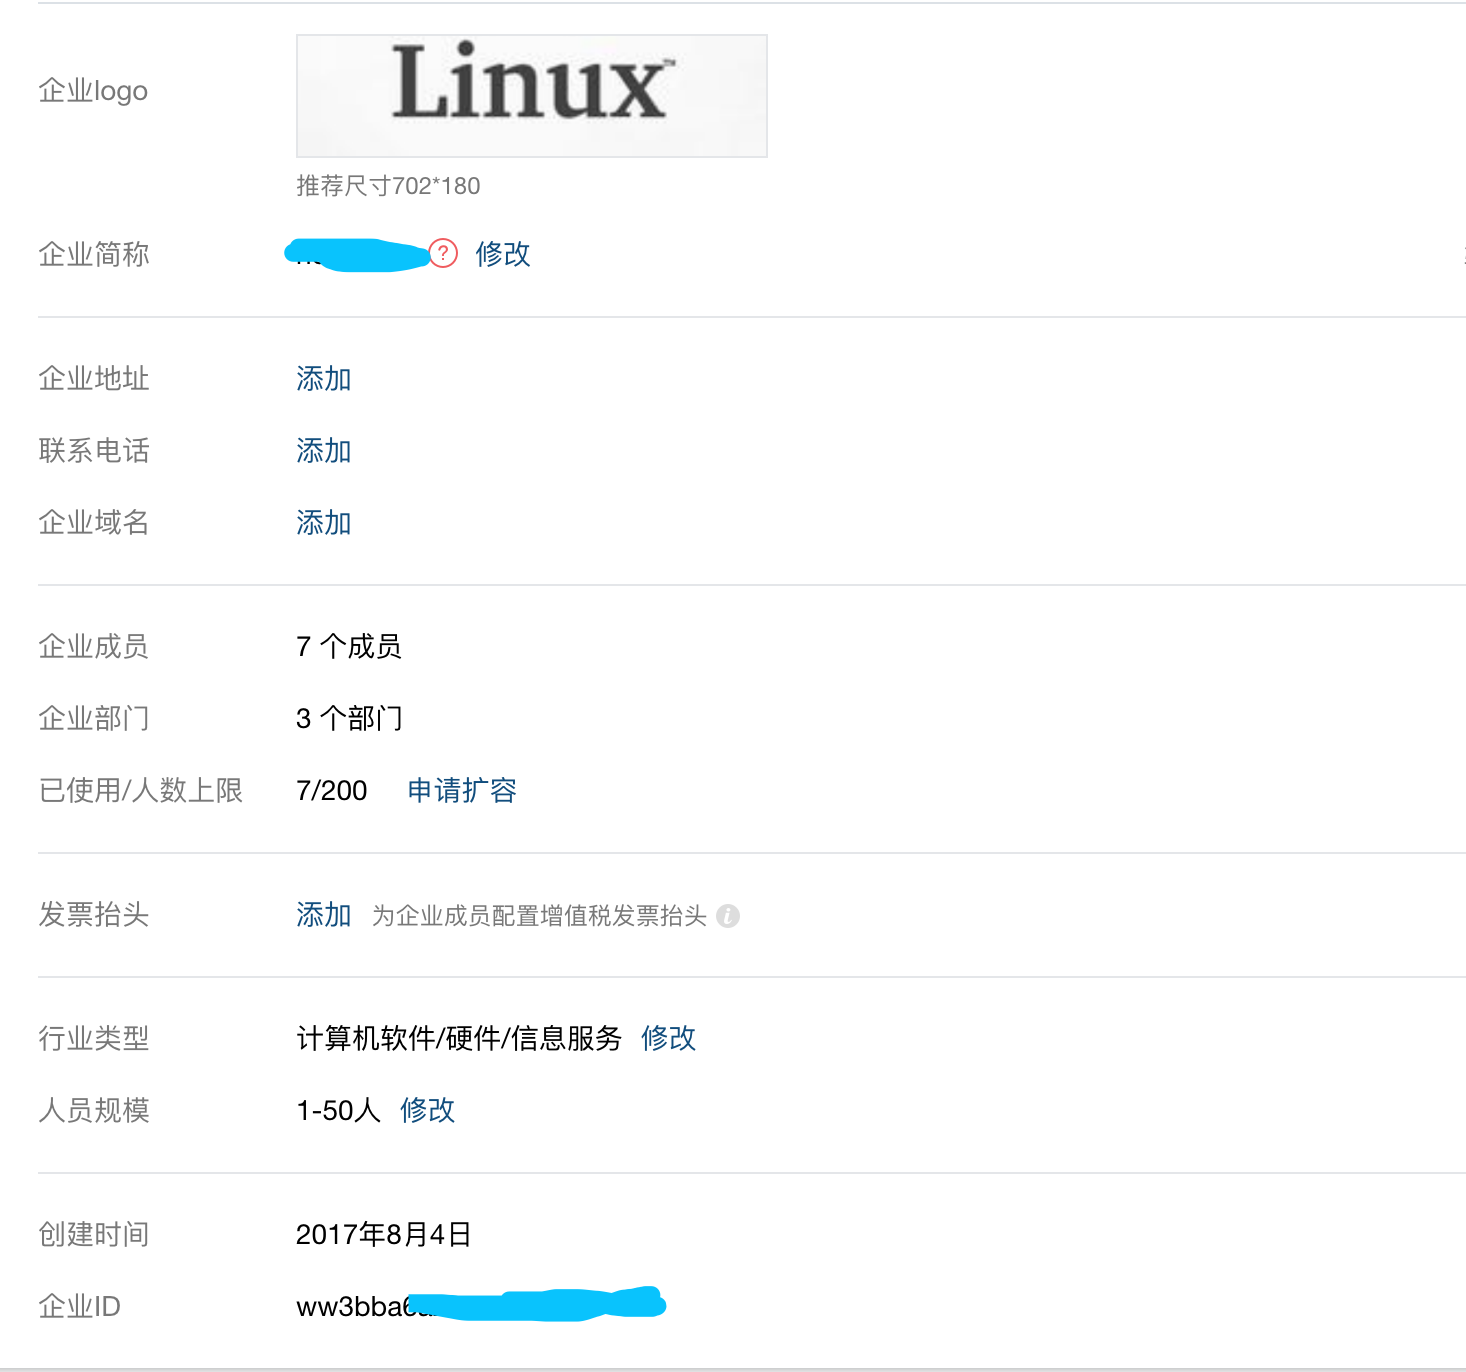
点击我的企业 —>企业信息 ,在这里可以看到企业ID, 也用于代码中配置的通知id用
好了,这时候我们就可以开始写代码了,在此,我要发送的信息是天气信息,每日金句,和通知专项等信息
第三方网站、接口
中国天气网 天气信息
在这里我选择的是大同的天气页面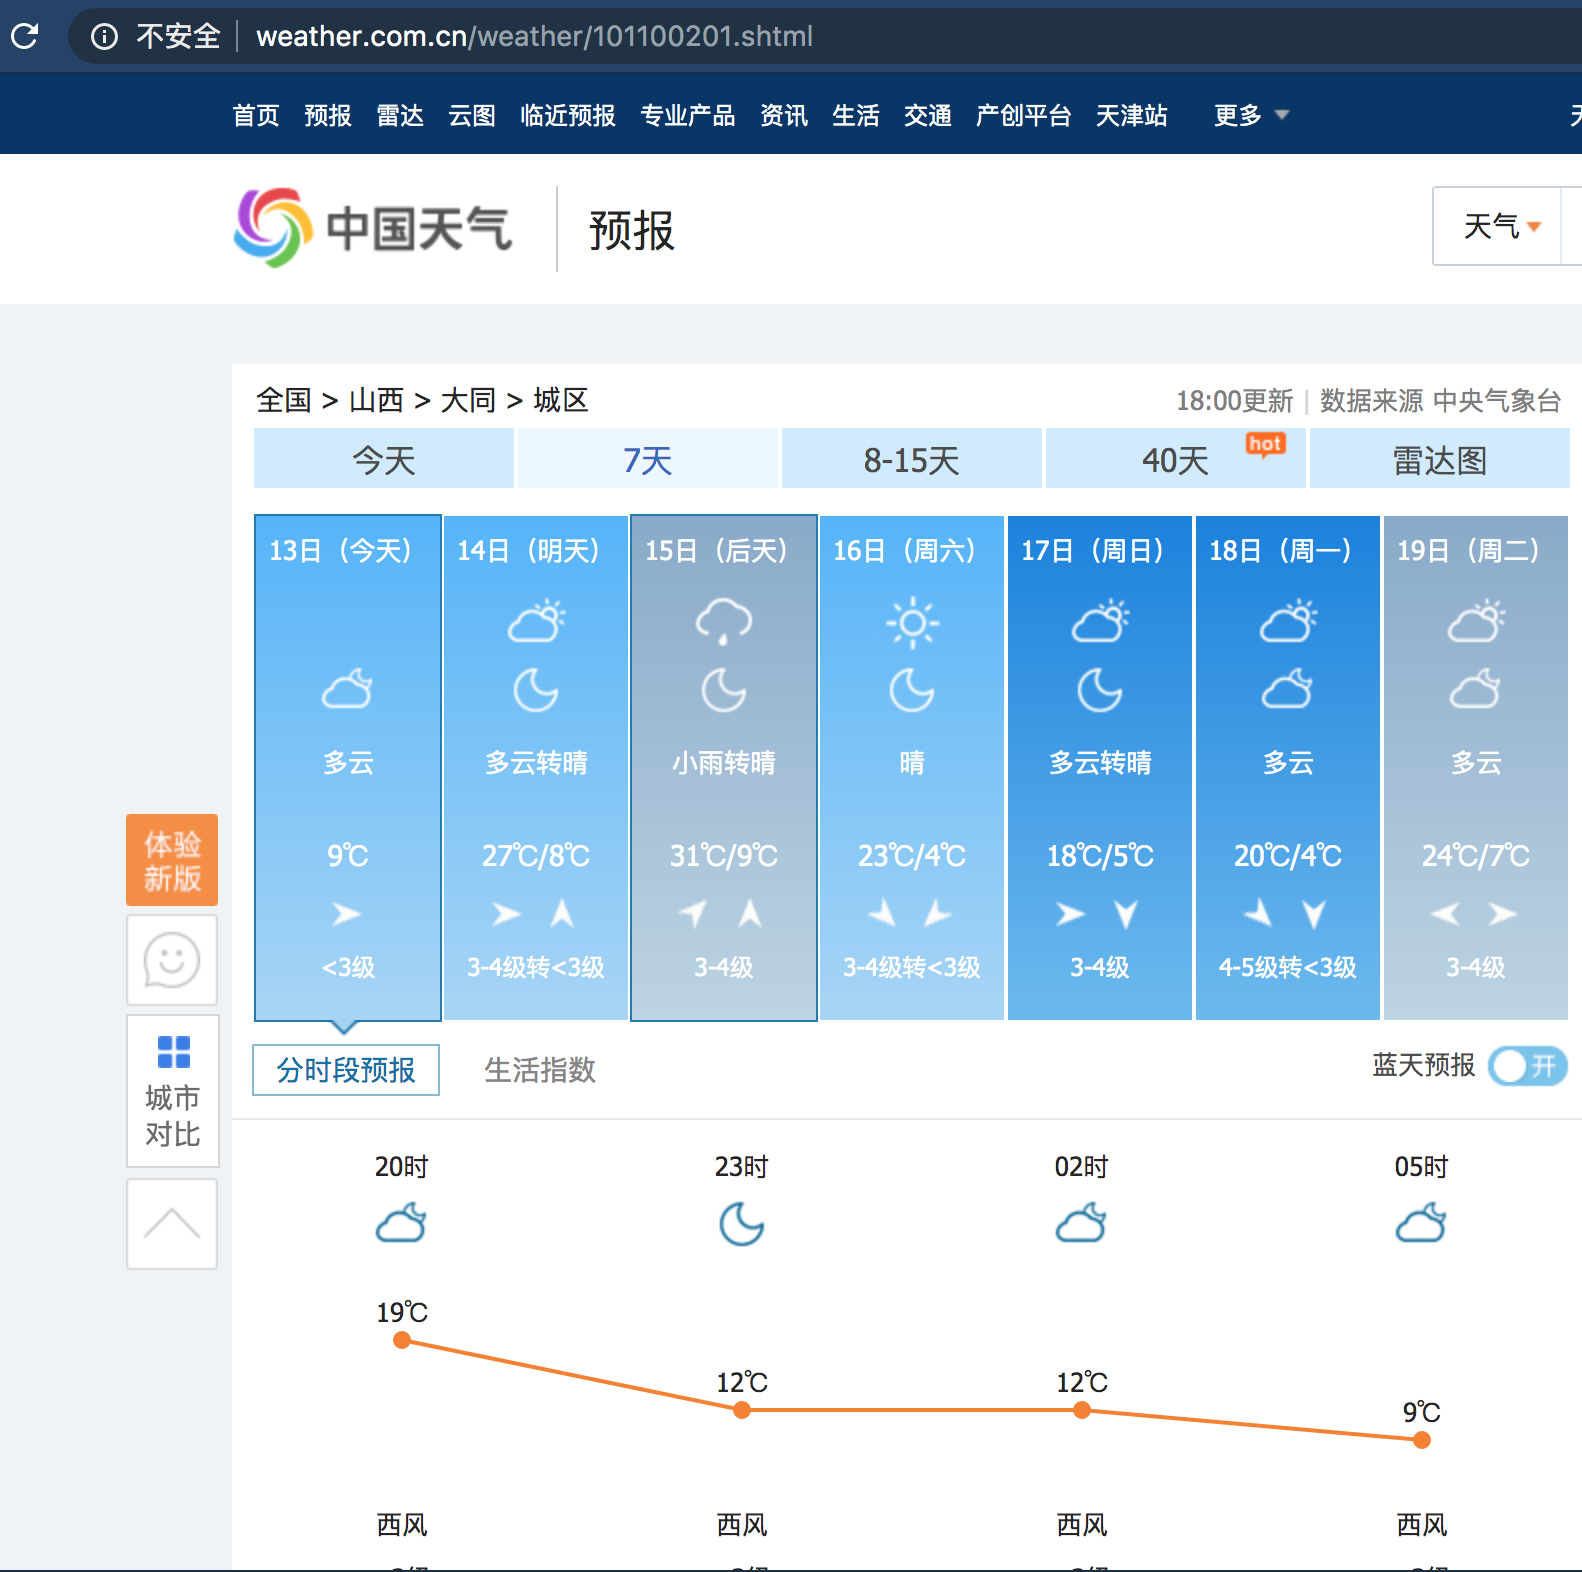
接口信息如下

python 爬取天气—>调用一言接口—>专项通知
代码实现
登录个人服务器,source python3 环境
~]# alias mp3='source  ~/mypython/py3_env/bin/activate && cd ~/mypython/python3'
~]# mp3
#!/usr/bin/env python3
# -*- coding: utf-8 -*-
import urllib
import urllib.request as urllib2
import json
import sys
import simplejson
import requests
from bs4 import BeautifulSoup
# reload(sys)
# sys.setdefaultencoding('utf-8')
def gettoken(corpid,corpsecret):
gettoken_url = 'https://qyapi.weixin.qq.com/cgi-bin/gettoken?corpid=' + corpid + '&corpsecret=' + corpsecret
print(gettoken_url)
try:
token_file = urllib2.urlopen(gettoken_url)
except urllib2.HTTPError as e:
print(e.code)
print(e.read().decode("utf8"))
sys.exit()
token_data = token_file.read().decode('utf-8')
token_json = json.loads(token_data)
token_json.keys()
token = token_json['access_token']
return token
def senddata(access_token,user,subject,content):
send_url = 'https://qyapi.weixin.qq.com/cgi-bin/message/send?access_token=' + access_token
send_values = {
"touser": user, #企业号中的用户帐号,如果配置不正常,将按部门发送。
"toparty":"2", #企业号中的部门id。
"msgtype":"text", #消息类型。
"agentid":"100xxxxx", #企业号中的应用id。
"text":{
"content":subject + '\n' + content
},
"safe":"0"
}
# send_data = json.dumps(send_values, ensure_ascii=False)
send_data = simplejson.dumps(send_values, ensure_ascii=False).encode('utf-8')
send_request = urllib2.Request(send_url, send_data)
response = json.loads(urllib2.urlopen(send_request).read())
print(str(response))
def get_tianqi(url, data=None): # 用来获取天气网页信息
try:
r = requests.get(url,timeout=30)
r.raise_for_status()
r.encoding = r.apparent_encoding
return r.text
except:
return '产生异常'
def get_qitian_data(html,city): # 处理网页信息提取近七天的情况
tianqi_list = []
soup = BeautifulSoup(html, 'html.parser')
body = soup.body
data = body.find('div',{'id': '7d'})
ul = data.find('ul')
list1 = ul.find_all('li')
for day in list1:
temp_list = [city]
date = day.find('h1').string
temp_list.append(date)
info = day.find_all('p')
temp_list.append(info[0].string)
if info[1].find('span') is None:
temperature_highest = ' '
else:
temperature_highest = info[1].find('span').string
if info[1].find('i') is None:
temperature_lowest = ' '
else:
temperature_lowest = info[1].find('i').string
temp_list.append(temperature_highest)
temp_list.append(temperature_lowest)
wind_scale = info[2].find('i').string
temp_list.append(wind_scale)
tianqi_list.append(temp_list)
return tianqi_list
def save_tianqi_data(data,filename): # 将近七天的天气信息存放在文件中
f=open(filename,"wt")
for line in data:
f.write(str(line)+'\n')
f.close()
def get_hitokoto(get_url):
f = requests.get(get_url)
hitokoto_message = f.json()
hitokoto_message_data = '嗨: ' + hitokoto_message['hitokoto']
hitokoto_message_data = hitokoto_message_data.replace(",",",\n").replace(",",",\n")
hitokoto_message_from = '来自: ' + hitokoto_message['from']
return [hitokoto_message_data,hitokoto_message_from]
def postrsg(filename,get_url,zhuanxiang_file): #取出信息并且用机器人发消息
hitokoto_memssage_print = get_hitokoto(get_url)
with open(filename,'r') as f:
lines = f.readlines()
first = lines[0].rstrip("\n")
first = first.replace("['",'').replace("']",'').replace("'","").replace("(今天)","")
first1 = first.split(',',2)[0:2]
str_first1 = "".join(first1).replace(" ","")
first2 = first.split(',',2)[-1]
str_first2 = "".join(first2).replace(" ","")
sec = lines[1].rstrip("\n")
sec = sec.replace("['",'').replace("']",'').replace("'","").replace("(明天)","")
sec1 = sec.split(',',2)[0:2]
str_sec1 = "".join(sec1).replace(" ","")
sec2 = sec.split(',',2)[-1]
str_sec2 = "".join(sec2).replace(" ","")
with open(zhuanxiang_file,'r') as f:
zhuanxiang_data = f.readlines()
zhuanxiang_data = "".join(zhuanxiang_data)
# tianqi_head = '天津天气信息'
# formate_box = '☀️' * 12 + '\n'
# formate_head = '{:<1}{:^36}{:>1}'.format('☀️' * 1, tianqi_head, '☀️' * 1) + '\n'
# formate_first = '{:<1}{:^36}{:>1}'.format('' * 1, str_first1, '' * 1) + '\n'
# formae_sec = '{:<2}{:^26}{:>2}'.format('*' * 2, str_first2, '*' * 2) + '\n'
# formate_box_end = '*' * 30
if '晴' in str_first2:
weather = '☀️'
elif '雨' in str_first2:
weather = '☂'
elif '雪' in str_first2:
weather = '❄️'
elif '云' in str_first2:
weather = '⛅️'
elif '阴' in str_first2:
weather = '🌑'
else:
weather = '*'
if '晴' in str_sec2:
weather_2 = '☀️'
elif '雨' in str_sec2:
weather_2 = '☂'
elif '雪' in str_sec2:
weather_2 = '❄️'
elif '云' in str_first2:
weather_2 = '⛅️'
elif '阴' in str_first2:
weather_2 = '🌑'
else:
weather_2 = '*'
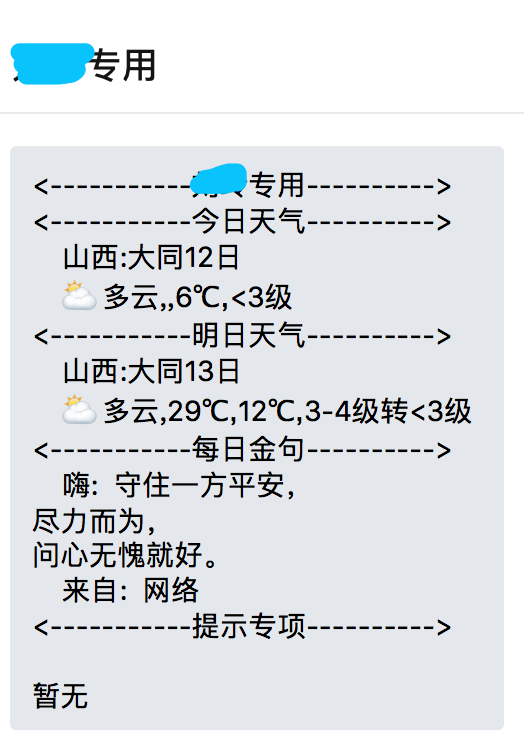
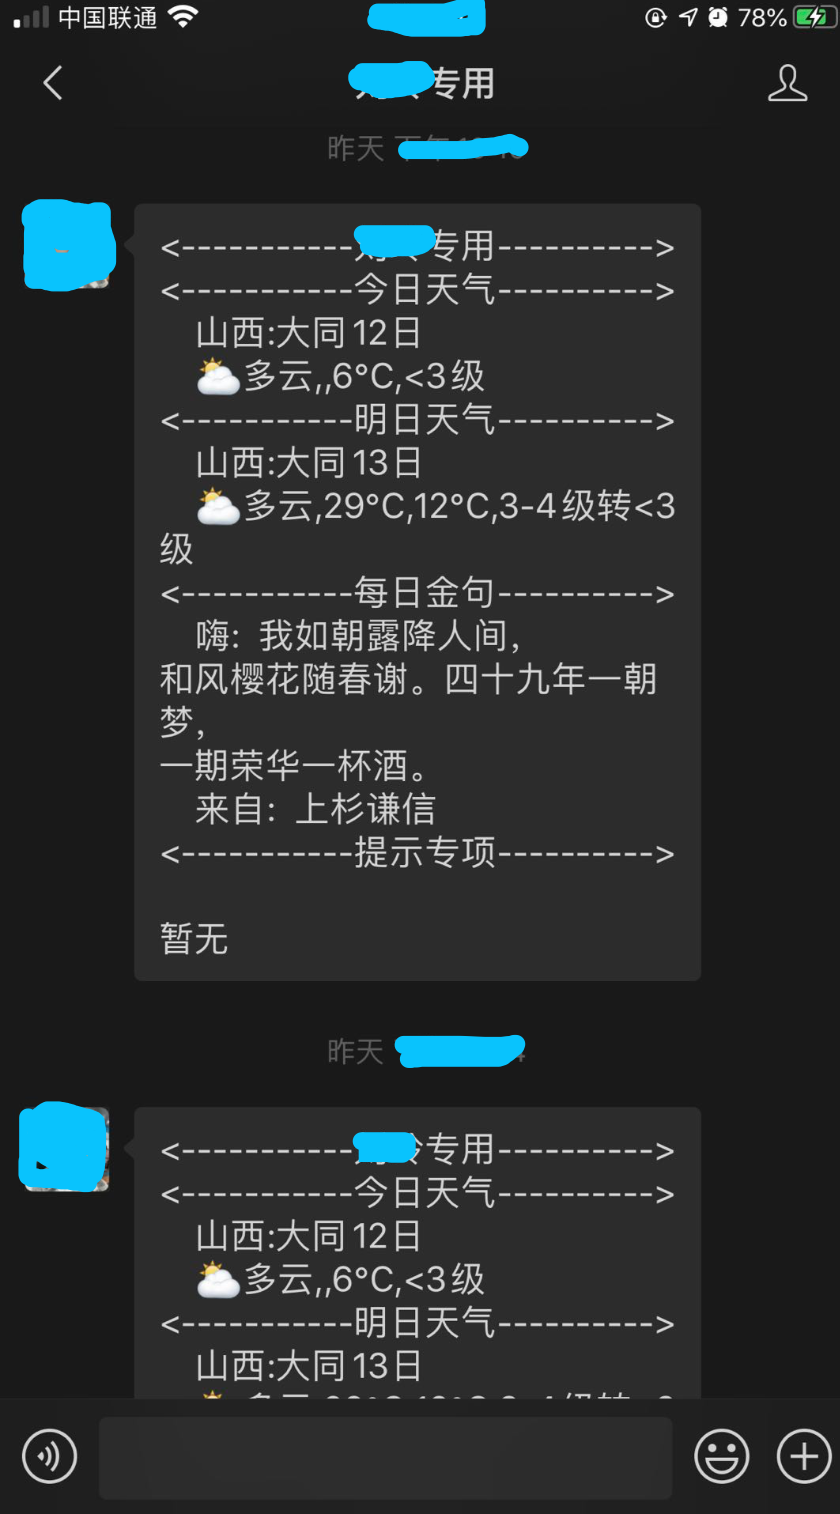
message_subject = '''<-----------任锦专用---------->'''
message_content = '''<-----------今日天气---------->
{}
*{}
<-----------明日天气---------->
{}
#{}
<-----------每日金句---------->
{}
{}
<-----------提示专项---------->
{} '''.format(str_first1, str_first2, str_sec1, str_sec2,
hitokoto_memssage_print[0], hitokoto_memssage_print[1],
zhuanxiang_data).replace('*', weather).replace('#', weather_2)
return [message_subject,message_content]
if __name__ == '__main__':
zhuanxiang_file = '/var/www/liuxxxx/liuxxxx_put.txt'
tianqi_url = 'http://www.weather.com.cn/weather/101100201.shtml'
html = get_tianqi(tianqi_url)
result = get_qitian_data(html, '山西: 大同')
filename = './liuxxxx.message'
save_tianqi_data(result, filename)
get_url = 'https://v1.hitokoto.cn/'
postrsg_message = postrsg(filename,get_url,zhuanxiang_file)
user = str('RenJin')
subject = str(postrsg_message[0]) # 发送的标题信息
content = str(postrsg_message[1]) # 发送的主体信息
corpid = 'ww3xxxxxxxxxxxxxxxxx' #企业号的id
corpsecret = 'OF-nuSt6xxxxxxxxxxxxxxxxxxxxxxxxxxxxxxxxxxxxxx' #管理组凭证密钥
accesstoken = gettoken(corpid,corpsecret)
senddata(accesstoken,user,subject,content)
这个时候执行就可以在企业微信上收到信息了
企业微信能收到通知后,可以测试一下微信端的收信
在此补充一下,如果想在微信端收到通知信息,在收信息的人关注微信号就可以了
在企业微信页面点击我的企业 —> 微信插件 —> 邀请关注
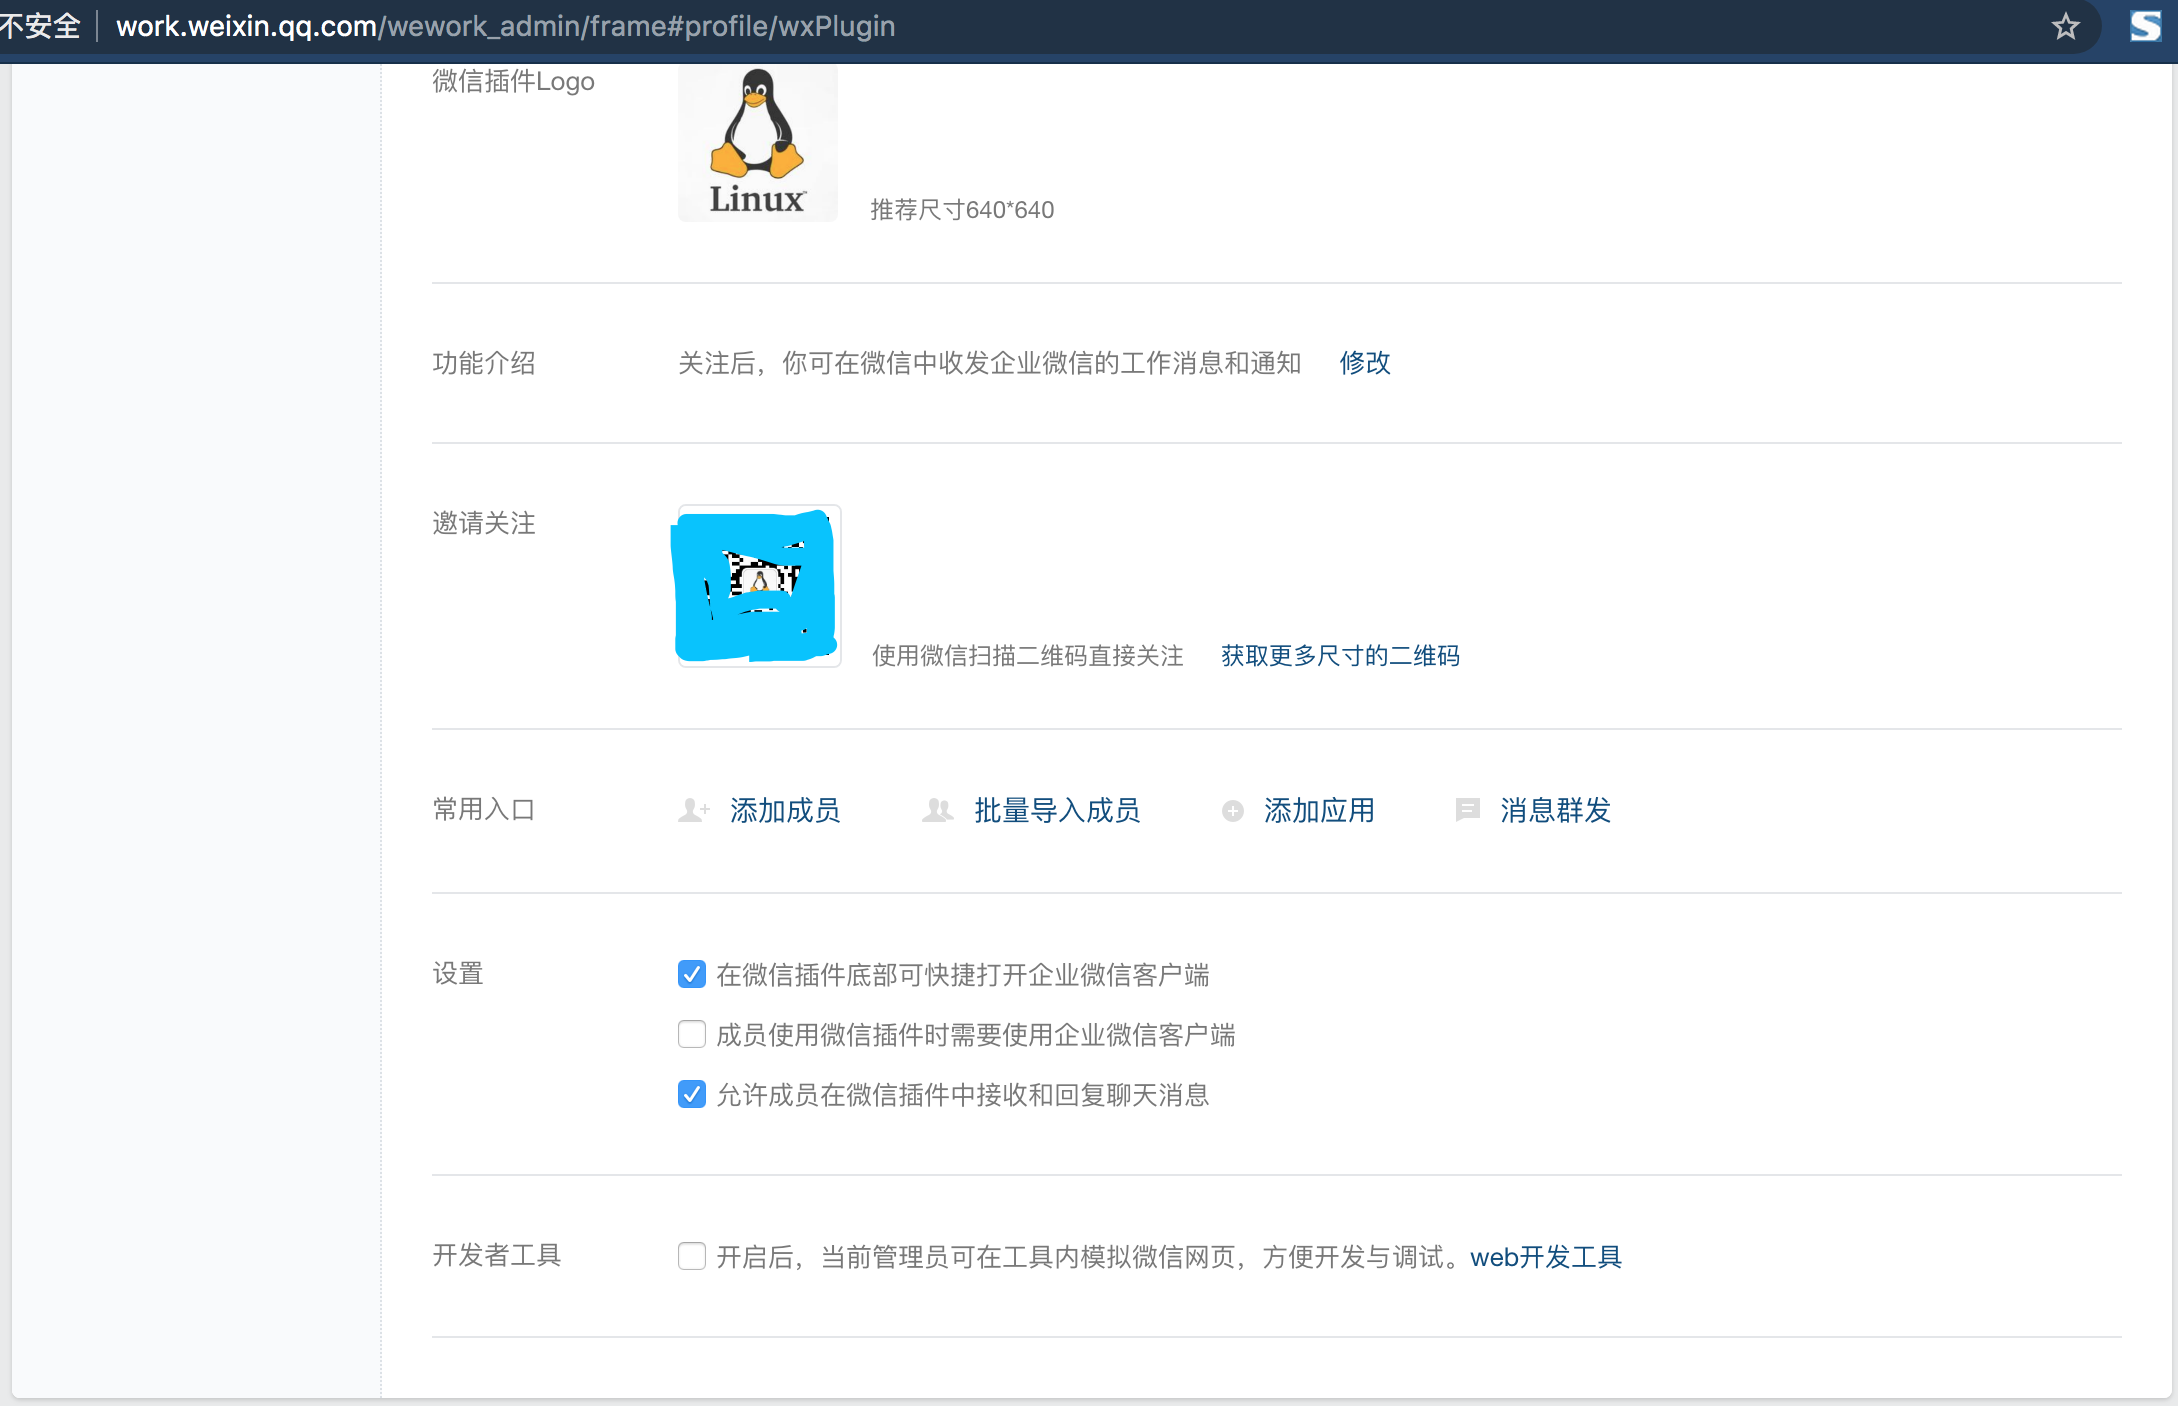
关注后,再发送就会收到如下信息
专项通知实现
进入nginx 站点根目录,这里需要有nginx环境
~]# cd /var/www/liuxxxx/
html web输入框
<html>
<head>
<meta charset="utf-8">
<title>刘xxxx提示专项</title>
</head>
<body>
<form action="./index.php" method="post">
    提示内容1: <input style="width:150px; height:50px;color:8B0000" type="text" name="ts1"><br>
    <br>
    提示内容2: <input style="width:150px; height:50px;color:8B000" type="text" name="ts2"><br>
    <br>
    提示内容3: <input style="width:150px; height:50px;color:1F099" type="text" name="ts3"><br>
    <br>
    <input style="width:90px; height:50px;float:160px;color:8B0012" type="submit" value="本玲确认提交">
</form>
</body>
</html>
php 提醒并写入文件
<h1> 写入新提示计划</h1>
提示通知1的内容是    <?php echo $_POST["ts1"];?><br>
提示通知2的内容是    <?php echo $_POST["ts2"];?><br>
提示通知3的内容是    <?php echo $_POST["ts3"];?><br>
<h1> 清空了旧提示计划</h1>
<?php
   echo '清空id';
   file_put_contents('liuxxxx_put.txt', "");
   $file = fopen("liuxxxx_put.txt","w+");
   echo fwrite($file,$_POST["ts1"]."\n");
   echo fwrite($file,"    ".$_POST["ts2"]."\n");
   echo fwrite($file,"    ".$_POST["ts3"]);
fclose($file);
?>
编辑现有的nginx虚拟主机
 location /liuxxxx {
     auth_basic "Auth Base For Liuxxxx";  #
     auth_basic_user_file /etc/nginx/conf.d/ssjinyao.db; # 这里用htpasswd  写了一个用户和密码保存在 ssjinyao.db 中
     #error_page 405 =200 $uri;
     alias /var/www/liuxxxx;
     index index index.htm index.html php index.php;
         location ~ /liuxxxx/(.*)\.php(.*)$ {
         #default_type text/html;
         #add_header Content-Type 'text/html; charset=utf-8';
         #return 200 "$document_root  , $fastcgi_script_name";
         alias /var/www;
         fastcgi_split_path_info ^(.+\.php)(.*)$;
         #fastcgi_param PATH_INFO $fastcgi_path_info;
         fastcgi_pass   127.0.0.1:9000;
         fastcgi_index  index.php;
         fastcgi_param  SCRIPT_FILENAME $document_root$fastcgi_script_name;
         include        fastcgi_params;
         }
 }
nginx 生效后,访问并页面写入专项通知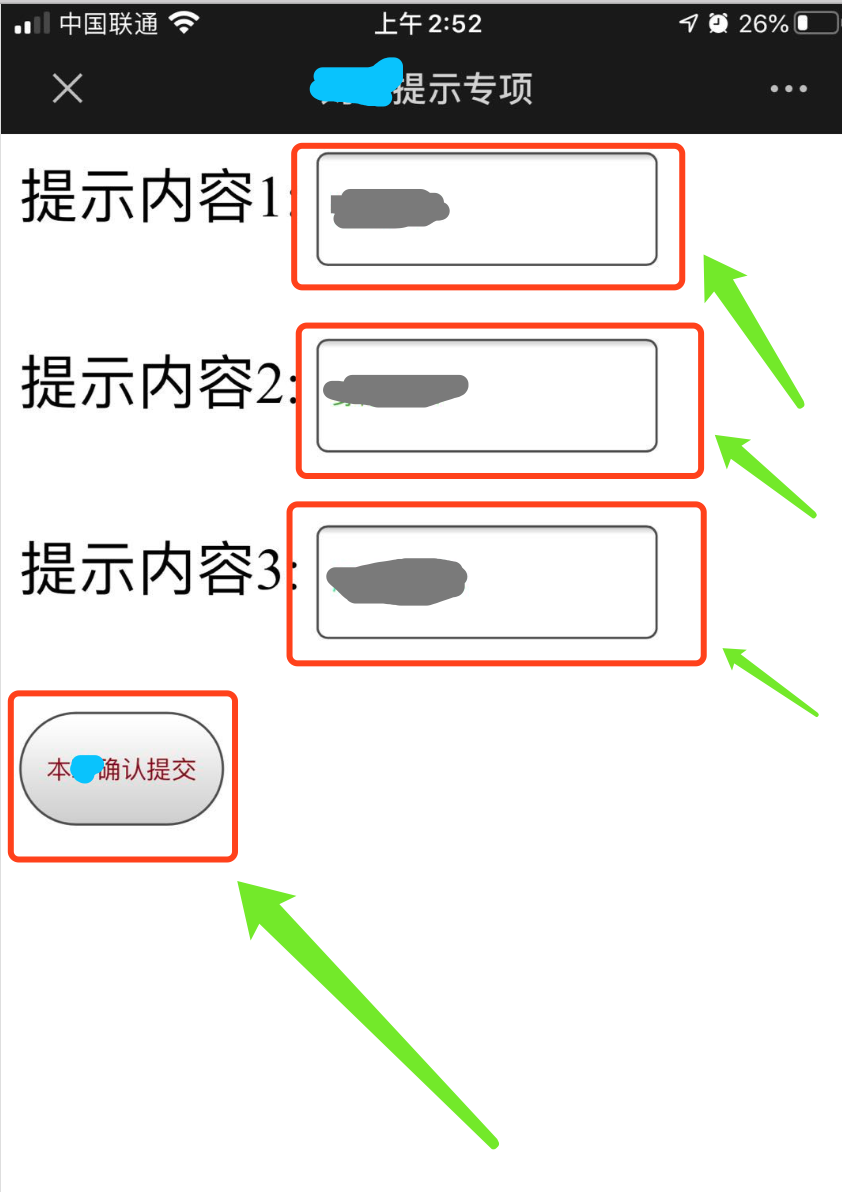
加入定时任务计划
0 7,12 * * * source /root/mypython/py3_env/bin/activate && cd /root/mypython/python3 && python liuxxx.py
最后的效果
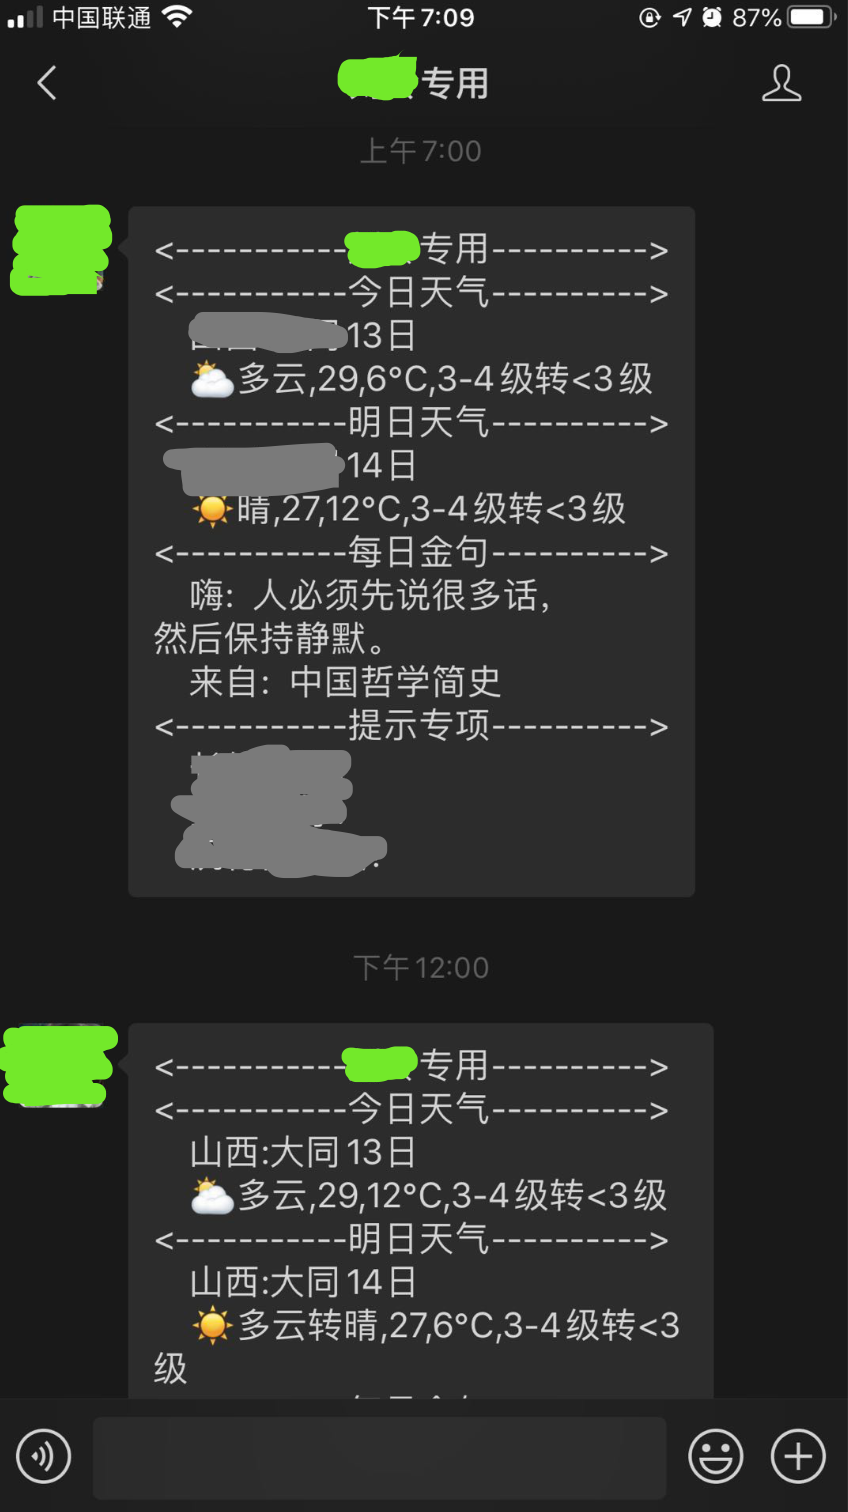
其它说明,这个python脚本可以把收信息的变量改为位置变量做zabbix prometehus 报警通知来用